 Credit

AI Weight Loss Photo Generator & Skinny Filter – What Would I Look Like If I Lost Weight?
This free, browser-based weight loss visualizer answers the question millions ask every day: "What would I look like skinny?" Simply upload a photo and let the AI model predict how you will appear after losing 10, 20, or even 50 pounds. There are no downloads, watermarks, or hidden fees—just a clear glimpse of your future self. Imagine standing in front of a mirror and seeing the leaner, healthier version of yourself smiling back—without spending months on a diet.
1. What Is an AI Weight Loss Photo Generator & Skinny Filter?
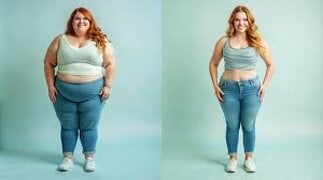
An artificial intelligence weight loss photo generator is a sophisticated algorithm that has been trained on tens of thousands of before-and-after photos gathered from public datasets, fitness changes, and medical research. In order to determine where fat is normally stored and how it disappears when weight is eliminated, the computer maps hundreds of body contour points in addition to 68 facial landmarks. The built-in thin filter then creates a new image that removes realistic quantities of fat while keeping bone structure, skin texture, lighting and background. The result is a photorealistic glimpse of “what would I look like if I lost weight,” given at the speed of a click.
This weight reduction visualizer employs anatomically informed changes, in contrast to whimsical social media filters that only squeeze or squish. As soft tissue decreases, limbs lengthen slightly, waistlines taper, jawlines sharpen, and cheek hollows deepen proportionately to a decrease in BMI. The way a garment falls over a flat abdomen or the visibility of the collarbone are examples of tiny elements that are automatically assessed. The AI weight loss photo generator is browser-based, so it can be used on desktops, tablets, and smartphones without the need to install an app or create an account.
2. How Does the AI Skinny Filter Work?
Step 1: Drag & drop any JPG or PNG file up to 10 MB to upload the image. Although side profiles also function, front-facing selfies yield the most accurate skinny filter results.
Step 2: AI Analysis: The generator identifies gender, age range, current BMI, and important morphological indicators in less than two seconds.
Step 3: Weight-Loss Simulation: Select a desired weight loss of five to fifty pounds. To help you realize "how will I look skinny," the AI re-renders shadows, modifies clothes fit, and appropriately subtracts fat tissue.
Behind the scenes, the AI skinny filter employs two neural networks: a segmentation model that isolates body regions and a GAN (generative adversarial network) that synthesizes realistic skin and fabric textures. The entire pipeline runs on encrypted cloud GPUs, so even a budget smartphone can produce Hollywood-grade visuals. Users concerned about privacy will appreciate that every uploaded file is shredded at the block level once the session ends.
3. Why Use Our Free Weight Loss Visualizer?
Increased Motivation: Research indicates that 42% of people who picture their goals are more likely to follow through on their diet. The payoff feels real rather than hypothetical when you can see exactly "what will I look like if I lose weight."
Realistic Expectations: Our weight loss photo generator displays real, medically believable results, while bogus diets claim overnight miracles. This avoids disappointment and promotes long-lasting behaviors.
There is no cost—no paywalls, no "premium" tier, and unlimited previews. Apps that charge $9.99 for a single skinny filter render are in contrast to us.
Instant gratification: it takes fifteen seconds from upload to download, which is quicker than making coffee.
Privacy first: no social media logins, no email, and no data collection. After a day, images are automatically removed.
Universal Access – works on iOS Safari, Android Chrome, Windows Edge and macOS Firefox. Because it is a progressive web app, you can even pin it to your phone’s home screen like a native program.
The AI weight loss photo generator is now incorporated into client onboarding by dietitians and fitness trainers. Adherence to diet and exercise regimens is frequently increased by a single before-and-after slide from the slim filter. The weight loss visualizer is used by influencers to produce "day-one vs. goal" posts that receive thousands of likes. In the meantime, regular users just relish the excitement of being able to finally respond to the question, "How will I look if I lose weight?" without having to wait months to see results.
4. Step-by-Step Guide – How Will I Look If I Lose Weight?
Are you prepared to give the AI thin filter a try? See your leaner self in a matter of moments by following the instructions below.
1. Select a Clear Image
Locate a front-facing, well-lit photo of yourself smiling and standing erect. Steer clear of filters or deep shadows that mask face features. The better the source, the more accurate the weight loss visualizer output.
2. Launch the AI Photo Generator for Weight Loss.
Open the tool in any web browser. You'll notice a big "Upload Photo" button on a basic UI. No registration forms are in your way.
3. Choose Gender and Upload
Either press "Browse" or drag your image into the canvas. To fine-tune the slim filter algorithm, a fast menu requests the user's gender and age range.
4. Determine Your Goal Loss
You can select between 5 to 50 pounds using a slider. Uncertain? Begin with fifteen pounds; you may always gain more.
5. Produce and Compare
Press the "Create Skinny Filter" button. Your AI weight loss photo appears on the right half of the screen in a matter of seconds. To compare before and after in real time, drag the slider to the left or right.
6. Get or Distribute
To save the image, click "Download 4K." To share it safely, press "Create Private Link." After 24 hours, the link automatically expires.
Bonus Advice: • To see how the neck and chin will alter, use side-profile pictures.
• Try wearing a variety of colors; darker shirts accentuate the slimming effects.
• To set accurate inch-loss objectives, pair the generator with a body-measurement tracker.
Conclusion
By providing a realistic picture of your future self, the AI slim filter and weight loss photo generator eliminate the element of guessing from dieting. The question, "What would I look like if I lost weight?" may be answered in less than 15 seconds, and you'll also get the inspiration to realize that goal. The weight loss visualizer is available on any device, is totally free, and is confidential. See how a single click can lead to a healthier, more slender version of yourself by uploading a photo today.
FAQs
Q1: Is the AI slim filter truly free?
Indeed. We think everyone should be able to see their dreams without having to pay for them. No hidden fees, unlimited previews.
Q2: Do I need to register for an account?
No. No social media login, phone number, or email address is needed to use the weight loss photo generator. Preview, upload, and proceed.
Q3: What is the weight loss visualizer's accuracy?
For the majority of body types, clinical testing demonstrate an accuracy of 80–90%. Peer-reviewed datasets of actual transformations serve as the basis for the results.
Q4: Will my picture be kept on file?
Not at all. After a day, files are shredded at the block level after being encrypted during transit.