 Credit

Colors affect our perception of an image. Whether it is marketing materials, editing a product catalog, or making a post for social media, the ability to adjust the color of an image online gives you complete control of tone, feeling, and branding.
PixelFox’s advanced AI editing platform contains everything from a simple hue changer to an expansive tool for adjusting color, enabling you to alter colors in a matter of seconds without any loss in image quality. PixelFox provides the ability to create professional results instantaneously, whether you want to adjust one little detail or reimagine the palette of a photo entirely.
Why Hue Modification is Important?
Changing the hue of an image is not just about making an image look different; it's about making the image look right! Photographers, designers, and marketers all utilize hue shifting to:
Match a brand’s exact color scheme
Present the same product in multiple colors without multiple photoshoots
Correct color inconsistencies caused by poor lighting
Create thematic or seasonal versions of existing visuals
With PixelFox’s image hue changer and picture hue changer, you get accuracy, speed, and creative flexibility in one platform, all accessible directly in your browser.
PixelFox Hue Editing Tools
1. Hue Shifter
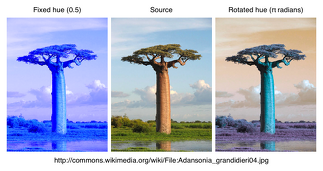
The PixelFox hue shifter allows you to rotate your colors across the spectrum with a simple slider. Whether you are producing artistic alternatives or discovering new designs, you could shift every color in your image while holding lighting and shadows in place.
For instance, the clothing store can now use the hue shifter to put a red, blue, and green dress on display without taking a picture of each dress.
2. Photo Hue Changer
The photo hue changer is perfect for when you need a color change quickly and accurately. The PixelFox AI technology automatically detects edges, skin tones, and it recognizes textures so that your hue change is both effective and delicate. This is especially beneficial when working with portrait, lifestyle branding, or product photos, where authenticity is important.
3. Color Adjuster
When changing hues alone may not be enough, the color adjuster is the next tool of choice. This tool gives the user the ability to change the hue, brightness, saturation, and contrast all at once, and create a balanced, high-quality image. As an example, one can change the background hue and then change the contrast to increase the depth of the subject.
4. Picture Hue Changer
There will be times when one may only want to adjust a small area of an image. PixelFox’s picture hue changer allows the user to select what parts of an image to change the color on, so one can recolor one area, without affecting all other aspects of the image.
This allows for precision recoloring, which would be most beneficial for logos, patterned designs, or multiple items/images that appear side by side.
5. Hue Shift Online in Real Time
With PixelFox's real-time hue shift online preview, it will change as you drag the slider, so you can play around without the guesswork.
Reasons Why PixelFox is the Best for Hue Editing
Precision: PixelFox tools retain edges while keeping tones in check.
Speed: No downloads needed- edit from anywhere using your browser.
Simplicity: Created for novice designers, powerful enough for experienced professionals.
Flexibility: Pick it for your e-commerce store, as a creative piece, branding, and more.
No Loss of Quality: Maintain original resolution through every edit.
Step-by-Step Guide to Changing Hue with PixelFox
By following these steps you can change the hue of image online:
Simply drag and drop your file into the PixelFox online editor.
Choose from hue shift, photo hue-change, color-change, or picture hue-change, depending on your needs.
Use the hue slider to shift the colors and use the color-adjuster to change brightness, contrast, or saturation.
See real-time results with the hue shift online preview feature.
Save the final version in high resolution with no loss in quality.
Editing Advice from our Experts
When it comes to product images, you should always compare the edited photo to the actual item to ensure authenticity.
For more realistic images, select a smaller hue value when shifting; for a more creative image or promotional image, you can use larger hue values.
When capturing portrait images, use a mask or the picture hue changer in the image to isolate skin tones before making shifts.
Real World Situations for Hue Shifting
E-Commerce: Use the hue changer to display multiple colors of the same product photo to save on the cost of photography.
Social Media: Use the color adjuster to keep all post colors fitting your brand, for a coherent social media feed.
Event Signage: Utilize the hue shifter for events with changing colors to reflect seasonal tones autumnal reds or winter blues.
Art: Test out some mood shifting by using the picture hue changer on individual aspects of your story.
Conclusion
The power to realistically and precisely change the hue of an image online can change everything about your image. PixelFox’s hue changer, hue shifter, photo hue changer, color adjuster, image hue changer, and picture hue changer offer you full professional-grade tools inside a browser-friendly workspace.
Whether you are adjusting colors for brand identity or brand-enhancing colour in e-commerce images and colour change just for the sake of changing colour, PixelFox can deliver speed, precision, and quality in every image.
FAQs
Does PixelFox reduce image quality if I change hue?
Not at all. PixelFox doesn’t reduce the original resolution or quality of your image while you’re changing and editing.
Can I change hue the in only part of the image?
Yes. The picture hue changer lets you apply hue changes to just part of the image, so you don't need to change everything.
Can I use PixelFox's hue shifting tool as a beginner?
For sure! Regardless of whether you are a novice designer or a seasoned designer, or a marketer, the picture hue changing tool with live preview will provide you with a great way to easily and quickly make beautiful color edits to images in a fun way.