 Credit

How to Edit a Photo to Look Professional
The quality of photography is more important than ever in the visual world today. You might be a beginner photographer, a content creator, or just a person who would like to bring his or her pictures to a new level, so knowing how to edit a photo and make it look professional will help a lot.
Editing is not about over-filtering or editing your photographs much; it is about getting the best out of your photographs. With the right tools and tricks, you can make the common photos into striking images that appear as clean, balanced, and polished as a professional's.
Here is a full tutorial on how to edit photos and make them stand out, be it on a computer or a mobile device.
Step 1: Start with Good Photos to Edit
No editing can correct a low-quality picture, not even the best. Start with good photos to edit with – photos with good lighting, focus, and composition. Natural lighting, particularly along the golden hour (immediately after sunrise or before sunset), is used in order to capture soft and flattering tones.
Do not shoot against a too-busy background, and make sure that your subject is properly framed. This facilitates easiness in improvement at a later stage when one is starting to edit photos in-camera.
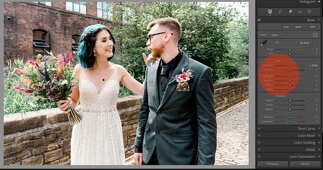
Step 2: Choose the Right Editing Tool
How to edit the photos will also vary depending on the platform that you are in.
For Desktop
Programs such as Adobe Lightroom, Photoshop or Capture One provide extensive control over exposure, tone curve, and color correction.
For Mobile
Applications such as Snapseed, Lightroom Mobile, or VSCO are excellent when you want to know how to edit your mobile photos professionally without the computer.
Note that all photo editors provide the same features, which are brightness, contrast, saturation, highlights, and shadows. The trick is to learn how to strike a balance between them.
Step 3: Adjust Basic Settings
Begin your editing process with exposure and contrast. When the image is too dark, make it a bit brighter. Introduce contrast to make the colors stand out, but do not be too aggressive with contrast, which may decrease the amount of natural detail.
Secondly, sharpen edges and darken with shadows to adjust the light-coloured parts and restore details in the darker ones. The most effective ways to edit photos to give them a polished look is proper lighting control.
Step 4: Correct Colors and White Balance
Photos that look professional are usually colour-accurate. In case your image is too yellowish (warm) or bluish (cool), change the white balance.
It is also possible to add vibrance (to make muted colors look more natural) and saturation (to prevent unnatural tones). This is aimed at obtaining a natural, clean color balance.
This is particularly important when you are getting familiar with editing photography pictures because color fix can entirely adjust the mood of your image.
Step 5: Sharpen and Add Clarity
When you feel your tones and colors are good, proceed to sharpen and clarity.
· Sharpening adds fine details, crisping edges.
· Clarity enhances the mid-tone contrast, which makes the pictures more expressive.
Use these tools moderately. Excessive sharpening will form rough surfaces, particularly on the skin color. It is to make photos look professionally over-edited.
Step 6: Crop and Straighten
One of the simplest, though the least used, methods of editing photos is cropping. Even a small tilt in the horizon or the subject can make a perfect photograph worth nothing. The grid tool also helps in straightening lines and adjusting composition.
See what works with the rule of thirds – place your subject in the background to create a more natural and dynamic composition. Cropping will also be used in eliminating distractions in the edges.
Step 7: Clean up and Eliminate Flaws
In portraits, light retouching is usually taught as a way of professional editing. Clean up all imperfections, rub the skin a little, and whiten the teeth where needed.
In landscape or product images, get rid of objects, spots, or wires you do not want. Even the slightest adjustment contributes to the overall professionalism.
Step 8: Apply Filters or Presets Carefully
Presets and filters are like the strong weapons in the right hand. They will assist in keeping your portfolio or social feed stream in a consistent appearance. Nonetheless, excessive use may result in artificiality of photos.
Add filters, and adjust the intensity of the filters. There is a professional effect of a light touch that provides a coherent, polished appearance that makes your pictures look professional without appearing unnatural.
Step 9: Export in High Quality
After that, you can save or export your photos in the best resolution. Never compress heavily, particularly when you are posting to some websites or even social sites, which already shrink images.
To share online, the quality of JPEG should be 80-90%. PNG and TIFF formats are best to use when printing, as they can be used to maintain all detail.
Final Thoughts
It is not about the most complicated software to make a picture look professional, but rather light, color and balance. Any image can be enhanced with little changes in exposure, tone and clarity.
And the next time you think, How to edit a picture to look professional? Consider these two tips: First, make sure you have good lighting; second, learn to use basic editing software in your favour; and yes, a third one also: worry less about filters and more about natural improvement.
Practice will make you good at professionally editing photos on a computer or mobile gadget and making every snapshot sound like a well-adjusted and suitable professional masterpiece.