 Credit

The Reasoning Why Photoshop Is the Gold Standard
When people are asked the question regarding the best photo editing software, a majority of them name the Adobe Photoshop. Generations of artists since the 1930s have used it as an artist-friendly means of editing portraits, landscapes, even surreal art through the use of its digital format.
Though nowadays there is an endless series of how to edit photos in photoshop that appear on sale, Photoshop can be regarded as the most shining one thanks to the precision and freedom in usage. The presence of knowledge in how to manipulate photographs in Photoshop allows you to turn simple photographs into a professional photograph.
How to Edit photos on Photoshop?
Before looking into the tools, it is useful to cover the basics. To start editing, you will have to download Adobe Photoshop and launch this program. Although it looks very complicated at first glance, it is easy to follow its step-by-step workflow.
Just because they can teach the students everything at once.
Step 1: Import your Image and Start your Workspace
To start, I opened Photoshop and imported my image into Photoshop
Go to file-> Open and select image.
Customise your work environment by activating panels such as Layers, Adjustments and History.
Photoshop supports work spaces that are customizable. Newer users are expected to find use of the “Photography” layout, which points out the most widely used editing tools.
Step 2 – Crop and Straighten the photos to provide a better composition.
One can start by means of composition.
This slight change can make a significant change to the balance of your photograph.
Step 3 – Brightness, Contrast and Exposure
Lighting constitutes mood Go to Image > Adjustments > Brightness/Contrast or use the Adjustments Panel. The brightness increases the dark areas, whereas the contrast increases the mass of light and dark.
Step 4 Color correction and white balance
There is a lot of variance between colors that appear different in varying circumstances of light. To resolve this
Open Image > Adjustments > Hue/Saturation to adjust color intensity.
Color Balancing provides a way of fine tuning tones.
Auto white balance: You can attempt an auto white balance operation with Camera Raw Filter, which provides sliders to correct temperature and tint.
A good color correction will mean that skin tones are natural and that landscapes will pop.
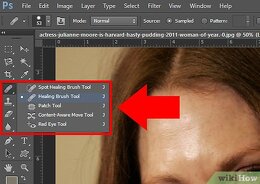
Step 5 Retouching Blemishes and Imperfections
Photo retouching is one of the most popular functions of Photoshop. Tools include:
Patch Tool Best to use when the wrinkles or bumpy areas have to be broken up.
use lightly The aim is an improvement, not an outright perfection.
Step 6- Non Destructive Editing with Layers and Masks
Layers are the spine of Photoshop. You do not do changes to the original photo but create them on different layers. By doing so, you will be able to make changes to it or delete them at any time.
Adjustment Layers:
Adjust the base image in the levels of brightness or other properties.
Layer Masks: These can remove or add selective editing- a great way to brighten a face without the background.
To fully understand Photoshop editing of photos, it is important to learn how to use layers.
Step 7 - Creation of borders and Details
Blurred pictures lack effect. Over sharpening may add noise or make the picture unnatural looking Slight manipulations can oftentimes give the best outcome
Step 8 the addition of Filters, Effects and Creative Adjustments
Photoshop is not meant to correct only but also to be creative. Experiment with:
Blur filters to cloudy backgrounds.
Gradient maps to color effects on paintings.
Textures to add drama.
To find rapid improvements, look into the Neural Filters that include face retouching, lighting modifications, and even changing an expression via AI-assisted capabilities.
Step 9- Optimize and reduce the size of the photos to be used either on the web or in print.
A great photo would not serve the purpose when it is not of the right size.
Step 10- Saving and Exporting your Final Image
Once you have done editing
A PSD file is saved to retain layers so that further modifications can be attained.
Export as JPEG or PNG to share on the Internet.
Have descriptive names of files so that it is easy to organize.
This leaves your work editable and at the same time ready to be shared.
Tips in Editing Photos in Photoshop Like a Pro
Dentarios always works with a duplicate layer, this saves the original.
Work with shortcuts to speed up.
Necessary is coming and going in and out where you get all the details and you see the bigger picture.
Use more than one trick- don`t use only one tool.
Some Common Errors that Should Not Be Made Regarding
How To Edit Photos In Photoshop
Being over edited An excess amount of contrast, saturation or sharpness will make the images look unreal.
Eluding layers It is less flexible to edit on the original photo.
Missing composition makes it Cropping is one of the most basic, but very effective edits.
No PSD backup You cannot review changes that have been made earlier on.
Final Thoughts:
Learning Photo Editing in Photoshop will open a Pandora box of possibilities. The program has features that range from the elimination of lighting mistakes to the production of magazine retouches at all levels.
You may be new to the world of power-enhanced images or an expert who is showing a client-prepared work and the process is the same: start basic, add finer details, and ensure that your creativity is there.
To learn more about digital editing and AI-driven creativity, refer to pixelfox.ai and learn more on how exciting its future is.
FAQs
Q1. Is Photoshop difficult to learn at a beginner level?
It might seem a lot at first, but it is always wise to start with simple editing.
Q2. Which is the contrast between Photoshop and lightroom?
Lightroom is perfect in making bulk adjustments of the photos, while Photoshop has more details to edit.
Q3. Can you use Photoshop to process RAW images?
Photoshop will have Adobe Camera Raw that is perfect to process RAW files.
Q4. What is the time line to learn to edit photos in photoshop?
The majority attains the basics in a few days, but advanced tools can only be mastered by time.