 Credit

The Reasons Why People Wish To Eliminate Watermarks
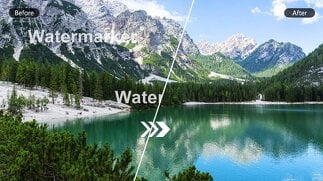
A watermark is a practice familiar to those who have downloaded a stock image or shared a video clip or saved a picture online. Such obvious emblems, as text or logos, or even sheer overlays, safeguard the rights of the creators and brands. Although their need may exist, there are a number of surmountable causes that would require the removal of watermark on a photo or a video.
For example
You purchased a legitimate license to an image but you are sent a version that still contains a watermark.
You made a photo or video yourself and an editing program has a default watermark.
You have an old photo that a watermark is accidentally covering some important element.
In such instances you need to have a watermark remover that can be counted upon. With the help of AI tools today, the process is much easier, cleaner, and devoid of rough edges you would get with manual editing.
What are Watermarks and Why Do They Exist?
Watermarks do not happen at random. They are electronic stamps which are used to regulate intellectual property. Stock image sites such as Shutterstock, Alamy, or Getty Images put watermarks to prevent abuse. They are sometimes inserted automatically by video editing software in trial versions.
Typical forms of watermark include:
Text watermarks - some name of the brand or copyright notice on the photo
Minor logos on watermarks - small logos in the corner.
Diagonal overlays – opaque text which covers the entire picture.
On the one hand, they protect creators; on the other hand they constrain that which is used by those who have a legitimate right to it. That is why there are common attempts to erase watermark on picture or eliminate watermark on video, as soon as the adequate rights have been established.
How AI Watermark Remover Tools Work
Conventional techniques included photocopying, cutting or softening sections of an image. The methods used usually left a physical trace behind Everything is different now with IHas
An artificial intelligence based watermark remover will analyze the surrounding pixels, and intelligently interpolate the spot where the watermark lies. Rather than just smudging, it forecasts what is supposed to be there under the watermark. Its outcome is smooth looking
Online AI watermark video remover tools use a frame-by-frame in the video. They follow the moving watermarks and clear them on a regular basis and leave the background untouched.
The advantages of removing watermarks by the use of AI are:
Time: Edit the work in a few seconds.
Accuracy AI completes missing information automatically
Flexible in nature, it works on pictures, video and even documents scanned.
The optimal Choice (pixelfox.ai Watermark Remover)
The major standout in this segment is pixelfox.ai. It is a platform that focuses on AI-based creative tools, which include watermark remover free.
Look at why pixelfox.ai is different
No design skills required: Simply upload and the AI does the rest.
Works with both photos and videos: It removes logo on image and removes watermark on video.
Free and simple: No high priced subscriptions to perform the simple tasks.
Clean results: Unlike manual editing that might be rough, the results given by AI are smooth to read.
To the creators, marketers, and other users, the pixelfox.ai offers a professional means to eliminate watermark on picture free without the complicated software.
Step-by-Step – How to Remove Watermark from Photo
A watermark does not exactly need to be removed in a complicated manner. The following is a step by step procedure involving the use of AI technology such as pixelfox.ai:
Upload picture
Go to the page and select the picture with the watermark on it. Some typical examples are stock photography with Shutterstock watermarks, or family photos with date timestamps.
Watermark Area
Select the watermark to be deleted. Other tools allow you to brush over the logo and others automatically detect.
AI Processing
Click on remove The AI analyzes the environment all around and recreates the pixels on the watermark.
Download the Clear Photo
Have your new picture without marks of water. The quality is not damaged and the result can look like the watermark never existed.
This process is also used to answer the common question: “How to remove watermarks on images?” It is a matter of seconds with AI and not hours.
Watermarks can be removed by video distortion programs.
Watermarks on video could be worse. Imagined as the YouTube text, with editing programs logos or previews on some stock footage, websites.
Post Your Photos
Utilize the online program pixelfox.ai to do a free video watermark remover.
Find the Logo or the Watermark
Choose where the watermark should be placed, i.e. in a corner, across the centre or moving.
Make AI Erase It
The tool processes frame by frame to remove the watermark in a video consistently throughout.
Edit your recorded video
What you get is a watermark-free, professional and polished version.
The approach can be applied effectively to such tasks as removing shutterstock watermark to clips, how to cover watermark on video sources, or even remove proof marks on photos prior to actual publication.
Alternative Ways to eliminate Watermarks
Even though AI tools are the most convenient solution, there is more than one method that people can use to remove watermarks on pictures or videos.
Cropping Remove some of the watermark, but the image is cropped.
Blurring Hide the watermark using a blur filter which usually can be distinguished easily.
Using stamping It can be found in Photoshop, but is time consuming and needs skill.
Covering a new object Move a shape, logo or a text box on top of the watermark.
These methods may work, but seldom will they seem all that natural in an AI driven scenario.
Laws and Ethics
It is significant to state that watermarks are created in order to safeguard owners of the content. Removing a watermark photo or video should only happen to you.
You have been the original owner of the image or video
You bought the license but the copy you got was watermarked
You are editing something of your own that a software watermarked.
Stealing or copying copyrighted content of another person using a watermark remover is an unethical thing to do and may even be illegal.
The Reason Why AI Tools Are the Future of Watermark Removal
The emergence of AI choreography generators indicates the inclusion of AI in creative academic disciplines. The same is with the removal of watermarks. Tools such as pixelfox.ai use deep learning, computer vision tools, and contextual reconstruction so that the edits create a natural look.
Watermark removal won’t only be about logo removal any longer in a few years. It will touch up color and white balancing to old photographs, remove date stamps and other elements and clean archival footage without destroying the original. Artifacts that are created as a result of poor editing can also be rectified by the use of IA.
Conclusion
Save yourself the time and effort of having to figure out how to remove watermark from a photo, how to delete watermark from video, or how to get rid of proof watermarks: AI has made the process widely accessible and efficient like never before. Instead of spending time in Photoshop you can obtain clean and natural-looking results in a few seconds.
Among the most promising solutions, pixelfox.ai impressed on the basis of the user-friendly interface, high accuracy rates and end-to-end support of both photos and videos. It is a game-changer to creators, marketers, and anyone otherwise concerned with clean visuals.
And now you have the answer to how to remove watermarks on photos or even how to remove proof watermarks on photos: leave it to the AI.
FAQs
Q1: Is AI able to dewatermark any photo?
Ye, AI has the ability to eliminate most of the watermarks, such as text, logos, and more transparent ones. The findings vary with complexity of the background.
Q2: What are the ways of eliminating proof watermarks on photos online and free of charge?
Apply the picture to such a tool as pixelfox.ai, select the watermark and AI will remove it.
Q3: How to take off copyright image?
This is only possible on the condition of the ownership of the right or a license Otherwise, it can be a violation of the copyright laws.
Q4: How can you remove watermark on dots grinding vibration Complete without losing quality?
The watermark removers based on reconstruction restore missing information, keeping the quality better than cropping or blurring.
Q5: Can I delete the logo off video free?
Such tools as pixelfox.ai can remove watermark video online free in a single click without leaving tracks.