 Credit

The lighting is so crucial with photography; even the most beautiful image can be ruined if it is too dark. Even helps make a big difference in not-so-good lighting, shadowy, or simply needs a little polishing up photo. Using sophisticated algorithms, these tools can brighten up a photo without sacrificing its colors to provide crisp and colorful output in no time.
Writing is just one way to do it; the other is Pixelfox, an AI image brightener app providing quick and professional photo enhancement.
What is an AI image enhancer?
AI color enhancer does exactly what it says and utilizes artificial intelligence to automatically analyze and adjust the overall brightness levels of an image. While editing manually can take a long time and be difficult, an AI system identifies underexposed areas and adjusts them in great detail. This way, your picture is brighter and the results don't look too artificial.
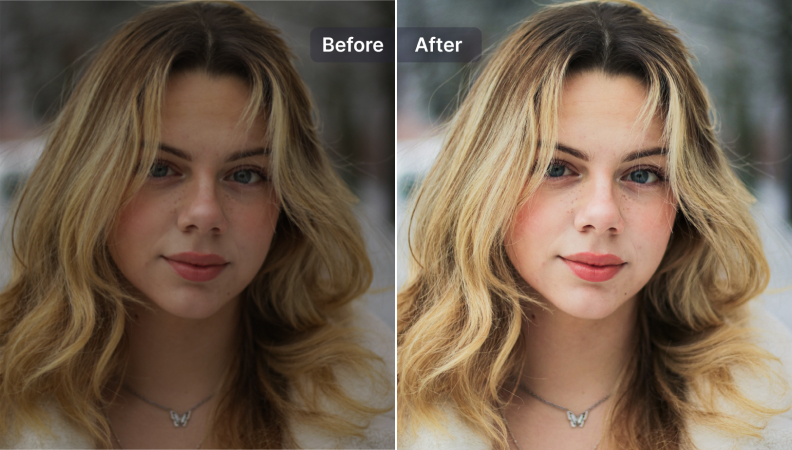
One use case would be to brighten up a picture that seems too dark. In most cases, uploading your photo to Pixelfox can look something like this.
Why do you have to use an AI tool to lighten images?
Fixing a dark photo (manually) is usually associated with some high editing skills and using software. Using an AI image enhancer app, however, you can:
Spend No Time: Nothing to adjust, no sliders to tweak.
Professional Results: AI intelligently adjusts exposure to create flawless photos.
Maintain Quality: Refrain from the grainy or washed-out look from over-editing.
Use it in Your Way: The Pixelfox Pic edit tool is suitable for mobile use or desktop use.
An image lightener is a must-have for photographers and other content creators who want to brighten up their holiday photos.
Boosting Image Brightness with Pixelfox
Here is the lightning of an image using Pixelfox as follows:
Select the image you wish to enhance, then click on ''Upload Your Photo''
Choose Brightening: Find the brightening feature in your photo editor.
AI Processing: Allow the AI to automatically discover dark areas and update them.
Preview Changes: Side by side comparison old bright image with the new one
Save or Share: Download the enhanced photo on your device or share it instantly
You can have your flat/dark photo turned into a beautifully lit masterpiece in seconds.
Use Cases for an AI Image Enhancer
Picture brightener for every situation
Night or Indoor Photos with No Flash are possible.
Old Photos: Brighten and enhance faded pictures
Social media content: Make sure your posts catch eyes with brightly lit images.
Product Images: Create more attractive online store listings with clear and crisp images.
The best part about using Pixelfox for this method is that you do not have to be an expert at any of these things, no coding, simply upload and auto-click your way to happiness.
The Perfect Choice AI Image Brightener App
There are several AI image brightener app options out there, but the best one should have:
FeaturesEase of Use: No Cinema 4D skills required
Lightning Fast Processing: results in seconds, not minutes.
Optimal Output: Sharp images with accurate details and colors
Access for free: The basic features should be available to the user without payment.
All those elements are perfectly executed by Pixelfox, which makes it an ideal choice for all, whether casual or professional users.
How To Lighten an Image and Keep Detail
The inherent advantage of using AI to improve your photos, especially when it comes to lighting a photo, is that the kind of whitewashing associated with losing coloring and blurring edges of objects found from other sources will not happen. Typical edits might lose details in highlights, yet with the help of modern AI, they balance exposure and saturation to achieve a natural image lightning glimpse.
More Tips on Brighter Photos
Whenever possible, use natural light in photographs.
Overexposure, overbrightening any region, shall flatten its details.
AI image brightener and color correction is one of the best ways to do it.
Preserve the original with a copy.
Final Thoughts
There is no light like the light of a good photo; this is why, when lighting conditions are not the best, an automatic image brightener AI has got your back. This makes it possible for instant photo lighting so that you can transform a dark and underexposed shot into an attractive, bright image in seconds using tools like our very own Pixelfox.
Whether it's to freshen up an old memory, create that perfect Instagram post, or simply to practise your photography, an image brightener makes the process a breeze. Pixelfox is your best choice for an AI image brightener app; it is quick, free, and delivers great results.