 Credit

In 2025 photography world has been shaken by the advent of artificial intelligence and sophisticated AI image editing software is now available to all users even casual users of smartphones not just seasoned professionals. The development of AI photo tools such as PixelFox has been a game-changer as their easy-to-use capabilities have simplified the editing process and increased creativity. Understanding the potential and limits of AI photo editors is essential when you want to remove backgrounds, correct imperfections create entirely new AI images and more. This blog will discuss what AI photo editing is, its advantages and disadvantages and ways in which you can use PixelFox to convert an image to artificial intelligence.
What Is the AI Image Editor?
An AI image editor is a service that utilizes the rapidly expanding field of artificial intelligence to improve, alter and distort digital images with minimal human intervention. Such tools use machine learning and neural network technology allowing them to analyze and work with photos to automatically adjust or AI transform an image that would otherwise need a manual edit. The potential of an AI photo editor lies in its capability to simulate human editing tasks such as replacing a background, inserting an object, skin retouching and even artistic beauty without knowledge.
How AI Is Transforming the Way We Edit Photos
Speed and Efficiency
Standard photo editing can be tedious at times especially when large volumes of images are involved. AI photo editors have saved a lot of time through automation of repetitive tasks. For instance, PixelFox's batch editing option allows you to edit multiple photos simultaneously saving you hours of labor.
Accessibility for All Skill Levels
You do not need to be a professional photographer to take stunning photographs. AI Photo editor tools are made with an intuitive interface which makes it possible to modify an AI image using a simple interface even for first-time users. PixelFox offers an AI photo converter that doesn't require prior experience to edit pictures.
Creative Possibilities
AI Photo editing creates new possibilities for creativity. Visuals made with the help of an AI image generator free online such as PixelFox are original because you just need to describe what you want to see in words. All you have to do is type it and the AI editor will do the work.
How to Use PixelFox for AI Photo Editing
PixelFox is an intuitive photo editing software that enables users to edit and enhance their photos, as well as convert images into artificial intelligence. Here is a step-by-step guide on how to utilize the capabilities of PixelFox:
Upload Your Image
To start, upload your image to the PixelFox site. The tool works with different types of images such as portraits, landscapes and product shots so with its help, you can start working as soon as possible. You can drag and drop files directly or use its file picker to select images in PixelFox.
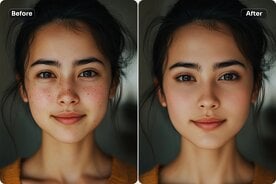
Automatic Enhancements
After uploading your image, PixelFox will automatically perform optimizations like brightness, contrast, saturation and sharpness which work based on its AI algorithm. The AI-based corrections make your photos look professional without any human interaction supporting them.
Transform and Add Effects Using AI Tools
The standout capabilities of PixelFox are that it can AI-transform an image with amazing effects or a filter. The AI photo tools help you achieve a high-quality unique edit that will set your photo apart in any setting.
AI Add to Image Feature
The AI add to image feature of PixelFox may allow you to add new objects to your photos which is a game-changer. You can add any new objects to photos including people, pets or even entire scenes. This AI image addition software utilizes advanced artificial intelligence technology to seamlessly integrate new pictures with the existing ones making the result appear as if they were part of the original photo.
AI Group Photo Generator
The AI group photo generator feature will be valuable to other businesses or social media addicts in creating group photos or some other custom compositions. You can merge several images into a single shot creating a group shot or collage with PixelFox.
AI Photo Editing Free for Everyone
The artificial intelligence photo editing free tools available in PixelFox enable amateurs and professionals to use the app easily. The free functionalities are basic including live tools like AI image changer, AI pic editor and automatic processes that curve sharper, cleaner photos. PixelFox also offers more professional edits with additional features as a premium version.
Key Features of PixelFox
AI Image Editor Free: Use a variety of AI-based photo editing tools at no cost.
AI Image Fixer: Automatically fixes problems like bad lighting or color balance.
AI Image Changer: Swap out backgrounds or elements in your AI imagery easily.
AI Picture Editor: This AI picture editor tool offers the most flexible photo editing experience.
The Future of AI Photo Editing
With the further development of AI photo editing technologies, the functional range of these AI image editors is projected to extend. The suggested developments of the future include more advanced editing capabilities increasing accuracy and integration with other creative applications. You will want to keep yourself at the forefront of all the latest trends impacting AI image changers so that you can maximize AI photo editing in any given project.
Conclusion
AI Photo editing has revolutionized how we edit and create pictures. PixelFox make high quality results accessible to everyone from beginners to less experienced users. By being aware of the strengths and weaknesses of AI photo editors, you can make the right decision and take your photography game to the next level.