 Credit

Suggested URL: /ai-photo-app
The world takes well over a trillion photos a year (industry trackers like InfoTrends and Statista have been calling it “trillions” for a while). And somehow, half of them look like they were shot through a foggy sandwich bag. That’s why an ai photo app is no longer a “nice-to-have”—it’s the only way most people get from “meh” to “postable” without opening Photoshop and losing the will to live 😅.
This guide gives you the real deal: what AI photo apps can (and can’t) do, why many of them look “plasticky,” how to pick the best photo ai for your needs, and how to get clean results on mobile and photo ai app pc setups. I’ll also show practical workflows using Pixelfox AI—the tool I recommend when you want fast, natural edits and you don’t feel like fighting a UI from 2014.
What an AI photo app actually does (in plain English)
An ai photo app is just photo editing with a brain transplant 🤖. Instead of you pushing sliders for 20 minutes, the app uses trained models to guess what a better version of your image should look like.
Here’s what “AI” usually means in photo apps:
- Enhancement / Upscaling: adds detail, sharpens, reduces noise, sometimes “rebuilds” missing pixels.
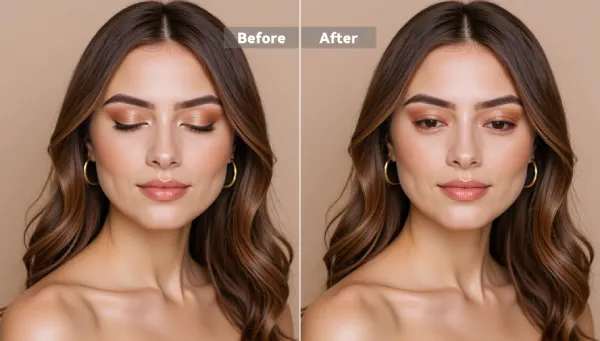
- Portrait fixes: skin smoothing, eye/teeth tweaks, lighting correction.
- Object removal: deletes stuff (tourists, trash cans, exes) and fills the gap.
- Background tools: remove, replace, or generate a new background.
- Generative edits: “add a neon sign,” “make it sunset,” “turn it into studio lighting.”
- Animation / talking photo: turns one photo into a moving video avatar.
Under the hood, most apps combine:
- Segmentation (finding people/backgrounds/objects)
- Super-resolution (upsizing without blocky pixels)
- Generative models (filling missing areas with plausible content)
If you want one tool that covers “clean up my photo” and “make my photo do something fun,” Pixelfox AI sits in a sweet spot: photo + video AI in one place, without turning your workflow into a subscription maze.
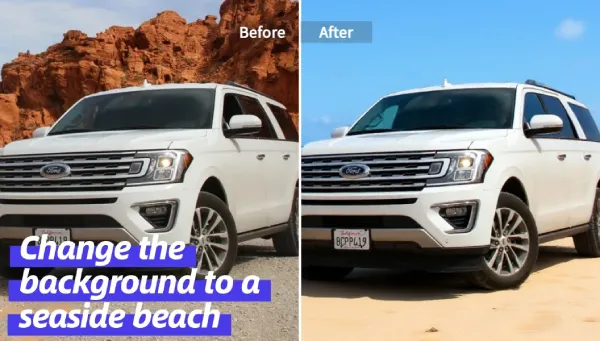
You can jump straight into Pixelfox AI when you want a browser-based editor (works great on desktop too, so yes—it can be your photo ai app pc option).
Why most AI photo apps disappoint (and how to spot it fast)
Let’s roast the common issues (lovingly) 🔥:
1) “My face looks like a wax figure”
That’s over-aggressive smoothing + fake detail. Many apps “enhance” by nuking texture, then re-adding AI texture that looks… suspicious.
Fix: pick tools that let you keep detail and avoid extreme presets.
2) Ads, popups, and “watch a video to export”
Free apps gotta eat, I get it. But some apps feel like a mobile game wearing a photo editor costume.
Fix: use tools that let you export cleanly, or at least don’t block the basics behind 12 ad screens.
3) Privacy anxiety is real
Uploading family photos, product prototypes, client work… yeah, people care. And they should.
What to look for: clear privacy language, delete options, and no creepy “we own your face now” vibes.
4) PC users get ignored (or punished)
A lot of “AI photo app” lists act like nobody edits on desktop anymore. Meanwhile, creators and sellers are sitting on 2000 product shots and need batch workflows.
Fix: choose a tool that works smoothly in-browser or has a desktop workflow. Pixelfox AI works in your browser, so it’s friendly for photo ai app pc setups.
According to Nielsen Norman Group, people form first impressions of visual design extremely fast (the famous “~50ms” finding often referenced in UX research). Translation: if your image looks off, people bounce before your caption even loads.
How to pick the best AI photo app in 2026 (without getting tricked)
Here’s the checklist I use when I help teams pick tools for content pipelines (and when I pick stuff for myself).
The 6 things that matter more than “cool filters”
1) Natural output (skin texture stays real, edges aren’t crunchy)
2) Control (you can fix one area without wrecking the whole photo)
3) Export quality (HD, no forced watermark, no weird compression)
4) Speed (especially on web or older phones)
5) Cost clarity (credits, limits, and “free” that isn’t actually free)
6) Privacy + safety (clear terms, no shady surprises)
Tip ✅
Do a “3-photo stress test” before you commit:
- a low-light selfie (noise + skin)
- a busy background shot (edges + hair)
- a slightly blurry photo (real enhancement)
If an app fails 2 out of 3, it’s not the best photo ai for you—no matter how pretty the landing page is. ¯\(ツ)/¯
Best AI photo app picks (mobile + photo ai app pc options)
You’re not crazy for wanting “one app that just works.” But different tools do different jobs. Here’s a practical short list.
Quick comparison table (real-world use)
| Tool | Best for | Platform | AI strengths | Watch-outs |
|---|---|---|---|---|
| Pixelfox AI | fast edits + AI video from photos | Web (mobile + PC) | enhancer, eye fixes, avatar/talking photo | depends on your use case (some users still want Photoshop-level layers) |
| Pixlr | quick browser edits | Web + mobile | generative tools, object removal | some features tied to credits/tiers |
| Picsart | creators who want everything | iOS/Android + web | templates + AI tools | ads + credit limits can get annoying |
| Canva | non-designers + social content | Web + mobile | easy design workflow | many AI “power tools” are paid |
| Photoroom | product shots | Web + mobile | ecom-friendly edits | HD export often paid |
| Adobe Express | quick brand assets | Web + mobile | Adobe ecosystem | can feel slow / feature gating |
| Photo enhancers (Remini-style) | restoring faces | mobile | strong portrait enhancement | can look artificial fast |
| Topaz Photo AI (desktop) | pro upscaling/denoise | PC/Mac | high-end enhancement | paid, heavier workflow |
| Luminar Neo (desktop) | creative pro editing | PC/Mac | AI tools + editing | learning curve |
If you want the “start here” answer: Pixelfox AI is the most balanced pick for most people because it covers the two big needs:
1) make photos cleaner (enhance/fix)
2) turn photos into content (avatars/talking video)
Why Pixelfox AI is my go-to ai photo app (and who it’s for)
Pixelfox AI is an online AI photo + video editor. You don’t install anything. You don’t need a NASA laptop. You upload, edit, export, done.
Here’s where it really shines:
- Enhance and clean up photos when the source image is weak (blur, noise, low-res)
- Fix closed eyes in group shots (this is way more common than people admit)
- Create AI avatars and talking photos for content, product pages, and social
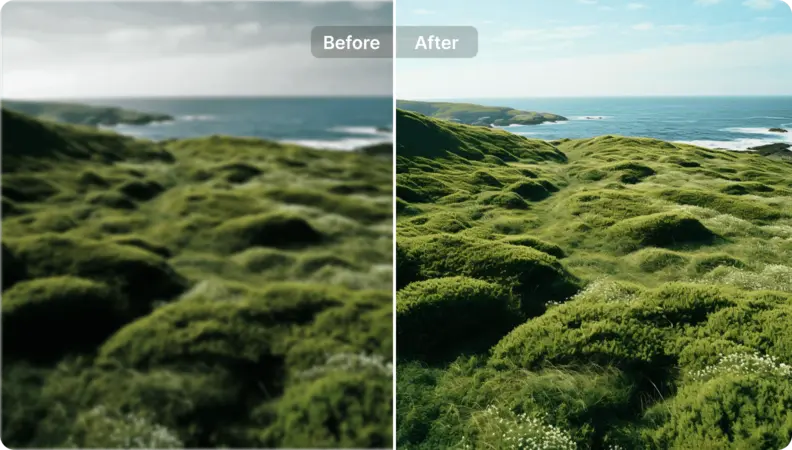
If you only try one feature first, try the AI Image Enhancer. It’s the fastest “proof” of whether an ai photo app is worth keeping on your shortlist.
When you need a photo ai app pc (Windows/Mac): the honest answer
If you edit on PC, you usually care about at least one of these:
- Batch work (a folder of images, not one selfie)
- Bigger screen precision (hair edges, product details, text overlays)
- File control (less compression, better exports)
There are two “PC” paths:
Path A: Browser-based (fast, low friction)
This is where Pixelfox AI fits. Open the site, drop images, export. No GPU drama.
Path B: Desktop heavy hitters (max quality, more effort)
Tools like Topaz can squeeze more detail out of tricky files, but they cost more and the workflow is slower. Great for pros. Overkill for most people.
My rule:
If you publish daily content or run a shop, browser-based wins. If you print giant posters or do client retouching, desktop tools earn their keep.
Step-by-step: get great results with Pixelfox AI (5–10 minutes)
Workflow 1: Fix blur + boost quality (the “save this photo” move)
Use: Pixelfox AI Image Enhancer
1) Upload your photo
2) Let the enhancer process it
3) Compare the before/after (zoom in on hair, edges, skin texture)
4) Download the improved image
What to watch:
If the output looks too sharp or “crunchy,” don’t keep enhancing the enhanced version. Start from the original again and adjust your approach. AI stacks can get ugly fast.
Workflow 2: Fix closed eyes in group photos (the underrated life-saver)
Use: Open Eyes in Photo
1) Upload the group photo
2) Let the tool detect the face and eye area
3) Preview carefully (zoom in, check symmetry)
4) Export and send it to your friends like a hero 😎
This is the kind of fix that used to require manual retouching skills. Now it’s a few clicks.
Workflow 3: Turn one photo into content (talking avatar / video)
Use:
Simple flow:
1) Pick a clear front-facing photo
2) Choose the talking/avatar option
3) Add text or voice (keep it short for best lip sync)
4) Export a video that looks like you worked way harder than you did (ง'̀-'́)ง
This is gold for:
- product intros (“Hi, I’m the founder…”)
- UGC-style ads
- course creators who hate filming
Tip 🎯
Want the most natural “AI talking photo” result?
Use a photo with even lighting and a neutral mouth expression. Big smiles confuse lip movement. Also keep the script under 12 seconds. Short videos hide AI flaws better. That’s not theory—that’s survival 😅.
Pro-level plays (not just “tap enhance and pray”)
These are the tricks that make people say “wait… how did you do that?”
1) E-commerce: clean, consistent product images (without a studio)
The real issue in product photos is not “sharpness.” It’s inconsistent lighting and color across a set.
Smart workflow:
- Enhance each shot so details are clear (Pixelfox enhancer)
- Keep exposure consistent across your catalog
- Export at the same size every time
Then your store looks like a brand, not a yard sale 🧼
2) YouTube thumbnails: fix the face first, then design
Thumbnails live and die on one thing: the face is readable at phone size.
Workflow:
- Enhance the face so it’s crisp
- Fix closed eyes if needed
- Then add text in your design tool
Your thumbnail does not need “more filters.” It needs clarity and contrast.
3) “Talking founder” product page video (no filming)
Instead of filming a talking head:
- Use a clean portrait
- Generate a talking photo video
- Put it on the product page or ad landing page
It’s not a replacement for real video forever. But for MVPs and early-stage brands? It’s a cheat code.
Real-world case studies (how people actually use this stuff)
Case study 1: Etsy seller cleaning up a messy product catalog
Problem: product photos were inconsistent—some warm, some cold, some slightly blurry. The shop looked untrustworthy.
Workflow used:
- Run each image through enhancement to improve clarity
- Re-export in consistent sizes for listings
Result: fewer “why does this look different in real life?” messages, and a cleaner brand look.
No magical “10x sales overnight” fairy tale here. Just better presentation, which is the boring thing that actually works.
Case study 2: Family photos + “talking memory” video
Problem: old family photos were low quality, and some group shots had closed eyes (classic).
Workflow used:
- Enhance the old images for clarity
- Fix closed eyes on the best group photo
- Create a short talking photo clip for a birthday montage
Result: a shareable video that made the family group chat go quiet for once. That’s how you know it hit 🥲
Note: These are anonymized workflow examples. Results vary by image quality, lighting, and how hard the AI has to “guess.”
AI photo app vs Photoshop (and vs other online tools)
Compared to Photoshop (traditional pro editing)
Photoshop is still king when you need:
- precise layers and masks
- complex compositing
- full control over every pixel
But it’s slow for everyday fixes. And it’s easy to overwork a simple edit.
An ai photo app (like Pixelfox AI) wins when you want:
- speed
- one-click fixes
- clean exports
- easy content creation (like talking photos)
Photoshop is a workshop. Pixelfox is a power tool. Both can build a table. One of them won’t ruin your Saturday.
Compared to other online AI tools
Many online tools do one thing well (background removal only, or upscaling only). That’s fine until you need a second thing and you start juggling tabs like a circus act 🤹.
Pixelfox AI is strong because it blends:
- photo improvement
- targeted fixes (like eyes)
- photo-to-video creation
That combo is still weirdly rare.
Common mistakes (and how to fix them fast)
New users mess up in predictable ways. Here are the big ones:
1) Over-enhancing
- Symptom: crunchy edges, fake skin, “HD” that looks worse
- Fix: enhance once, compare at 100%, stop there
2) Using low-quality inputs and expecting miracles
- Symptom: warped faces, weird eyes, AI guesswork
- Fix: use the sharpest original you can find
3) Exporting in the wrong size
- Symptom: blurry uploads on Instagram/Etsy
- Fix: export close to the platform’s preferred size
4) Editing the same file again and again
- Symptom: quality loss and artifact build-up
- Fix: always restart from the original
5) Ignoring lighting
- Symptom: “why does this still look cheap?”
- Fix: even lighting beats “more filters” every time
How to avoid photo ai app pc backfires (yes, PC users can mess it up too)
On desktop, people tend to zoom in, panic, and over-correct.
- Don’t judge an image at 400% zoom unless you’re printing a billboard.
- Don’t stack multiple enhancers from different tools on the same file.
- Keep one “master export” in high quality, then make platform copies.
Professional advice: consistency beats perfection. Your audience is not doing forensic pixel analysis. (If they are, block them. Kidding. Sort of.)
FAQ
1) How do I choose the best AI photo app for my needs?
Pick based on your main job: enhancement, background edits, portraits, or content creation. If you want a balanced tool that covers photo cleanup and fun video outputs, start with Pixelfox AI.
2) Can an ai photo app replace Photoshop?
For many everyday tasks, yes. For deep compositing, advanced retouching, and layer-heavy work, Photoshop still wins. Most people don’t need that power every day.
3) Why do some AI photo apps make faces look fake?
They over-smooth skin and then re-add artificial “detail.” Use lighter settings, avoid stacking edits, and keep the original texture when you can.
4) Can I use a photo ai app pc setup without installing software?
Yes. Web tools are the easiest route. Pixelfox AI runs in the browser, so it works well on PC without installs.
5) What’s the safest way to use AI photo tools with private images?
Use tools with clear privacy policies, avoid uploading sensitive documents, and don’t use random apps that hide terms. If it feels sketchy, it usually is.
The takeaway (and what to do next)
A good ai photo app should do three things: make your photo cleaner, keep it looking real, and save you time. Most apps can do one of those. The best photo ai tools do all three—and they don’t make you watch an ad just to download your own face.
If you want one place to start, try Pixelfox AI. Use the enhancer, fix a closed-eye group photo, then generate a talking clip. You’ll know in 10 minutes if it fits your workflow. And if you’re editing on desktop, it’s a solid photo ai app pc option too.
Author note / transparency: Tool features and pricing can change. Always verify current limits inside the product before you commit. Results also vary by image quality, lighting, and how much AI “guessing” is required.