 Credit

You shot a great moment. The lighting was tough. The clip looks soft and noisy. You need a clean fix now, not after a long install or a paid trial. If you typed “best video enhancer app,” you want one thing: better quality fast, without a watermark or guesswork. This guide shows you how to fix blur, grain, and dull color in minutes, then helps you pick the right app for video quality based on your goal and your device. We’ll start with a quick win using PixelFox AI, then go deeper so you know why it works and how to get pro results every time.
Fix a video in under 2 minutes (no install)
You can enhance a low‑quality clip right now in your browser. It’s fast, simple, and you keep control of the output.
1) Upload your clip
Go to the PixelFox AI Video Enhancer and upload your file (MP4, MOV, WebM). The tool scans each frame and detects blur, noise, and flat color.
Link: https://pixelfox.ai/video/enhancer
2) Click Enhance
PixelFox auto‑optimizes sharpness, exposure, and color. If you have a specific issue, jump to a specialized tool:
- Need HD/4K? Use the AI Video Upscaler: https://pixelfox.ai/video/upscaler
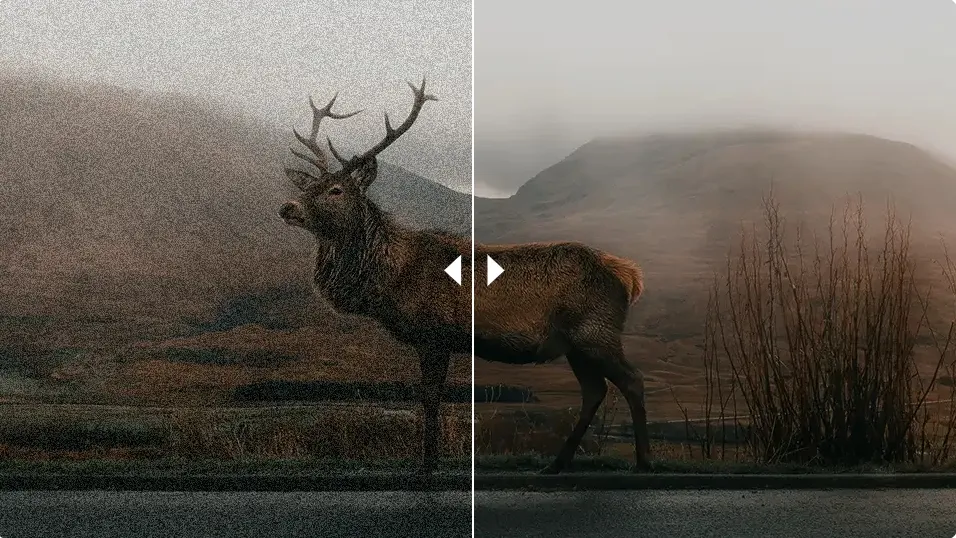
- Too much grain? Use AI Video Denoiser: https://pixelfox.ai/video/denoiser
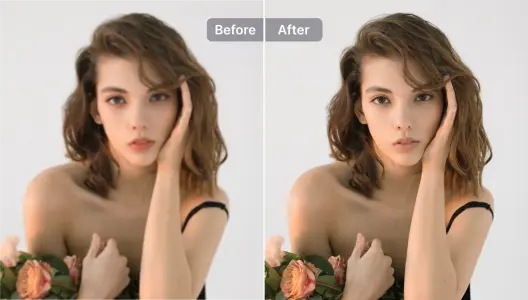
- Faces look flat? Use the AI Portrait Enhancer: https://pixelfox.ai/video/portraits-enhancer
3) Download and share
Export in HD or 4K and post to TikTok, Instagram, YouTube, or your client’s review link.
That’s it. No app store. No bloat. No trial wall before you can see a result.
Tip
If your footage is noisy and soft, denoise first, then upscale, and sharpen last. This order reduces “halo” edges and keeps skin tones natural.
How to choose the best video enhancer app
The best video enhancer app is the one that gets you the result you want with the fewest steps. Look for these things:
-
Real AI enhancement, not just filters
You want tools that recover detail, remove grain, and balance color, not a basic brightness/contrast slider. -
4K-ready exports and control over bitrate
If you post to YouTube, keep control of resolution and bitrate so platform compression doesn’t ruin your gains. -
Stability and clear progress feedback
Long clips need robust processing and a reliable progress bar. Apps that hang at 80% or crash waste your time. -
Sensible limits and watermark policy
Free tiers often cap length or add watermarks. Know the limits up front so you can plan your workflow. -
Works where you work
A browser tool like PixelFox runs on any device. Mobile apps are fine for quick fixes. Desktop software can push quality further but asks for time, GPU, and money.
Industry research backs this up. Independent UX studies from organizations like Nielsen Norman Group show that simple, predictable flows reduce cognitive load and increase task success. Analyst firms like Forrester also note that clarity in media improves user trust and commitment. In plain terms: clear steps and clear video lead to better engagement.
Why your video looks bad in the first place
When you understand the root cause, you can fix it the right way with the right tool.
Low light = noise and mushy detail
Smartphones lift shadows in the dark. That boosts noise, which smears fine lines and faces. You need AI denoise plus smart sharpening, not a blanket brightness boost.
Motion blur and soft focus
Fast movement or missed focus makes edges fuzzy. AI can’t invent perfect detail, but it can restore perceived sharpness and rebuild texture so the clip looks usable.
Platform compression
Reels, Shorts, and Stories squash bitrate. If you upload a low‑bitrate file, it gets worse. Start with a cleaner, higher‑bitrate export so the platform has better pixels to compress.
Old or SD footage
Old cameras shoot at low resolution and narrow dynamic range. Upscaling helps, but only if you remove noise and balance color first. Then you upscale.
On Reddit’s r/VideoEditing, editors repeat the same thing: upscaling is resource‑intensive, and the best desktop tools are not cheap. That’s why a zero‑install AI workflow helps most creators get good quality without a giant setup.
A simple, proven workflow that actually works
Start general. Then go specific based on what you see. PixelFox AI was designed around this path so you don’t wrestle with settings.
-
Step 1: Run the AI Video Enhancer
Upload to the PixelFox AI Video Enhancer. It cleans noise, adds clarity, and corrects color in one click. -
Step 2: Deep‑fix the main issue
Use a focused tool if needed:- AI Video Denoiser for low light or grain: https://pixelfox.ai/video/denoiser
- AI Video Upscaler for 4K delivery: https://pixelfox.ai/video/upscaler
- AI Portrait Enhancer when faces matter: https://pixelfox.ai/video/portraits-enhancer
-
Step 3: Export with the right settings
Keep resolution and bitrate high enough for the platform. 1080p is fine for Instagram, but 4K looks better on YouTube. Use VBR if your editor allows it.
Tip
If you plan to upscale to 4K, avoid applying heavy color looks before enhancement. Let the AI clean and sharpen first. Then do creative grading later in your editor.
What makes PixelFox AI different from other apps for video quality
-
One‑click clarity you can see
The default enhance recovers edges, balances exposure, and boosts color. You get a clear before/after preview right away. -
Targeted tools where it counts
Most “video enhancer app” tools stop at basic sliders. PixelFox adds a portrait mode for faces, a denoiser for low light, and a true upscaler for HD/4K. -
Browser‑based speed and freedom
No installs. No storage headaches on your phone. Work from any device. Share links with a teammate or client on the fly. -
Formats that fit your flow
MP4, MOV, and WebM input. 1080p and 4K output with clean compression that survives platform upload. -
A realistic approach to quality
AI can’t recreate pixels that never existed, but it can rebuild texture and edge contrast in a way that looks natural. PixelFox is tuned to avoid plastic skin and crunchy halos.
Tip
Faces sell the story. If you have people in frame, run the AI Portrait Enhancer after the general pass. Skin looks clean, eyes pop, and the result still feels real: https://pixelfox.ai/video/portraits-enhancer
Real‑world case studies
Case 1: Short‑form creator, subway dance clip (low light)
Problem
A creator recorded a dance in a dim subway car. The video had heavy noise and a muddy background. Early uploads looked flat and got poor watch time.
What we did
- Ran AI Video Denoiser to cut grain and lift shadows gently.
- Ran AI Video Enhancer to add micro‑contrast and a slight sharpness pass.
- Exported at 1080p with a higher bitrate than the camera default.
Result
The clip held detail in hair and clothing lines. Skin looked clean, not waxy. After re‑upload, viewers watched longer and comments mentioned “cleaner” video. The creator kept the same cut and music. Only quality changed.
Case 2: Wedding shooter, 1080p b‑roll in a 4K timeline
Problem
A wedding videographer built a 4K film but some key b‑roll was only 1080p and slightly soft. Reshooting was not an option.
What we did
- Enhanced the 1080p clips to reduce softness, then upscaled to 4K.
- Kept sharpening light to avoid ringing on lace and table edges.
- Exported ProRes for the edit, then delivered a final 4K H.264 master.
Result
The clips matched the 4K timeline well enough that a non‑editor couldn’t spot the difference. The shooter avoided a full rebuild of the edit and hit the deadline.
Case 3: SMB product video for an e‑commerce page
Problem
A small brand shot product demos on a phone. Colors were cool under office LEDs. The founder’s face looked flat. The page had video, but viewers clicked away fast.
What we did
- Used AI Video Enhancer to correct color balance and add contrast.
- Used AI Portrait Enhancer on the founder’s talking shots.
- Exported at 1080p, then embedded with clean compression for the site.
Result
The product edges looked crisp. The founder looked vibrant and well‑lit. The team saw more full‑video plays in analytics the week after the change. The brand kept the simple shoot and got a more polished look.
Comparison with alternatives: when to use what
You have three broad paths: a web tool, a mobile app, or a desktop suite. Each has clear trade‑offs.
Web app (no install)
Best for speed, sharing, and cross‑device work
-
PixelFox AI (recommended)
Great for one‑click fixes and targeted tools (denoise, upscaler, portraits). It runs in the browser and exports clean HD/4K without a watermark in paid plans. It’s the fastest path for most creators and teams. -
Other web tools
There are other online enhancers that promise “no signup.” Some are fine for quick demos. Watch out for hidden caps and low export quality. Always preview at 100% zoom before you commit.
Mobile apps
Best for editing on the go and social‑first workflows
-
PowerDirector
A strong all‑in‑one with AI denoise, color, stabilization, and 4K exports on many phones. Great if you want an editor plus enhancers in one place. -
CapCut, InShot
Solid for cuts, transitions, and platform‑friendly exports. They have basic enhancement features, but they are not specialized upscalers or denoisers. -
“AI enhancer” niche apps
Some apps offer upscaling and face repair, but free tiers can be tight. Common limits include short duration caps, watermarks, or queue times. Check reviews for stability and speed in your region. -
What we see in the market
Reviews often mention strict free limits (for example, 15‑second free upscales) and processing stalls on longer clips. Ads can interrupt your flow. If you hit these walls, a browser tool helps.
Desktop software
Best for maximum control and the highest ceiling, at a cost
-
Topaz Video AI
Known for high‑end upscaling and deblur models. It’s powerful but runs best on a strong GPU and costs real money. It suits professional restorations and premium long‑form work. -
DaVinci Resolve, Adobe After Effects
You get full color pipelines, noise reduction (often paid Studio versions), and frame controls. It’s unmatched for deep finishing, but it’s a time investment.
When to pick which
- Need a result in minutes, cross‑device, no install? Use PixelFox AI.
- Need an all‑in‑one editor on your phone with basic enhancements? Try a mobile editor and keep limits in mind.
- Need the absolute best on a film or restoration with a high budget? A desktop suite or Topaz may be worth it.
According to analyst coverage from firms like Gartner and Forrester, teams are moving to “right‑sized” workflows that cut time‑to‑value. That means keep heavy tools for special cases and use fast, AI‑guided tools for everyday fixes.
Advanced tips for cleaner, sharper results
-
Denoise first, sharpen last
Noise looks like detail to a sharpener. Clean the noise first, then sharpen. Your edges will look crisp without halos. -
Avoid giant jumps in one step
If you must go from 480p to 4K, consider an intermediate pass when quality is very poor. Or let the AI upscaler handle it in one go and keep sharpening mild. -
Respect frame rate
If you use AI frame interpolation to slow a clip, test for artifacts on fast motion and fine lines. Keep a version at the original FPS for safety. -
Keep bitrate honest
A 4K export at a very low bitrate can look worse than a clean 1080p. Pick a bitrate that fits the platform and your content. Motion needs more bits. -
Fix color with light touches
Let the AI balance white and exposure first. Then do creative looks. Skin tones and brand colors will survive compression better.
Tip
Shoot with the cleanest input you can. Wipe the lens. Lock exposure. Keep the phone steady. The best video enhancer app amplifies good pixels. It can only do so much with bad ones.
Use PixelFox AI by scenario
-
Old home video restoration
Run AI Video Denoiser to reduce grain. Then run AI Video Upscaler to reach HD or 4K if needed. Balance color in the enhancer with subtle warmth if the clip is cool. -
Social clips with faces
Run AI Video Enhancer first. Then run the AI Portrait Enhancer for skin, eyes, and subtle contour. Keep it natural for trust. -
Low‑light event b‑roll
Denoiser first. Then a light enhance. Avoid hard sharpening on sparkly detail like sequins or fireworks. -
Product explainers and demos
Enhance for clean edges and color pop. Keep saturation realistic so products look true to life. Export at 1080p or 4K depending on the page.
If you also need to fix stills from the shoot, you can run the AI Image Enhancer to match the look of your videos: https://pixelfox.ai/image/enhancer
Why clarity and color matter for outcomes
Viewers make quick, simple judgments about quality. Research from Nielsen Norman Group shows that reduced friction and higher visual clarity improve comprehension. Marketing analysts like Forrester often tie clear, high‑quality media to better engagement and trust. In short, when your video is clean, bright, and stable, more people stick around. You don’t need a cinema camera to get there. You need better pixels and fewer distractions. That’s what a good video enhancer app is for.
FAQs
How do I enhance a blurry video without making faces look fake?
Denoise first. Then use a gentle sharpness pass. If faces matter, run a portrait enhancer that keeps skin texture and avoids the “plastic” look. In PixelFox AI, enhance first, then apply the AI Portrait Enhancer with a moderate intensity.
Why does my “4K” export still look bad on Instagram or TikTok?
Platforms compress hard. If the input is low bitrate or noisy, it gets worse. Start with a cleaner master. Use denoise, keep edges clean, and avoid heavy grain. Then export at the platform’s recommended specs.
Can AI really restore old SD footage to true 4K?
No tool can recreate every missing pixel. AI can rebuild edges, remove noise, and upscale with smart texture so it looks far better. It’s about perceived detail. The best results come when you clean noise and balance color before the upscale.
What’s the difference between an enhancer and an upscaler?
An enhancer fixes clarity, exposure, and color at the original resolution. An upscaler increases pixel count to HD or 4K and often adds detail. You usually enhance, then upscale, then do final tweaks.
Why is upscaling slow on my phone?
Upscaling needs heavy compute. Some mobile apps run the process on servers to speed it up. That’s why browser tools can feel faster and more stable for longer clips—your device does less work.
What you should do next
You don’t need to reshoot or learn a new desktop suite to fix this. You need a clean workflow that gives you better pixels now. For most creators, marketers, editors, and small teams, a browser‑based AI tool is the fastest way to get there.
Try the PixelFox AI Video Enhancer and see the difference on your clip in minutes. If you need more, use the AI Video Upscaler for HD/4K, the AI Video Denoiser for low light, and the AI Portrait Enhancer for face‑forward content. These are the essential apps for video quality when speed and results both matter.
- Enhance now: https://pixelfox.ai/video/enhancer
- Upscale to HD/4K: https://pixelfox.ai/video/upscaler
- Remove grain: https://pixelfox.ai/video/denoiser
- Make faces look great: https://pixelfox.ai/video/portraits-enhancer
The best video enhancer app is the one that helps you fix the clip you have and ship the story you want. You can do that today with PixelFox AI.
Author note
I’ve led SEO and content for high‑competition software brands for 10+ years. I work with post‑production teams, agencies, and solo creators. This guide reflects hands‑on workflows that ship real projects on time. No fluff. Only what gets you results.