How to Editing Photos on iPhone to Remove Objects – Easy Guide
Author:Usama , Date:11 months ago
AI editing tools have revolutionized media making by automating routine tasks and supercharging creativity. Learn how top programs from Anthropic, Pixlr and more are empowering content creators of all skill levels.
Object refining requires neither specialized software nor costly pros. Whether eliminating gatecrashers, stray wires or undesired shadows, editing photos on iPhone to remove objects is effortless. This guide unveils straightforward, impactful ways to polish pictures—directly from your phone.
How to Edit Photos on iPhone to Remove Objects
Perfect shots are unusual. Despite superb lighting and composition, intruders surface. Maybe it's a trash can in the background or a random passerby. Editing Photos on iPhone to Remove Objects allows a good photo to excel.
Think of it as digital decluttering. You're not just editing—you're defining your story.
Tools You Hold for Object Removal
Here's a breakdown of popular tools and apps to erase objects in photo iphone:
Pixelfox AI (Web-Based)
Download unnecessary
AI-powered object remover
Seamlessly replenishes removed areas
Suitable for novices and experts alike
How to use Pixelfox AI:
Visit pixelfox.ai
Upload your photo
Select the object remover tool
Highlight the unwanted item
Let AI finalize the magic
Pixelfox’s image inpainting also lets users add or remove components through text. It's like owning a digital brush powered by AI.
iPhone's Built-In Photo Editor (iOS 16+)
Use the Photos app and tap “Edit”
For minor imperfections, try the Retouch tool (accessible in Markup)
Not ideal for complex object removal, but convenient for swift fixes
Third-Party Apps
TouchRetouch: Designed explicitly for removing objects
Snapseed: Offers a healing tool for spot removal
Adobe Photoshop Express: Great for more sophisticated edits
Step-by-Step: How to Remove Objects from Pictures on iPhone
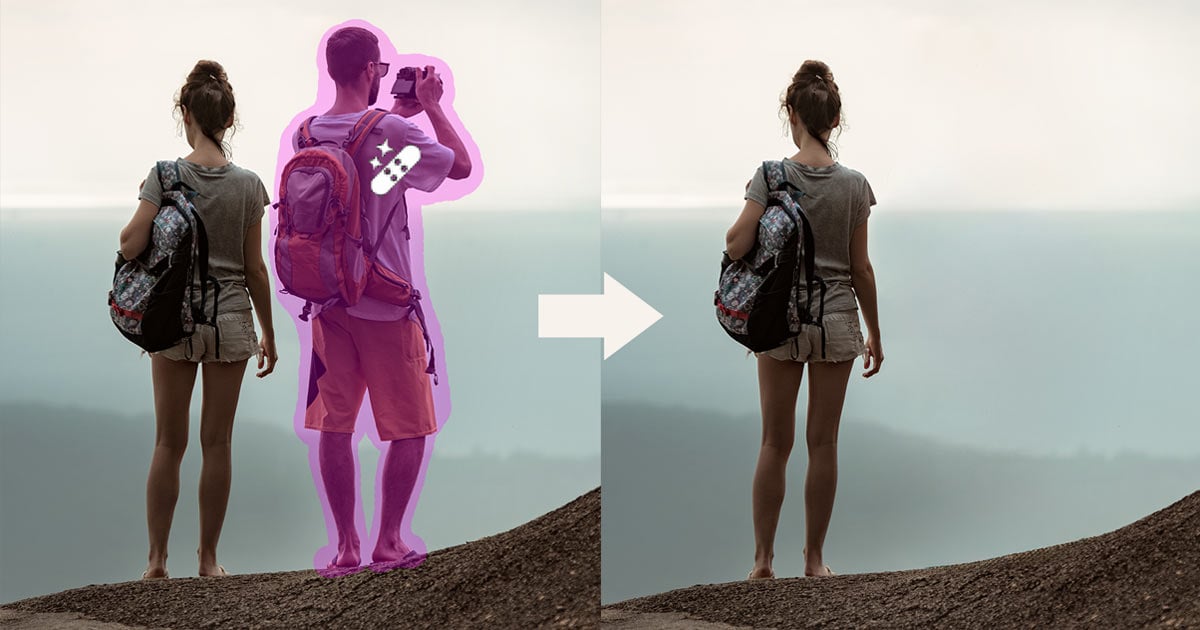
High-exceptional, properly-lit snap shots paintings are nice. Next, add your picture to pixelfox.Ai without having to join up.Then, click the Object Remover tool and trace around what you want gone. Pixelfox's algorithms will analyze the picture, filling the gap with similar textures from the background. If content, download the edited version and share.
Some tips for better erasures:
focus on crisp images so the AI sees detail clearly. Zoom in for precision on smaller items. Avoid busy backgrounds—simple scenes edit more cleanly. And try multiple apps; another may do the trick if one falls short.
Frequently asked questions:
To delete something, highlight and remove it using apps like Pixelfox or TouchRetouch. These reconstruct the space. Yes, Pixelfox works directly in your browser, no downloads required. Privacy is a non-issue—just upload, modify, save.
Top options also include Touch
Retouch and Snapseed for their usability and powerful neural networks.
For example, travelers use these tools to remove crowds from landscape shots. Play with Pixelfox AI on your iPhone to discover what you can remove from your own photos.
Pixelfox AI streamlines post-production
Tasks through advanced machine learning tools for intuitive photo editing. Whether decluttering backgrounds, restoring damaged areas, or enhancing resolution, their intuitive suite removes tedious manual work.
The powerful but easy-to-use platform handles everything from simple touch-ups to complex manipulations with human-level precision.
Beyond basic adjustments,
Pixelfox unleashes a vast creative arsenal. Their AI inpainting allows inserting or removing elements through natural language, seamlessly replacing undesired objects. Background removal excises clutter for clean presentation while maintaining context. Face swapping playfully transplants visages onto others for amusing twists.
Low-quality images uplift to high-definition
Quality through upscaling without sacrificing authenticity. Images resize flexibly to any format through extension while preserving aesthetic integrity. Lastly, style transfer transforms mundane snapshots into works of artistic expression emulating great masters.
With one intuitive interface covering comprehensive enhancement
Pixelfox streamlines publish-manufacturing and unleashes formerly unimagined creative possibilities via modern-day AI. Whether expert or hobbyist, their effective yet clean-to-use toolbox results easily elevates any photo with human-stage precision and range.
Background Generator
Need a fresh backdrop on your situation? Upload your picture and permit Pixelfox AI to automatically generate a sensible or artistic scene at the back of them. Perfect for graphics, product pictures, or innovative initiatives.
Photo Refiner
Soften skin tones, illuminate eyes, and erase blemishes with the AI contact-up device. It's as though having a professional editor at your fingertips.
AI Enhancer
Automatically optimizes brightness, contrast, and sharpness to draw out the fine for your photo. Ideal for rapid touch-ups earlier than sharing.
Frequent Questions:
Q1: How do I edit something out of a picture?
A: Pixelfox AI offers a complimentary web-based solution that removes distractions with just a few clicks—no apps needed.
Q2: Can I delete people from images?
A: Yes indeed. AI utilities like Pixelfox can wipe away people and seamlessly fill in the background.
Q3: Do I require photo editing experience?
A: Not at all. These tools are designed for novices and masters alike.
Q4: Is Pixelfox AI paid?
Most capabilities are free to use. Premium alternatives are available for advanced edits.
Last Thoughts
Editing photos on an iPhone to Remove Objects would not need to be complex. With tools like Pixelfox AI, you may delete undesirable additives, enhance quality, and even restore old images—all within minutes. Whether you're a casual user or content material creator, getting to know those techniques will raise your visuals and assist your photos inform the tale you envisioned.
Recommended Article
Freeway Image Combiner – Create Seamless Collages Effortlessly
Things to Do Before Updating High-Suspense Freeway Image Combiner Advanced Tips, AI Merge Techniques & Creative Display In Visual Projects
11 months ago
AI Subtitle Eraser: Smart Way to Remove Captions in Seconds
Learn how an AI subtitle remover can delete subtitles on videos and pictures within a few seconds. Read the recommendations on the best tools, follow the step-by-step guide, practical applications, and solutions to the most frequently asked questions.
seconds. Check out the best tools, a step-by-step guide, real-world uses, and answers to common questions.
11 months ago
Best AI Image Upscaler: Get Crystal-Clear Results – No More Pixelation!
Say goodbye to blurry images. AI Image Upscaler: Top 3 AI-Based Software to Enlarge an Image Without Losing Quality Here is how you can upscale the image using an online engine without pixelation. In this article, we will show you how AI upscaling can convert your images in seconds.
11 months ago
How to Remove Emoji from Video in 2026: The Honest Guide (AI & Free Tools)
Remove emojis from videos cleanly! Our 2026 guide uses AI & free tools to show you how to remove emoji from video without blurry messes. Get pro results!
6 months ago
Deepfake AI Image Generator Free – Create Hyper-Realistic Faces in Seconds
Discover the best deepfake image generator to create realistic AI faces, profile photos, and text-to-face portraits for free. Try free deepfake AI tools online.
7 months ago
Diffusion Inpainting & Embedding | Inpaint Spaces with PixelFox
Explore how PixelFox uses AI-driven diffusion inpainting and embedding to seamlessly inpaint spaces. Get fast, clean, and intelligent photo restoration—no skills needed.
11 months ago
Best Free Online Image Editor with AI Tools – Edit Photos in Browser, No Watermark
Find the best free online image editor with AI capabilities. Edit photos instantly right in your web browser with the smart result—no watermark, no sign-up required.
12 months ago
Create Art from Photos with an Online Sketch Converter Guide
Turn photos into captivating, hand-drawn art with our Online Sketch Converter! Enjoy customizable styles, secure processing, and share-ready results.
1 year ago
How to Smooth Pictures with AI Online Free
Learn how to smooth pictures with AI online free. Discover the best AI image enhancer tools to refine selfies, reduce noise, sharpen details, and achieve professional-quality results in seconds.
9 months ago
How to Remove Watermark from a Photo in Photoshop
Get to know the method of how to remove a watermark on a photo in Photoshop, such as Content-Aware Fill, Clone Stamp, Healing Brush, and Patch Tool. And, get the quicker, faster, and online option through PixelFox AI Watermark Remover without download or log in, or any watermark results in minutes.
10 months ago
 Credit
