 Credit

You stretch the picture a bit to fit Instagram or a product page. Then you look at it again. The face is wider, the logo looks drunk, and the whole image feels… wrong 🙃
If this sounds familiar, you’re in the right place.
This guide walks you through how to stretch a picture (yes, literally stretch the picture) in ways that keep it sharp, natural, and not cursed. We’ll cover:
- Simple “click and done” methods
- Phone workflows
- Pro tricks in Photoshop and other tools
- AI methods (with Pixelfox AI as the main weapon)
- Common mistakes and how to avoid them
By the end, you’ll know how to stretch a photo for social media, e‑commerce, or print, without trashing the quality.
What “stretch the picture” actually means (and why it often looks awful)
When people say “stretch image”, they often mean one of three things:
- Make the image wider or taller to fit a frame
- Add more background so nothing gets cropped
- Change the aspect ratio to match a platform (like 9:16 for TikTok)
The problem is simple:
- If you just drag the corner in a basic editor with aspect ratio unlocked, you distort the subject. Faces get wider, circles turn into ovals.
- If you blow up a tiny image to a large size, you lose detail and it looks blurry or pixelated.
According to Statista, photo and video apps are still some of the most downloaded apps worldwide. So a lot of people edit. But most people still fight with the same boring problems: warped faces and ugly stretched edges.
So we need tools and methods that can stretch the picture while:
- Keeping the main subject natural
- Filling the new space in a smart way
- Keeping resolution and sharpness as much as possible
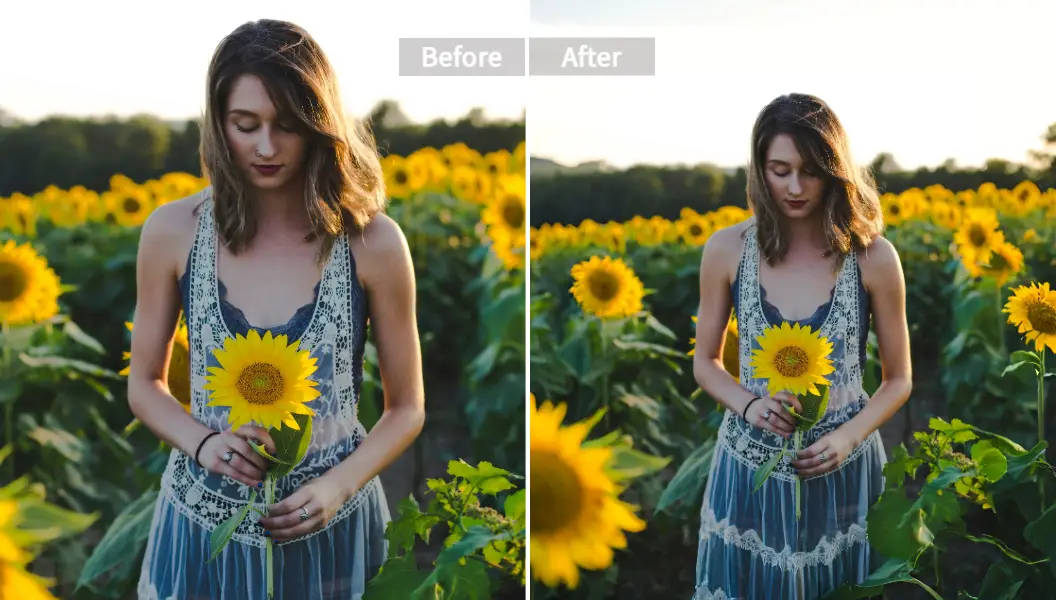
This is exactly where AI outpainting and tools like Pixelfox AI Image Extender come in.
Quick answer: the easiest way to stretch the picture in under 1 minute
If you just want a fast fix and you don’t care about theory, here is the short version 👇
-
No software, just browser?
Use Pixelfox AI Image Extender. Upload, pick how you want to expand, and let AI fill the edges. -
On iPhone or Android only?
Use your phone’s built‑in editor for simple scale, or a mobile photo editor with a “photo editor stretch” or “resize” feature. Good for quick story posts. -
Need pixel-level control?
Use Photoshop / GIMP / Affinity Photo and play with Free Transform or Content-Aware Scale. Takes more time, but you control everything.
If you want the best mix of speed + quality + zero drama, the cleanest choice right now is AI. And Pixelfox is built exactly for this type of stretching and uncropping.
Method 1 – Stretch the picture online with AI (no install)
Let’s start with the lazy but smart way.
Online tools are perfect when you:
- Don’t want to install heavy software
- Need fast results for social media or a client
- Work across different computers
The issue with most basic online tools is this: they only scale the whole image. They don’t add new content. So they will:
- Either distort the subject
- Or stretch the existing pixels and make everything look low‑quality
Why Pixelfox AI is different from a basic “photo editor stretch” tool
Pixelfox AI Image Extender uses deep learning (GAN‑style models) to generate new background around your image. It does not just stretch old pixels.
So it:
- Analyzes colors, textures, and patterns
- Predicts how the scene should look outside the original crop
- Creates new content that blends in with your picture
You get:
- More background
- Bigger canvas
- Natural borders
All that without fattening your subject or turning text into a mess.
Step‑by‑step: stretch image with Pixelfox AI Image Extender
Here is how to stretch a photo with Pixelfox in a simple flow:
-
Upload your picture
Go to Pixelfox AI Image Extender and upload your image (JPG or PNG works fine). You can also drag and drop or paste from clipboard. -
Set how you want to expand
- Pick a preset aspect ratio (like 1:1, 4:5, 9:16) or set a custom size
- Choose where to extend: top, bottom, left, right, or a mix
This is sweet when you need exact formats for Instagram, TikTok, or an e‑commerce template.
-
Let AI outpaint the new area
Pixelfox uses AI outpainting to fill the extra space.
It keeps the original style and blends new content into the old one. No obvious seams. -
Download the high‑res result
When you like what you see, save the extended image in high resolution.
You can share, print, upload to your store, whatever you want.
Tip
If you know you will stretch the picture, start from the highest resolution original you have. When you extend from a larger base, AI has more detail to learn from and the final image looks cleaner.
When to use Pixelfox vs generic online editors
Most simple online editors only scale and crop. They are okay when:
- You just need a quick size change
- You don’t care about new background
- The subject is not sensitive (like a pattern or abstract art)
Pixelfox AI is a better choice when:
- You want natural uncropping
- You need AI to invent extra scene (more sky, more room, more background)
- You handle faces, products, or logos that must not warp
Here is a simple comparison:
| Use Case | Basic Online Editor | Pixelfox AI Image Extender |
|---|---|---|
| Stretch image to match aspect ratio | ✅ | ✅ |
| Add new realistic background | ❌ | ✅ |
| Keep faces and products undistorted | 😬 | ✅ |
| Batch edit many photos | ❌ | ✅ (batch support) |
| Best for | Simple tweaks | Social, e‑com, marketing |
Method 2 – How to stretch a photo on your phone (iPhone & Android)
Most people first try to stretch the picture right on their phone. Makes sense. You shoot on your phone. You post from your phone.
On iPhone (Photos app + simple tools)
You can do basic stretching and resizing inside the Photos app and some simple editors. It will not be as smart as AI, but it works for quick jobs.
Basic approach in iOS Photos:
- Open the image in Photos
- Tap Edit
- Tap the crop icon
- Change the aspect ratio (like 9:16 or 4:5)
- Use pinch to zoom and reposition
This does not really “stretch” pixels. It crops. So it is clean but you lose parts of the image.
If you really want to stretch, you need an app with a resize / warp feature. Many mobile editors have a “resize” or “stretch” option in their Transform or Tools menu.
The risk is the same: if you stretch unevenly, you get distortion.
On Android (Gallery / Google Photos / third‑party apps)
Most Android phones also let you:
- Crop
- Change aspect ratio
- Resize
But true stretch is usually inside more advanced apps. You look for:
- “Transform”
- “Perspective”
- “Stretch”
- “Liquify”
You can use those to make a photo taller for Reels or Shorts. But you need to be careful with people and text.
This is where a cloud tool like Pixelfox helps. You can shoot on your phone, then:
- Upload to Pixelfox AI Image Extender in your browser
- Let AI add space top/bottom for vertical formats
- Download and post
It takes a bit longer than tapping in the native app, but you skip the weird distortion and junk quality.
Tip
Many people search “how to stretch res a photo” when they actually want higher resolution, not just stretched size. If you make the canvas bigger, you should also think about upscaling or using a larger source. Stretch alone does not magically add detail.
Method 3 – Stretch image with pro software (Photoshop, GIMP, Canva, etc.)
If you use pro tools already, you get more control. But also more ways to mess up the image 🤷♂️
In Photoshop: Free Transform vs Content-Aware Scale
You have two main tools for this:
-
Free Transform (Ctrl/Cmd + T)
- Unlock aspect ratio (hold Shift or unlock link icon)
- Drag sides to stretch horizontally or vertically
Very quick. Also very easy to destroy the subject. Use this only when distortion is acceptable (like stretching a background, not a face).
-
Content-Aware Scale
- Convert layer to a Smart Object if you want non‑destructive edits
- Edit → Content-Aware Scale
- Drag to extend one side
Photoshop tries to protect detailed areas and stretch low‑detail areas (like sky or walls). Good for landscape photos and environments.
You can also combine stretching with Liquify:
- Stretch the picture to new ratio
- Then fix faces / bodies manually with Liquify
This gives good results but takes time and skill.
In GIMP or similar free editors
GIMP and a few other free editors have:
- Scale Tool for uniform / non-uniform resize
- Perspective / Warp Tools for local stretch
You can:
- Add canvas space
- Then scale the background layer to fill the new area
- Or duplicate background and blend with clone stamp
This is manual work. So it is slower than AI and easy to spot if you rush.
In Canva and browser design tools
Canva and similar tools are great for quick social graphics.
You can:
- Add an image into a template
- Unlock aspect ratio
- Stretch the picture to fill the frame
But this is pure scaling. No new content appears. So it is better to:
- Prepare your image in something like Pixelfox first
- Then drop the extended version into Canva for text and layout
That way you avoid ugly warping and still keep a fast design flow.
Method 4 – Use AI to stretch the picture without distortion
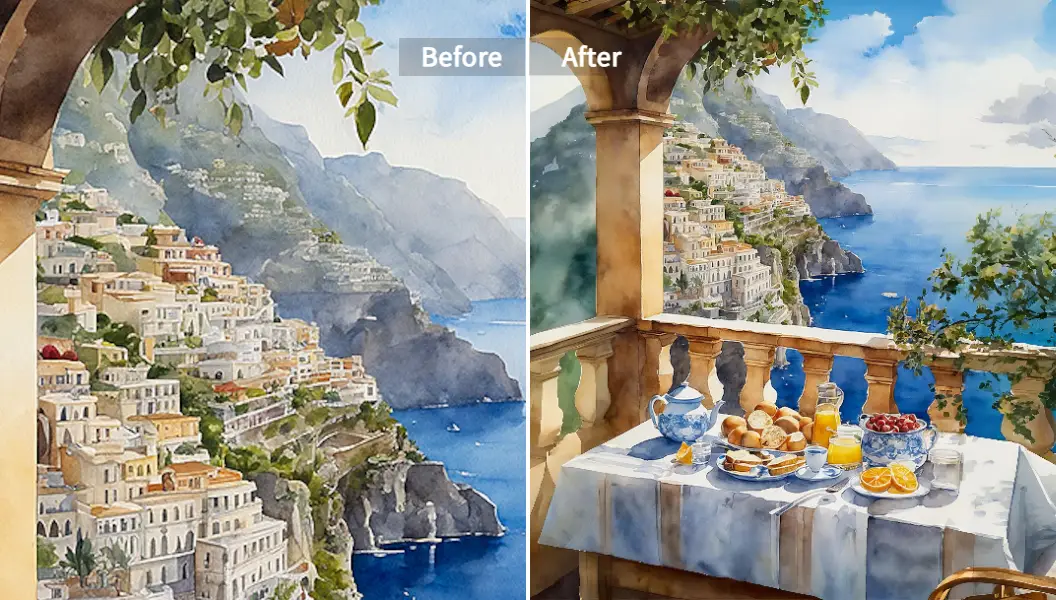
Now let’s talk about the fun part: AI outpainting.
Traditional tools stretch existing pixels. AI tools invent new ones that match your image.
How AI stretching works in simple terms
AI models like the ones used in Pixelfox AI:
- Look at your original image
- Learn patterns (edges, lighting, material, style)
- Predict what would probably exist outside the frame
- Generate that content in a way that blends with your original
So when you stretch the picture, you are not just pulling it apart. You are expanding the scene.
You can:
- Turn a tight portrait into a wider shot
- Add more sky or room for text
- Uncrop product photos to fit store rules
And the subject stays natural.
Pixelfox AI vs Photoshop for stretching a picture
Photoshop is powerful. But it is manual. You need skill, time, and a decent machine.
Pixelfox AI Image Extender gives you:
- One-click AI outpainting for natural edges
- Preset and custom aspect ratios for any platform
- Batch processing to handle many images in one go
- Instant download in high quality
Photoshop gives you:
- Full control
- Many other tools in one place
- A big learning curve
If you do client work daily and love full control, Photoshop stays relevant.
If you want to stretch image content fast, with less effort, AI is usually the smarter front line tool now.
Pixelfox AI vs other online stretch image tools
There are many “AI” tools out there right now. Some are good. Some just resize.
Here is a simple view of what sets Pixelfox apart:
| Feature / Need | Random Online Tool | Pixelfox AI Suite |
|---|---|---|
| Real AI outpainting | Sometimes | ✅ Yes, purpose‑built Image Extender |
| Smart aspect ratio & canvas control | Basic or none | ✅ Custom and preset ratios |
| Batch processing | Rare | ✅ Built-in |
| Face and skin cleanup after stretch | Almost never | ✅ Use AI Photo Retoucher |
| Face shape fix after weird crops | Rare | ✅ AI Face Reshape tool and AI Face Slimming |
| Style match / creative finish | Basic filters | ✅ AI Style Transfer |
So Pixelfox is not just “one more editor”. It is a small toolbox built around real‑world image problems:
- Stretch the picture
- Fix skin
- Adjust face shape
- Match artistic styles
You can build a full social or e‑commerce visual pipeline around it.
Advanced tricks: pro ways to stretch photos for social, e‑com, and YouTube
If you already know basic stretching, here are a few tricks that give you a “ok I actually learned something” feeling.
1. Turn a cramped product shot into a clean white background hero image
You have a product photo shot too tight. No white space. Amazon, Shopify, or your own store wants a clean layout.
Here is a simple play:
- Upload your image to Pixelfox AI Image Extender
- Extend the canvas on all sides
- Choose options or prompt that favor simple, clean background (if available), or start from an image with mostly white
- Download
- If you see small skin or detail issues on models, fix them with AI Photo Retoucher
Now your product sits in a more spacious frame. You can add price tags, badges, and copy without covering the object.
2. Build a YouTube thumbnail from a vertical selfie
This is a common mess:
- You shoot a vertical selfie
- You need a 16:9 YouTube thumbnail
- You refuse to crop half your face off
Here is a path:
- Take the original selfie
- Run it through Pixelfox AI Image Extender and stretch the picture horizontally
- Let AI add more background on both sides
- Drop the new wide image into Canva or any design tool
- Add text and branding without blocking your face
This keeps your central subject intact and uses AI to fill the boring parts.
3. Logos and transparent graphics: stretch without destroying shape
If you stretch a logo the wrong way, you hurt the brand. No one wants an egg‑shaped circle.
So you:
- Keep the logo itself at its original aspect ratio
- Expand the canvas around it, not the logo layer
- Use AI to fill background, or use a solid color / pattern
You can also:
- Extend a scene with Pixelfox
- Then overlay the logo as a separate layer
- Keep the logo sharp while the scene stretches
This is safer and keeps brand consistency intact.
Real‑world case studies (simplified but very real)
Let’s look at two simple stories. Names are made up, problems are not.
Case 1 – E‑commerce seller fixing mismatched platform sizes
Emma sells handmade jewelry.
Her problems:
- Photos shot in 3:2
- Etsy wants one layout
- Instagram wants another
- Paid ads need yet another
- Cropping kept cutting off parts of earrings and props
She tried manual crop + resize in a free editor. The images looked tight and messy.
So she:
- Put her original photos into Pixelfox AI Image Extender
- Created extra space on the top and sides
- Let AI generate more soft background and table surface
- Exported different versions for Etsy, Instagram, and ads
Result:
- Nothing important got cut off
- Every platform got the right aspect ratio
- Her product grid looked like a real brand, not a collage of random screenshots
According to research from firms like Nielsen Norman Group, consistent and clear visuals help users trust a site more quickly. Emma basically hacked that with better stretched images.
Case 2 – Content creator repurposing one photo 5 ways
Jason is a YouTuber and short‑form creator.
He had one good photo from a shoot and wanted to:
- Use it as a YouTube thumbnail
- Use it on TikTok profile
- Turn it into a banner
- Turn it into a newsletter header
He could have asked for a reshoot. He used AI instead.
He:
- Sent his base image into Pixelfox AI
- Stretched vertically for TikTok and vertically with extra space
- Stretched horizontally for YouTube and newsletter
- Used AI Face Reshape tool for tiny adjustments so his expression looked nice in each crop
- Used AI Style Transfer to give one version a more cinematic look
Now one original shot turned into many platform‑ready versions, each built on the same consistent face and outfit.
This is the kind of visual reuse that serious creators need in 2025.
Common mistakes when you stretch the picture (and how to avoid them)
You are not alone if you did some of these. People do them every day.
Mistake 1 – Stretching the whole image instead of extending the canvas
You unlock the aspect ratio. You drag the side. You think you “made it wider”.
You did not. You just squashed the content.
Fix:
Keep the image itself intact. Change the canvas size or use AI outpainting to add new areas. Let the subject stay the same.
Mistake 2 – Trying to stretch a tiny low‑res image to a poster
If the file is 600px wide, it will not become a clean 4000px wide print by stretching.
Fix:
Use higher-resolution files. If you must use a small one, use AI upscaling or accept smaller output size.
Mistake 3 – Ignoring faces and skin
Faces are very sensitive to distortion. Even a tiny stretch can make them look odd.
You will feel it even if you can’t say why.
Fix:
Use tools that protect or repair faces:
- Stretch the picture with AI that understands faces
- Then run the result through an AI Photo Retoucher to clean up skin and make it look natural again
- If stretch changed jawlines or eye size in a weird way, adjust lightly with AI Face Slimming or face reshape features
Mistake 4 – Text and logos get warped
Stretching a design that already contains text turns letters into weird shapes.
Fix:
Do these as separate layers:
- Use AI to extend or stretch the background photo
- Add text and logos later in a design tool
- Keep all type layers at 100% ratio
Mistake 5 – Over‑relying on free tools with watermarks and limits
Free is fine. But if the tool prints a giant watermark or crushes quality, your brand looks cheap.
Fix:
Use a tool that has a free tier for testing, then upgrade when you need volume.
Pixelfox offers an AI Image Extender Free option so you can test stretches before you decide to go bigger.
Professional advice: best practices for stretching images in 2025
Let me group the good habits.
- Work from the best source file you have
- Extend canvas + outpaint, do not just scale
- Protect faces, logos, and text
- Match aspect ratios to platform rules instead of forcing one size everywhere
- Batch process when you run a store or handle many posts
If you ask how to stretch a photo the “professional” way, it is less about one magic button. It is more about using the right tool for each part:
- AI to extend
- Retouch tools to polish
- Layout tools to add branding and text
In practice, Pixelfox covers most of this chain for single creators and small teams.
FAQ: stretch the picture without losing quality
How can I stretch the picture without losing quality?
Use tools that add content instead of only scaling old pixels. An AI‑based extender like Pixelfox analyzes the scene and generates new background. You keep the original subject sharp and avoid heavy distortion.
Why does my image look blurry after I stretch it?
Because you increased the size but not the detail. You spread the same pixels over a larger area. To fix this, start from a higher resolution image or pair stretching with AI upscaling and smart outpainting.
Can I stretch a photo on my phone and still get good results?
Yes, for small changes and social media posts. Use crop and aspect ratio tools for simple layouts. For more advanced needs, send the photo from your phone to a browser‑based AI like Pixelfox, stretch there, then download it back to your phone.
How is AI stretching different from basic resize tools?
Basic tools only change width and height. They pull and push existing pixels. AI tools understand content and generate new parts to fill the extra space. This makes the final image look like it was shot that way.
What is the difference between “stretch image” and “resize image”?
“Resize image” usually means scaling the whole image up or down while keeping the aspect ratio. “Stretch image” often means changing one dimension more than the other or adding more background. Stretching can distort things if the tool is primitive.
One last push: stop fighting your images, let AI stretch the picture for you
You do not need to keep wrestling with warped selfies, chopped product photos, or ugly banner crops.
Modern AI tools finally make it easy to stretch the picture in a way that:
- Keeps your subject natural
- Feels clean and professional
- Fits every platform you care about
If you want a simple path:
- Use Pixelfox AI Image Extender to extend and uncrop
- Clean face and skin with AI Photo Retoucher if needed
- Adjust face shape subtly with AI Face Reshape tool for portraits
- Apply AI Style Transfer if you want a more artistic look
You get a workflow that feels modern, fast, and actually fun.
So next time you need to stretch the picture for a store, a thumbnail, or a post, skip the guesswork and let Pixelfox AI handle the heavy lifting ( ̄▽ ̄)ノ🖼️