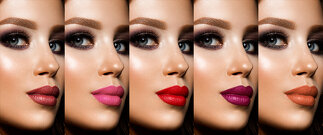
\u003C/p>\n\u003Ch2 id=\"TgLAMc\">What a video sharpener actually does\u003C/h2>\n\u003Cp>A “video sharpener” enhances local contrast along edges. It makes lines look crisp and small textures pop. Classic methods use unsharp mask or high‑pass filters. These work by boosting differences near edges. They can make a flat shot look clear.\u003C/p>\n\u003Cp>Modern AI sharpeners go further. They use super‑resolution and deblurring models to predict missing detail and fix soft focus. They also look across time so frames stay stable. This means less flicker and fewer “shimmering” edges.\u003C/p>\n\u003Cp>Here is a simple way to think about it:\u003C/p>\n\u003Cul>\n\u003Cli>Edge enhancement: boosts contrast around edges. Good for mild softness.\u003C/li>\n\u003Cli>Deblurring: reduces lens blur or motion blur. Works best when blur is small to moderate.\u003C/li>\n\u003Cli>Super‑resolution: adds pixels and fills detail when you upscale.\u003C/li>\n\u003Cli>Temporal consistency: keeps sharpness steady across frames to avoid flicker.\u003C/li>\n\u003C/ul>\n\u003Ch2 id=\"GynYes\">When sharpening helps and when it cannot\u003C/h2>\n\u003Cp>Sharpening helps when:\u003C/p>\n\u003Cul>\n\u003Cli>Footage is slightly out of focus.\u003C/li>\n\u003Cli>The lens is soft wide open.\u003C/li>\n\u003Cli>Compression smoothed fine detail.\u003C/li>\n\u003Cli>Resolution is low but the subject is still visible.\u003C/li>\n\u003C/ul>\n\u003Cp>Sharpening will not fix:\u003C/p>\n\u003Cul>\n\u003Cli>Severe out‑of‑focus faces where eyes are a smear.\u003C/li>\n\u003Cli>Strong motion blur from a long shutter.\u003C/li>\n\u003Cli>Heavy macroblock artifacts where the picture broke apart.\u003C/li>\n\u003Cli>Extremely noisy low‑light clips where there is no signal left.\u003C/li>\n\u003C/ul>\n\u003Cp>A useful rule is this: sharpen video only as much as needed. Stop when edges look clean. If you see halos, stair‑steps, or flicker, you went too far.\u003C/p>\n\u003Ch2 id=\"8odVhJ\">How to sharpen video: a step‑by‑step workflow\u003C/h2>\n\u003Cp>You can follow a simple flow for most projects.\u003C/p>\n\u003Cp>1) Diagnose the problem\u003C/p>\n\u003Cul>\n\u003Cli>Play the clip at 100%. \u003C/li>\n\u003Cli>Pause on faces, text, and high‑contrast lines. \u003C/li>\n\u003Cli>Decide if the issue is focus blur, motion blur, compression, or low resolution.\u003C/li>\n\u003C/ul>\n\u003Cp>2) Prep the clip\u003C/p>\n\u003Cul>\n\u003Cli>Remove noise first if grain is heavy. \u003C/li>\n\u003Cli>Balance exposure and white balance so sharpness is not fighting poor lighting. \u003C/li>\n\u003Cli>Crop out edges with big motion if they distract.\u003C/li>\n\u003C/ul>\n\u003Cp>3) Apply sharpening\u003C/p>\n\u003Cul>\n\u003Cli>Start with a modest “amount” and small “radius.” \u003C/li>\n\u003Cli>Increase in small steps. \u003C/li>\n\u003Cli>Watch for halos around edges and ringing. \u003C/li>\n\u003Cli>Keep faces natural. Do not over‑sharpen skin pores.\u003C/li>\n\u003C/ul>\n\u003Cp>4) Add detail with upscaling if needed\u003C/p>\n\u003Cul>\n\u003Cli>If the video is 240p, 360p, or 480p, upscale before final export. \u003C/li>\n\u003Cli>Use AI upscaling when possible so added pixels carry detail, not just bigger blur.\u003C/li>\n\u003C/ul>\n\u003Cp>5) Export smart\u003C/p>\n\u003Cul>\n\u003Cli>Choose a high bitrate and a quality codec (H.264 High, H.265, or ProRes). \u003C/li>\n\u003Cli>Avoid over‑compression. \u003C/li>\n\u003Cli>Keep the frame rate consistent.\u003C/li>\n\u003C/ul>\n\u003Cp>Pro tip: run a denoiser before sharpening. You will need less amount, and the result will look cleaner.\u003C/p>\n\u003Ch2 id=\"hjHQPo\">AI video sharpener vs manual filters\u003C/h2>\n\u003Cp>Manual sharpeners give control. You can tune amount and radius for each shot. They are great when you know exactly what you want.\u003C/p>\n\u003Cp>AI sharpeners save time. They detect faces, estimate blur, and adjust per frame. Good AI pipelines also fix noise, add detail, and keep motion smooth.\u003C/p>\n\u003Cp>In 2025, most editors blend both. They use AI for fast base enhancement, then fine‑tune with a gentle manual pass on problem areas like eyes or brand text.\u003C/p>\n\u003Ch2 id=\"wo98Gb\">Key features to look for in a video sharpener\u003C/h2>\n\u003Cul>\n\u003Cli>Edge‑aware sharpening: protects flat areas and avoids halos on high‑contrast lines. \u003C/li>\n\u003Cli>Face refinement: restores eyes, lashes, and edges around lips without making skin harsh. \u003C/li>\n\u003Cli>Temporal consistency: reduces flicker so sharpness does not pump frame to frame. \u003C/li>\n\u003Cli>Super‑resolution: upscales to HD, 4K, or higher with real detail. \u003C/li>\n\u003Cli>Noise‑aware processing: sharpens signal but not grain. \u003C/li>\n\u003Cli>Motion handling: respects moving objects and avoids double edges. \u003C/li>\n\u003Cli>Batch processing: speeds up large jobs. \u003C/li>\n\u003Cli>Export control: supports 10‑bit, high bitrate, and modern codecs.\u003C/li>\n\u003C/ul>\n\u003Ch2 id=\"vFt71H\">How to judge quality: simple and trusted checks\u003C/h2>\n\u003Cp>You can use both your eyes and metrics. This mix gives better confidence.\u003C/p>\n\u003Cul>\n\u003Cli>Side‑by‑side preview: open the original and the sharpened clip together. Check edges, skin, and text. \u003C/li>\n\u003Cli>Stop on faces: eyes should look crisp but natural. Whites should be clean, not clipped. \u003C/li>\n\u003Cli>Look for halos: bright lines on one side of an edge show over‑sharpening. \u003C/li>\n\u003Cli>Watch for flicker: play at normal speed. If sharpness pumps, you need temporal smoothing.\u003C/li>\n\u003C/ul>\n\u003Cp>Metrics:\u003C/p>\n\u003Cul>\n\u003Cli>VMAF is a well‑known quality metric from Netflix that aligns well with human perception. You can read about it on the Netflix TechBlog (search “Netflix VMAF”). \u003C/li>\n\u003Cli>SSIM and PSNR are common too, though they can miss some temporal issues.\u003C/li>\n\u003C/ul>\n\u003Ch2 id=\"fEVbI1\">A practical “sharpen video” recipe for common cases\u003C/h2>\n\u003Cp>Low‑light phone footage\u003C/p>\n\u003Cul>\n\u003Cli>Denoise lightly first. \u003C/li>\n\u003Cli>Raise exposure and contrast a bit. \u003C/li>\n\u003Cli>Apply edge‑aware sharpening at a modest amount. \u003C/li>\n\u003Cli>If resolution is low, upscale 2x. \u003C/li>\n\u003Cli>Export at a higher bitrate to protect new detail.\u003C/li>\n\u003C/ul>\n\u003Cp>Slightly soft interviews\u003C/p>\n\u003Cul>\n\u003Cli>Mask the face area if needed. \u003C/li>\n\u003Cli>Apply a gentle unsharp mask with a small radius. \u003C/li>\n\u003Cli>Add a touch of micro‑contrast for texture. \u003C/li>\n\u003Cli>Keep skin natural. \u003C/li>\n\u003Cli>Leave the background softer to maintain depth.\u003C/li>\n\u003C/ul>\n\u003Cp>Archival or old family videos\u003C/p>\n\u003Cul>\n\u003Cli>Deinterlace if needed. \u003C/li>\n\u003Cli>Denoise first to remove tape grain. \u003C/li>\n\u003Cli>Upscale to HD or 4K with AI. \u003C/li>\n\u003Cli>Apply small sharpening to faces and text. \u003C/li>\n\u003Cli>Add mild color correction for faded hues.\u003C/li>\n\u003C/ul>\n\u003Cp>Social clips for TikTok, Reels, or Shorts\u003C/p>\n\u003Cul>\n\u003Cli>Resize to fit the platform. \u003C/li>\n\u003Cli>Sharpen edges so text overlays pop. \u003C/li>\n\u003Cli>Keep motion smooth; consider frame interpolation if your video stutters. \u003C/li>\n\u003Cli>Export at the platform’s top bitrate settings.\u003C/li>\n\u003C/ul>\n\u003Ch2 id=\"3eNHvx\">The role of denoising, upscaling, and frame interpolation\u003C/h2>\n\u003Cp>Sharpening is only one part of the stack. You get the best results when you also:\u003C/p>\n\u003Cul>\n\u003Cli>Remove noise that hides detail. \u003C/li>\n\u003Cli>Increase resolution so small edges can exist. \u003C/li>\n\u003Cli>Smooth motion so subtle details are visible and not blurred by judder.\u003C/li>\n\u003C/ul>\n\u003Cp>These steps work together. Denoise first, then upscale, then sharpen, and finally balance color. This order reduces artifacts and protects fine detail.\u003C/p>\n\u003Cp>\u003Cimg loading=\"lazy\" src=\"https://api.pixelfox.ai/template/image-upscaler/feat_1.webp\" alt=\"AI Video Upscaler example\" />\u003C/p>\n\u003Ch2 id=\"hofROV\">Why bitrate and codec matter after you sharpen video\u003C/h2>\n\u003Cp>When you sharpen video, you create new high‑frequency detail. Low bitrates will crush that detail. So:\u003C/p>\n\u003Cul>\n\u003Cli>Use H.264 High or H.265/HEVC with a generous bitrate. \u003C/li>\n\u003Cli>For masters, consider ProRes or DNxHR. \u003C/li>\n\u003Cli>Keep 10‑bit if your source supports it. \u003C/li>\n\u003Cli>Avoid double compression. Work from the best source you have.\u003C/li>\n\u003C/ul>\n\u003Ch2 id=\"LMsjR1\">Expert settings that prevent artifacts\u003C/h2>\n\u003Cul>\n\u003Cli>Use a small radius for skin. Large radius sharpens halos. \u003C/li>\n\u003Cli>Limit sharpening in flat skies and gradients. It prevents banding. \u003C/li>\n\u003Cli>Add a tiny amount of film grain or dithering if gradients show steps. \u003C/li>\n\u003Cli>Keep local contrast under control. Too much makes faces look plastic. \u003C/li>\n\u003Cli>Do not sharpen noise. If you see grain getting crunchy, step back and denoise more.\u003C/li>\n\u003C/ul>\n\u003Ch2 id=\"jTmrhp\">Field capture choices that reduce the need to sharpen\u003C/h2>\n\u003Cul>\n\u003Cli>Focus on the eyes for people. \u003C/li>\n\u003Cli>Use faster shutter speeds for action. \u003C/li>\n\u003Cli>Stop down a little for more depth of field if your subject moves. \u003C/li>\n\u003Cli>Light the scene so ISO stays lower. \u003C/li>\n\u003Cli>Use a tripod or stabilization to reduce motion blur.\u003C/li>\n\u003C/ul>\n\u003Ch2 id=\"Fk0PTx\">An AI‑powered way to sharpen video fast\u003C/h2>\n\u003Cp>If you want a simple and reliable path, an AI pipeline can sharpen video, upscale, and denoise in one run. It also keeps frames consistent. That means fewer artifacts and less time tuning sliders.\u003C/p>\n\u003Cul>\n\u003Cli>You upload your clip. \u003C/li>\n\u003Cli>The AI finds edges and faces. \u003C/li>\n\u003Cli>It removes noise, restores detail, and upscales if you choose. \u003C/li>\n\u003Cli>It keeps motion steady across frames. \u003C/li>\n\u003Cli>You preview and export in HD or 4K.\u003C/li>\n\u003C/ul>\n\u003Cp>You can try an integrated tool like the PixelFox \u003Ca href=\"https://pixelfox.ai/video/enhancer\">AI Video Enhancer\u003C/a>. It boosts clarity, fixes low‑light shots, and enhances colors in one pass. This type of tool is useful for social videos, client reels, and old home movies. It also helps when you have many short clips and not much time.\u003C/p>\n\u003Ch2 id=\"lEZJGm\">When you should add upscaling and denoising\u003C/h2>\n\u003Cul>\n\u003Cli>Add upscaling when the source is SD or 480p and the target is HD or 4K. This unlocks detail for the sharpener to enhance. The PixelFox \u003Ca href=\"https://pixelfox.ai/video/upscaler\">AI Video Upscaler\u003C/a> can turn SD clips into HD or 4K while preserving faces and lines. \u003C/li>\n\u003Cli>Add denoising when grain hides edges or compression left blocks and mosquito noise. The PixelFox \u003Ca href=\"https://pixelfox.ai/video/denoiser\">AI Video Denoiser\u003C/a> helps remove grain so your sharpen pass can stay gentle and clean.\u003C/li>\n\u003C/ul>\n\u003Cp>\u003Cimg loading=\"lazy\" src=\"https://api.pixelfox.ai/template/video/denoise/feature-4.webp\" alt=\"AI Video Denoiser example\" />\u003C/p>\n\u003Ch2 id=\"AeCZwu\">How to keep results trustworthy and natural\u003C/h2>\n\u003Cp>Sharpening should respect the scene. Here are simple checks:\u003C/p>\n\u003Cul>\n\u003Cli>Compare before/after with a clean wipe. If it looks like a filter instead of the same scene, reduce the amount. \u003C/li>\n\u003Cli>Zoom in on hair, eyelashes, and text. They should look clear yet not brittle. \u003C/li>\n\u003Cli>Watch the full clip. Make sure edges stay stable and do not flicker. \u003C/li>\n\u003Cli>Ask someone else to view it. Fresh eyes catch halos and noise.\u003C/li>\n\u003C/ul>\n\u003Ch2 id=\"xHXJz7\">Authoritative guidance you can trust\u003C/h2>\n\u003Cul>\n\u003Cli>Netflix engineers developed VMAF to match human judgment of video quality. You can read their public work on the Netflix TechBlog (search “Netflix VMAF”). \u003C/li>\n\u003Cli>The open research community has shown strong gains in super‑resolution and deblurring (for example, ESRGAN for super‑resolution). These models inspire many consumer tools today. \u003C/li>\n\u003Cli>Adobe and Blackmagic have long documented best practices for sharpening in their help guides and product manuals, which advise gentle amounts and careful masking around faces.\u003C/li>\n\u003C/ul>\n\u003Ch2 id=\"zUTRAt\">Common mistakes that make sharpened video look worse\u003C/h2>\n\u003Cul>\n\u003Cli>Over‑sharpening flat surfaces. This creates banding and noise. \u003C/li>\n\u003Cli>Sharpening after aggressive compression. The encoder already smoothed edges. Start from a better master. \u003C/li>\n\u003Cli>Using the same settings for every clip. Scenes vary, so your amount should vary too. \u003C/li>\n\u003Cli>Leaving noise in place. Grain fights sharpness and causes “crunch.” \u003C/li>\n\u003Cli>Forgetting bitrate at export. High‑frequency detail needs bits.\u003C/li>\n\u003C/ul>\n\u003Ch2 id=\"0um4FI\">A quick “sharpen video” checklist\u003C/h2>\n\u003Cul>\n\u003Cli>Diagnose the root issue (soft lens, motion blur, low res, noise). \u003C/li>\n\u003Cli>Denoise first if needed. \u003C/li>\n\u003Cli>Sharpen with a small radius and modest amount. \u003C/li>\n\u003Cli>Avoid halos and flicker. \u003C/li>\n\u003Cli>Upscale if you deliver in HD or 4K. \u003C/li>\n\u003Cli>Export with a quality codec and high enough bitrate. \u003C/li>\n\u003Cli>Validate with side‑by‑side and a short VMAF run if you can.\u003C/li>\n\u003C/ul>\n\u003Ch2 id=\"opnCZT\">FAQ: fast answers to common sharpening questions\u003C/h2>\n\u003Cul>\n\u003Cli>\n\u003Cp>Can a video sharpener fix strong motion blur?\u003Cbr />\nNot fully. It can improve perceived detail, but heavy blur from long shutter times will remain.\u003C/p>\n\u003C/li>\n\u003Cli>\n\u003Cp>Can AI sharpen a badly out‑of‑focus face?\u003Cbr />\nIt can help if the eyes are still visible. If the face is a smear, recovery will be limited.\u003C/p>\n\u003C/li>\n\u003Cli>\n\u003Cp>Should I sharpen before or after upscaling?\u003Cbr />\nUpscale first with AI, then apply a light sharpen if needed. This protects edges and reduces halos.\u003C/p>\n\u003C/li>\n\u003Cli>\n\u003Cp>What export settings should I use after I sharpen video?\u003Cbr />\nUse H.264 High or H.265 with a high bitrate. For masters, use ProRes or DNxHR. Keep 10‑bit if you graded in HDR or log.\u003C/p>\n\u003C/li>\n\u003Cli>\n\u003Cp>How do I avoid halos?\u003Cbr />\nUse a smaller radius, reduce the amount, and consider edge‑aware modes. Mask faces with softer settings.\u003C/p>\n\u003C/li>\n\u003Cli>\n\u003Cp>How do I check if I went too far?\u003Cbr />\nLook for bright halos along high‑contrast edges, brittle skin texture, and flicker across frames. If you see them, dial it back.\u003C/p>\n\u003C/li>\n\u003C/ul>\n\u003Ch2 id=\"PD0c95\">Simple case studies: what works in real life\u003C/h2>\n\u003Cul>\n\u003Cli>\n\u003Cp>Creator reels from 720p to 4K\nA creator has 720p dance clips and wants a 4K reel. They run AI upscaling 2x to 1440p, then a gentle sharpen, then export 4K with a high bitrate. Result: crisp edges and smooth motion without halos.\u003C/p>\n\u003C/li>\n\u003Cli>\n\u003Cp>Old family VHS to HD\nAn old tape shows noise and interlacing. They deinterlace, denoise, upscale to HD, then sharpen in small steps. They fix color cast and export with a good bitrate. Faces look clear and natural.\u003C/p>\n\u003C/li>\n\u003Cli>\n\u003Cp>Low‑light phone vlog\nThe clip has noise and soft edges. They denoise lightly, raise exposure, add small sharpening, and upscale to 1080p. They export at a high bitrate to protect detail. The vlog looks cleaner and brighter.\u003C/p>\n\u003C/li>\n\u003C/ul>\n\u003Ch2 id=\"sOSgt4\">Why this matters for brand and audience trust\u003C/h2>\n\u003Cp>Sharp, clean video lifts first impressions. It also improves watch time and helps algorithms that value engagement. More important, it respects your story. It lets viewers see faces, gestures, and product features clearly. That builds trust.\u003C/p>\n\u003Cp>If you publish on social platforms, a small boost in clarity can move the needle. You do not need a big budget. You only need a sound workflow and a toolset that you trust.\u003C/p>\n\u003Ch2 id=\"3vo12F\">How to pick a video sharpener in 2025\u003C/h2>\n\u003Cul>\n\u003Cli>Look for AI that understands faces and motion. \u003C/li>\n\u003Cli>Check that it supports denoising and upscaling in the same run. \u003C/li>\n\u003Cli>Make sure it offers preview and side‑by‑side. \u003C/li>\n\u003Cli>Confirm it exports at HD, 4K, or higher with good codec support. \u003C/li>\n\u003Cli>Test it on one clip. Check for halos, flicker, and skin texture.\u003C/li>\n\u003C/ul>\n\u003Cp>You can start with an end‑to‑end option like the PixelFox \u003Ca href=\"https://pixelfox.ai/video/enhancer\">AI Video Enhancer\u003C/a>. If you need higher resolution from SD or 480p, add the PixelFox \u003Ca href=\"https://pixelfox.ai/video/upscaler\">AI Video Upscaler\u003C/a>. And if your footage is noisy, clear it first with the PixelFox \u003Ca href=\"https://pixelfox.ai/video/denoiser\">AI Video Denoiser\u003C/a>. This stack gives you a clean, natural look with less manual work.\u003C/p>\n\u003Ch2 id=\"nhRSLk\">Conclusion: a video sharpener is a tool, not a magic wand\u003C/h2>\n\u003Cp>A video sharpener can lift clarity, restore edges, and improve the look of your story. It works best when you diagnose the root problem, denoise first, upscale if needed, and apply gentle sharpening with care for faces and motion. Use simple checks and trusted metrics to confirm what you see. If you want speed and consistency, try an AI pipeline to sharpen video in one pass.\u003C/p>\n\u003Cp>Start with one clip. Keep changes small. Watch the result at 100%. Then publish with confidence. If you need an easy way to get there today, test an AI‑powered video sharpener and see how much cleaner your footage looks.\u003C/p>","best-video-sharpener-how-to-sharpen-video-with-ai-in-2025",51,1755619798,1755619771,["Reactive",144],{"$si18n:cached-locale-configs":145,"$si18n:resolved-locale":15},{"en":146,"zh":149,"tw":151,"vi":153,"id":155,"pt":157,"es":159,"fr":161,"de":163,"it":165,"nl":167,"th":169,"tr":171,"ru":173,"ko":175,"ja":177,"ar":179,"pl":181},{"fallbacks":147,"cacheable":148},[],true,{"fallbacks":150,"cacheable":148},[],{"fallbacks":152,"cacheable":148},[],{"fallbacks":154,"cacheable":148},[],{"fallbacks":156,"cacheable":148},[],{"fallbacks":158,"cacheable":148},[],{"fallbacks":160,"cacheable":148},[],{"fallbacks":162,"cacheable":148},[],{"fallbacks":164,"cacheable":148},[],{"fallbacks":166,"cacheable":148},[],{"fallbacks":168,"cacheable":148},[],{"fallbacks":170,"cacheable":148},[],{"fallbacks":172,"cacheable":148},[],{"fallbacks":174,"cacheable":148},[],{"fallbacks":176,"cacheable":148},[],{"fallbacks":178,"cacheable":148},[],{"fallbacks":180,"cacheable":148},[],{"fallbacks":182,"cacheable":148},[],["Set"],["ShallowReactive",185],{"$fszgvXyguFESYFhbTTAjMrM9bcgUzvAB0Fb48HzxoEwc":-1},"/blog/lips-editor-free-lip-enhancement-app-amp-lipstick-editor-to-add-lipstick-to-photo",{"userStore":188},{"showLoginModal":189,"showLoginClose":148,"loading":190,"inviteCode":15,"bidIdentification":15,"token":15,"userInfo":192,"showPriceDialog":189,"paidBefore":50},false,{"show":189,"message":191},"加载中...",{"avatar":193,"nickname":193,"email":193},null]