 Credit

When you need to clean up a photo fast, an object remover is the tool you reach for. It helps you remove unwanted object elements like people, wires, logos, or clutter in seconds. With today’s AI object remover technology, you get clean edits that look natural. They blend with the background. And they save you hours of manual work. In this guide, I explain how it works, when to use it, what quality to expect, and how to get pro‑level results with simple steps. I also share workflow tips, common mistakes, and trusted sources you can read if you want to go deeper.
What is an object remover and how does an AI object remover work
An object remover is a tool that erases parts of an image and then fills the gap. A good AI object remover does two jobs at once. First, it selects the area you want to delete. Then, it predicts what was behind it and paints it back in. This process is called inpainting. It uses machine learning to guess textures, edges, and light.
- The selection step can use a brush, a lasso, or an automatic mask.
- The inpainting step looks at pixels around the hole. It then fills that hole with content that matches color, detail, and depth.
- A modern AI removal tool often blends results to avoid seams, noise, or blur.
Researchers have studied inpainting for decades. Early methods copied nearby pixels into the hole. New methods use deep learning and diffusion to predict complex scenes. If you want to see the science, you can read:
- LaMa: Resolution-robust Large Mask Inpainting with Fourier Convolutions (arXiv, 2021): https://arxiv.org/abs/2109.07161
- Adobe’s Content-Aware Fill overview (Photoshop Help): https://helpx.adobe.com/photoshop/using/content-aware-fill.html
These sources show why newer models feel “smart.” They do not just smear nearby pixels. They rebuild missing parts in a way that looks right to the eye.
When to use an object remover online
You can use an object remover online in many cases. Here are the most common ones.
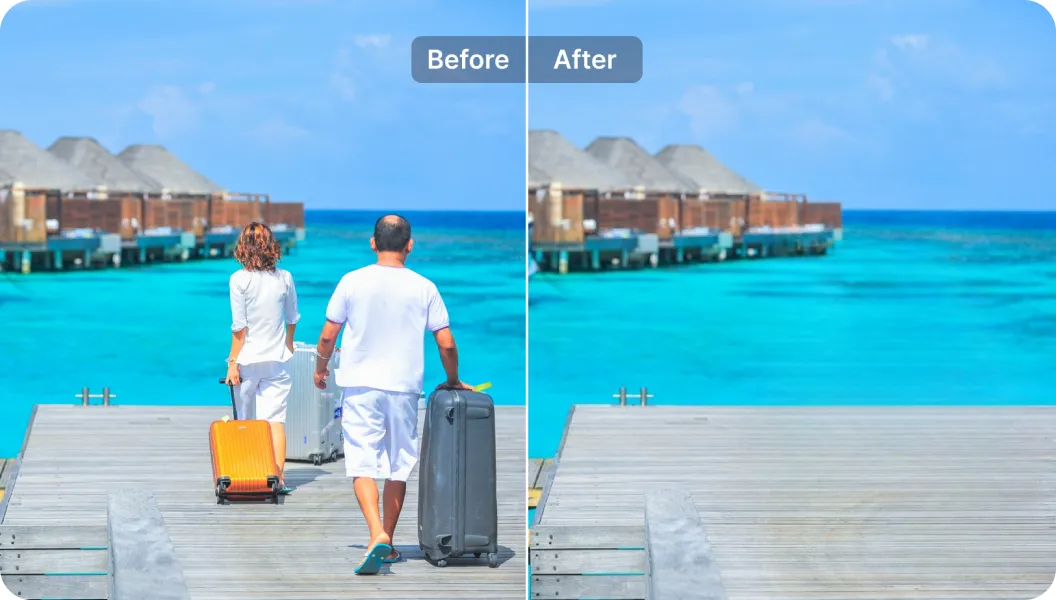
- Travel and street photos. Remove strangers, traffic signs, wires, trash bins, or reflections. Keep the city clean and the subject clear.
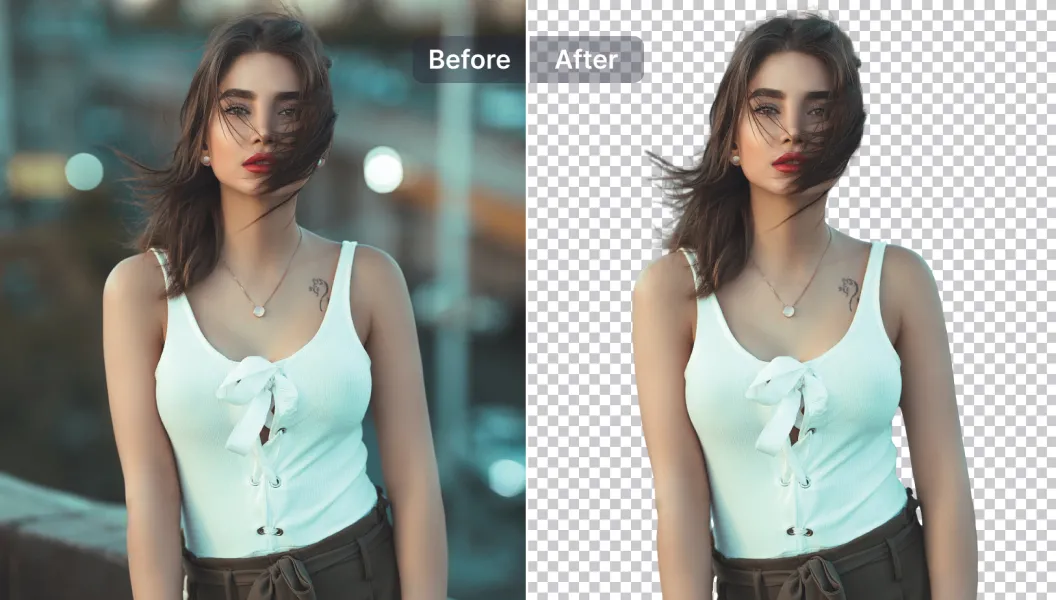
- Portraits and lifestyle. Erase things like bags on the floor, exit signs, or photobombers. Fix small background issues without a reshoot.
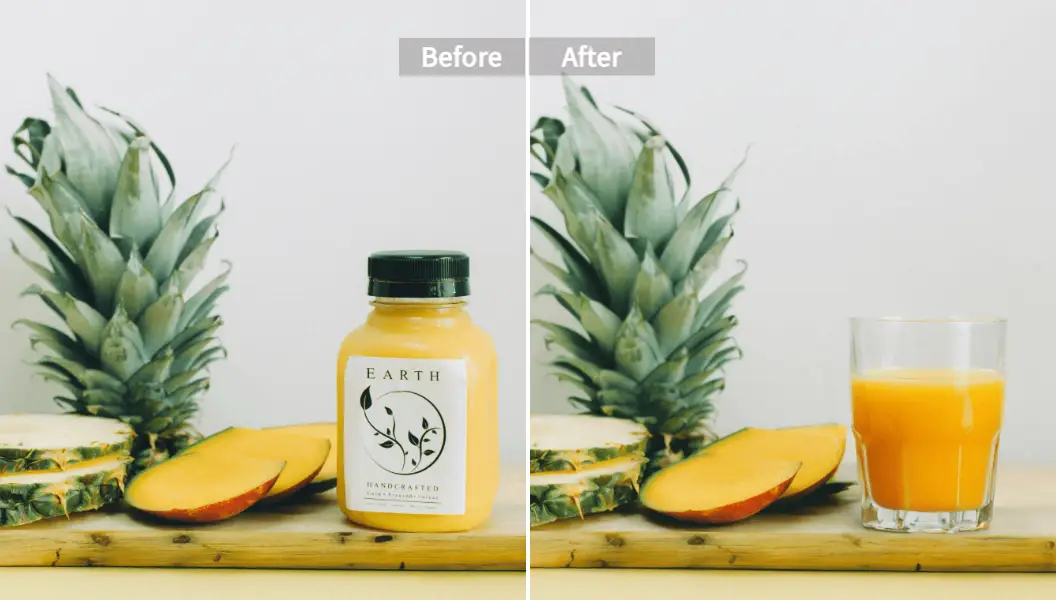
- E‑commerce and product shots. Clean stickers, price tags, dust, and light stands. Show only the product. Keep the frame tidy.
- Real estate and interiors. Remove cords, tools, or seasonal clutter. Make rooms look neutral and open.
- Social media. Tighten your composition. Take out small distractions to boost focus and reach.
- Old photo fixes. Repair scratches, stains, and creases. Fill lost detail without harming the tone.
In all of these, the goal is the same. Remove distractions. Keep context. Protect the story.
Key benefits of using an AI removal tool
An AI removal tool does more than erase things. It speeds up the full editing workflow.
- Fast. Edits take seconds, not hours.
- Natural look. Good tools match texture and light well.
- Simple. You do not need advanced skills to get great results.
- Scalable. You can process many images when the tool supports batch operations.
- Consistent. Uniform results help your brand look the same across channels.
This is why teams in design, marketing, and content use AI object remover tools every day.
Step‑by‑step: remove unwanted object with Pixelfox AI removal tool
The basic flow is simple. You follow three steps. You can do it on desktop or phone. You can do it in less than a minute.
1) Upload your image
- Click Upload Image.
- Drag and drop also works.
- Use JPG, PNG, or HEIC for best speed and quality.
2) Select the object
- Use the brush to highlight what you want to delete.
- Adjust the brush size for edges and corners.
- Cover a bit more than the object if it casts a shadow.
3) Erase and refine
- Click Erase.
- Wait a moment while the AI fills the gap.
- If needed, run a second pass on small parts or edges.
4) Download
- Save the cleaned image.
- Keep editing if you want to crop, enhance, or replace the background.
If you prefer an end‑to‑end editor, try an object remover online. It gives you a simple workspace with the brush, the erase button, and a fast preview. It also works in a browser, so there is no heavy software to install.
Free vs paid: what “object remover free” really means
You will see “object remover free” across the web. Free tools are great for quick work. But they may have limits.
- Export size can be small. Some tools cap at 720p or similar.
- Queue speed can slow down at peak times.
- Advanced controls may be locked.
- Some free tiers add a watermark.
A paid plan often adds the following:
- Full‑resolution export for print and pro use.
- Batch processing for large sets.
- Priority rendering and faster queues.
- More brushes, masks, and history.
- Better privacy and support for teams.
Pick based on your work. If you share on social only, a free plan may be enough. If you sell products, shoot real estate, or print large, a pro plan is worth it.
How to get clean, pro‑level results when you erase things
Small changes in your process can boost quality a lot. Use this simple checklist.
- Start with a good source. Higher resolution gives the AI more context to rebuild fine detail.
- Zoom in on edges. Cover the full object and a thin border around it. This helps remove shadows and glows.
- Work in passes. Remove big items first. Then clean small spots and patterns.
- Match texture flow. If a background has lines or grain, remove in smaller strokes that follow that flow.
- Avoid extreme crops after removal. Let the inpaint area breathe inside the frame.
- Watch reflective surfaces. Mirrors, glass, and water need a bit more care. Use smaller strokes.
- Do a quick color check. A small contrast or white balance tweak can hide minor seams.
This simple method makes results look natural. It helps the model predict the missing parts more accurately.
How to choose the right object remover online
You have many options. So look for these traits:
- Quality of fill. The result should match texture, light, and color.
- Speed. Edits should return in seconds.
- Ease of use. The UI should be simple and stable.
- Features. Brush size, undo/redo, zoom, history, and masks are must‑haves.
- Batch processing. This is key for e‑commerce, real estate, or archives.
- Privacy. Files should be processed securely and not stored without consent.
- File support. JPG, PNG, and HEIC cover most use cases.
If a tool checks these boxes, it will save you time and improve your output.
Why Pixelfox AI stands out for object removal
Pixelfox AI focuses on fast and accurate inpainting. It uses AIGC‑powered models to reconstruct fine textures and edges. It also keeps the workflow simple. You upload, brush, erase, and download. Most edits take a few seconds.
- High‑quality inpainting. The AI handles portraits, products, interiors, and outdoor scenes well.
- Precise selection. The brush is responsive and easy to control.
- Batch support. You can process many images when you need speed and scale.
- Cross‑platform. Works on modern browsers and mobile devices.
- Privacy. Images are processed securely. Files are not kept for other uses.
- Full toolset. You can remove objects, replace content, enhance images, and change backgrounds in the same workspace.
If you want to replace parts instead of only removing them, you can switch to AI image inpainting. It lets you add or swap elements in your selection with AI, which is useful for creative edits and layout work.
Common use cases and quick settings
Below are short examples with small tips you can copy.
-
Remove strangers in a beach photo
- Use a medium brush and cover people plus a thin border.
- Run one pass for each person. Check foot shadows on sand.
-
Clean wires from a skyline
- Use a smaller brush.
- Follow the sky gradient with short strokes.
-
Erase price stickers on a product
- Cover the sticker and a bit of the surrounding label.
- Zoom in to fix text edges or curved surfaces.
-
Take out signage in a real estate shot
- Paint over the sign and include its shadow.
- Match wall texture by removing in two passes if needed.
-
Fix an old photo crack
- Use a small brush.
- Work along the crack’s path in short segments.
These simple steps help you avoid blur or repeated patterns.
Ethics, copyright, and safety
An object remover has power. Use it with care. Here are simple rules.
- Respect copyright and trademarks. Do not remove watermarks or logos from content you do not own or lack rights to use. For general guidance, the U.S. Copyright Office offers a plain‑language overview of fair use: https://www.copyright.gov/fair-use/
- Be transparent for news or documentary use. Do not remove facts from the frame that change the meaning.
- Protect privacy. Blur or remove faces when you must comply with policy or law.
- Keep an original. Save a copy of the unedited file for audit and backups.
These practices build trust with your audience and clients.
Object remover for e‑commerce and marketing workflows
Product listings demand clean, consistent visuals. An AI object remover helps you meet that standard with speed.
- Remove dust, lint, tape, price tags, and light stands.
- Keep shadows that help shape the product.
- Use the same crop ratio across the catalog.
- Combine with background removal for a full studio look.
- Run batch processing for seasonal refreshes.
For many teams, this change lifts click‑through, time on page, and conversion. As a bonus, you reduce reshoots and studio hours.
Handling hard scenes: glass, water, hair, and fine patterns
Some scenes are hard for any object remover free or paid. You can still get good results with a few tricks.
- Glass and mirrors. Remove in smaller strokes. Pay attention to reflected shapes. If needed, take two passes: object first, reflection second.
- Water and waves. Use a medium brush and follow the flow of the pattern. Avoid giant selections that cross many wave lines at once.
- Hair and fur. Zoom in. Remove background distractions in small segments near the strands.
- Fine patterns. Brick walls, tiles, or fabric can look “repeated” after fill. Reduce selection size, and do more passes to avoid visible tiling.
Small selections give the model better local context. This prevents wrong guesses and makes seams harder to spot.
Advanced edits: replace objects, expand scenes, and retouch text
Modern AI removal tools now go beyond erase. They also help you replace or expand content.
- Replace objects in place. Select the area and generate new content with inpainting. This lets you swap a label, change a color, or add a missing detail without reshooting.
- Outpaint or expand. Extend the canvas to fit a new aspect ratio while keeping the scene style.
- Remove text or logos you own. Clean your own branding layers when you update a design. For watermark cleanup of your own materials or licensed assets, try the AI Watermark Remover.
These tools turn one photo into many placements. One asset can serve web, print, ads, and thumbnails with less work.
Data and privacy: what to check before you upload
If you work with client data, privacy is not optional. Check these points.
- Secure transport (HTTPS).
- Short or no retention after processing.
- No model training on your uploads without consent.
- Clear privacy policy and a way to contact support.
- Optional team controls for shared accounts.
A professional tool should state these clearly and honor them in practice.
Quality metrics: how to measure success
Look at the final image and ask simple questions.
- Does the fill match the background in color and texture?
- Are edges clean where the object used to be?
- Is there any stretch, duplicate pattern, or smear?
- Does the light direction still make sense?
- Does the edit hold up at 100% zoom?
If the answer is yes in all cases, you have a pro‑level result. If not, try smaller selections, more passes, or a small color correction.
Troubleshooting: quick fixes for common issues
-
Visible seam after fill
- Reduce the selected area and try again.
- Apply a tiny noise or grain to unify the surface.
-
Repeated pattern looks obvious
- Remove in two or three smaller strokes.
- Slightly adjust the selection border.
-
Color band or halo
- Expand the selection 3–5 pixels beyond the object.
- Check white balance or exposure to blend tones.
-
Soft or blurry area
- Use higher‑resolution input.
- Run the erase step again on the soft region with a smaller brush.
These small tweaks fix most cases in one minute or less.
External benchmarks and research that support best practices
If you want to read more about why these tips work, these resources are helpful:
- LaMa (arXiv): Large mask inpainting with strong structure recovery. It explains why models that understand frequency and structure can rebuild large missing regions well. https://arxiv.org/abs/2109.07161
- Adobe Content-Aware Fill (Photoshop Help): A practical view of selection strategy and how to guide fills. https://helpx.adobe.com/photoshop/using/content-aware-fill.html
- U.S. Copyright Office Fair Use: Guidance on lawful use and editing in different contexts. https://www.copyright.gov/fair-use/
These sources are widely cited. They inform how modern tools are built. They also support ethical use.
FAQ: quick answers about object remover tools
-
Is an AI object remover better than a clone stamp?
- In most cases, yes. It predicts structure, not just copies pixels. It handles complex scenes more cleanly.
-
Can I use it on faces?
- You can remove small blemishes or stray hair, but do it lightly. Keep skin texture natural.
-
Does batch processing matter?
- It matters for catalogs and events. It lets you finish in hours, not days.
-
What formats should I use?
- JPG and PNG work well. HEIC is fine when supported. For print, keep a high‑resolution master.
-
Do I need a fast computer?
- Not always. Cloud tools run the heavy work on the server. A browser is enough in many cases.
Final checklist before you publish or deliver
Use this short list to avoid last‑minute issues.
- Open at 100% zoom and scan the edit area.
- Check light direction and shadows.
- Inspect edges for halos.
- Confirm export size and color profile.
- Keep an original file in your archive.
This simple check saves rework and protects quality.
Conclusion: choose an object remover that fits your work
A strong object remover gives you speed, control, and natural results. It helps you remove unwanted object elements without harming the story of the image. When you pick an AI removal tool, look for quality of fill, ease of use, privacy, and speed. Then test it on your real use cases. Start with a clean workflow. Use small, careful selections. And follow the ethics rules. If you want a fast start, try an object remover online that is built for creators and teams. Pixelfox AI keeps the steps simple and the results clean, so you can edit more and wait less. In short, the right object remover turns hard fixes into a few clicks—and it makes every photo look like it should.