 Credit

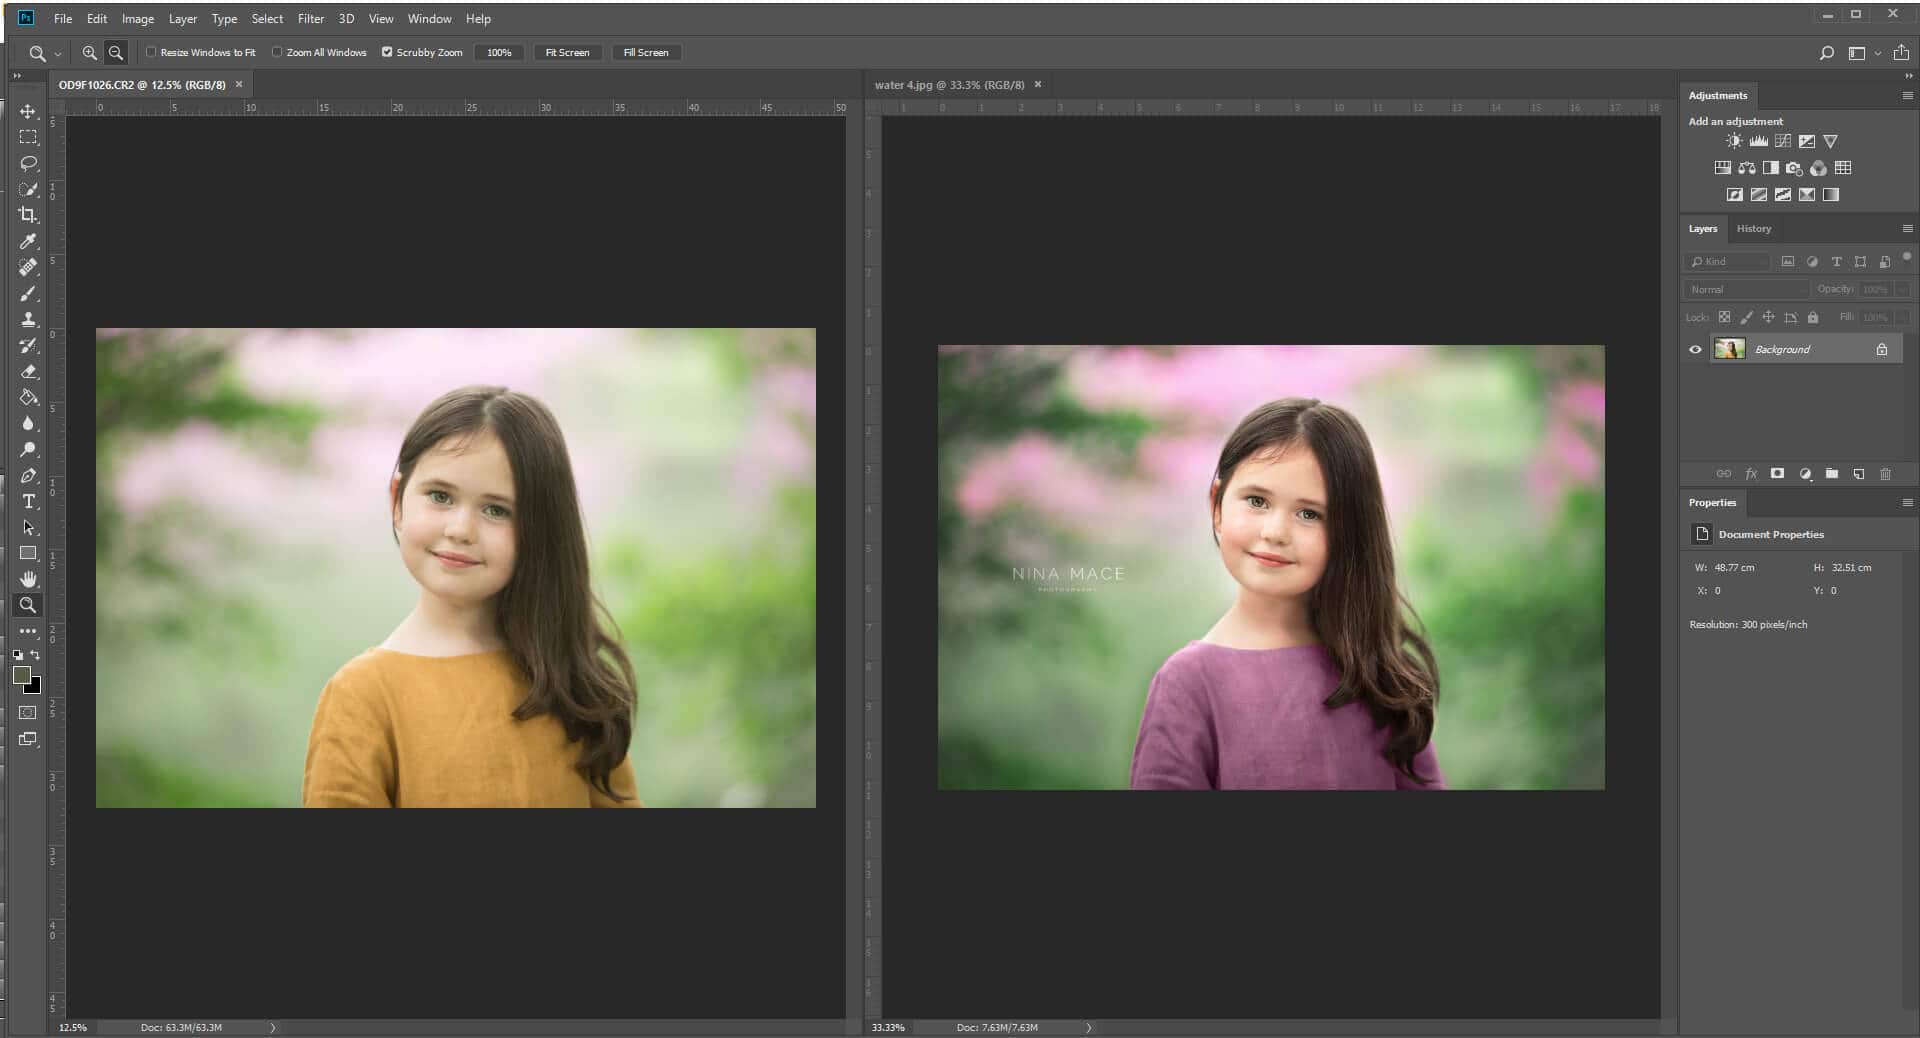
Have you taken a photo that you wish later in life that you could change the color of the shirt? Or perhaps you want to match a product color to your brand? Photoshop is the answer. Luckily for you, you do not have to be a designer to do it right.
Perhaps the easiest way to change colors in an image is the color replacement tool in Photoshop. It is quick and works great by leaving all of the texture in place while switching one color for another. Let’s learn more about the PS color replacement tool!
What Is the Color Replacement Tool in Photoshop?
The color replacement tool allows for the painting over an existing color in the photo and replacing it with a new color. And, what's really pretty cool about it is that it keeps all of the shading, folding, shadows, and lighting from the original area. So, for example, if you're switching a red t-shirt to green, it still looks like fabric with all its creases and shadows. It just happens to be green and not red.
Where to Find the PS Color Replacement Tool?
Here's how to find the PS color replacement tool:
Open Photoshop and load your image.
On the left toolbar, find the Brush Tool.
Click and hold the brush icon until a list of tools appears.
Select the Color Replacement Tool from that list.
You’re ready to go.
Setting Up the Tool
Before using it, make sure your settings are dialed in:
Foreground Color: Pick the new color you want to apply. This will replace the old one.
Brush Size: Choose a size based on the area you're painting.
Sampling Mode: Continuous keeps sampling as you move. Once use the color, you first click on. Background Swatch only replaces the background color set in your toolbar.
Tolerance: This controls how much of the similar colors should change. Start at about 30% and change it according to how picky you want to be.
Blending Mode: Set to Color (Top menu bar) to only change the color and not the brightness.
How to Exchange Colors in Photoshop?
We'll do a real example: say you want to change a blue hoodie into a yellow hoodie.
Step 1: Open your image
Open up Photoshop and the image you would like to change.
Step 2: Select the Color Replacement Tool
It can be found in the Brush Tool group as I described before.
Step 3: Choose Your Replacement Color
Click on the foreground color square (bottom of the toolbar) and pick the color to replace with, like yellow.
Step 4: Adjust the Brush
Set your brush size - it should not be too big or too small, but just enough to provide control and prevent painting on colors you don't want to change.
Step 5: Choose Your Settings
Set the Sampling to Once, Limits to Contiguous, and Tolerance 30-50%. Make sure the Mode is set to Color.
Step 6: Start Painting
Zoom in on the part that you want to change and start brushing over it. You will see the color change right away, while everything else —shadows, wrinkles, and edges—stays the same.
Tips to Get Cleaner Results
Zoom In: Helps stay inside the lines and avoid color leaks.
Lower Tolerance: If it starts changing areas you didn’t intend, lower the tolerance.
Use a Soft Brush: Makes edges blend better and avoids hard lines.
Keep "Once" Sampling On: Prevents the tool from changing too many areas as you brush.
When Should You Use This Tool?
The Photoshop color replacement tool works best in these cases:
Replacing solid or consistent colors
Editing product photos for listings
Changing outfit colors in portraits
Swapping out background colors (simple ones)
Different Ways to Edit Colors in Photoshop Color Replacement Tool
1. Hue/Saturation Adjustment Layer:
Select Layer > New Adjustment Layer > Hue/Saturation.
Select the checkbox that says Colorize.
Move the hue, saturation, and lightness sliders until you find a color you like.
Control where it is showing up with a layer mask.
2. Replace Color Dialog:
Select Image > Adjustments > Replace Color.
Select the color(s) you want for your changes.
Change the fuzziness slider where needed to control how far the change reaches.
Choose the new color using the result color box.
3. Solid Color Fill Layer with Masking:
Create a solid color fill layer.
Use a layer mask to paint the application of color where needed.
Set the blending mode of the layer to "Color" or "Overlay."
Common Problems And How to Fix Them?
Problem:1
Color bleeds into nearby areas
Fix: Lower the tolerance or switch to “Contiguous” limits.
Problem:2
It doesn’t cover all of the original color
Fix: Raise the tolerance a bit, or change sampling from “Once” to “Continuous.”
Problem: 3
The Color looks dull or weird
Fix: Double-check that your brush is set to “Color” mode, not “Normal.” Try adjusting brightness after color replacement.
Conclusion
Once you understand it, Photoshop has fast and easy color replacement options. The color replacement tool is great for simply changing a color without masks or selections. It leaves you with a natural blend and the perfect option for photos where you only want to replace one color and leave everything else unchanged.
FAQs
Can I use the PS color replacement tool to change hair color?
Yes, but make sure to use a soft brush and low tolerance. Hair has lots of small details, so zoom in for control.
Is the color replacement tool available in Photoshop Elements?
Yes, a limited version is available. It works the same, but you might have fewer options.
Can I later undo the color change?
If you are on the original layer, you can just use Ctrl+Z; If you want to add a little more buffer, copy the layer so you will have an original to rely back to.