 Credit

Bad AI hands. Wonky faces. Weird props that look like melted toys. If you’ve used Stable Diffusion for more than five minutes, you’ve met these gremlins. This guide shows you how to use stable diffusion inpainting to fix them fast, add new elements that actually blend, and keep your style consistent. We’ll walk through the “why” and the “how,” with step‑by‑step workflows, advanced tricks, and a few hard truths. We’ll also show where a hosted tool like Pixelfox AI saves you time (and sanity) when you just need clean results, no GPU, no drama.
The short version: inpainting lets you mask a part of your image and regenerate only that area, guided by a prompt and the surrounding pixels. It’s the surgical edit Stable Diffusion does really well—if you drive the settings right. We’ll use Automatic1111 and Diffusers techniques, and we’ll point you to Pixelfox AI for fast, pro-grade outcomes that don’t require local setup.
What “inpainting” actually does (and why you should care)
Stable Diffusion is a latent diffusion model. That means the model edits a compressed version of your image (the latent) through a UNet that removes noise step by step. Inpainting adds extra context: the model takes your original image, your mask, and your prompt, then regenerates the masked area so it fits the scene.
Here’s the important bit. Inpainting-specific models like the SD v1.5 Inpainting and SD 2 Inpainting include five extra UNet input channels (four for the encoded masked image + one for the mask). This gives the model stronger spatial awareness. It “knows” what stays and what changes. That’s why inpainting checkpoints are more consistent than vanilla text-to-image in tough edits like hands, faces, and edges.
- When you use Mask Content = Original, the model respects the shape and color of the original area and nudges it toward your prompt.
- When you use Latent Noise or “Fill,” you tell the model to replace the area from scratch. This is how you remove objects or add new ones.
Why it matters: you get clean edits that fit anatomy, lighting, and perspective. You can rework a tiny area without breaking the whole image. That’s a huge win for creative teams and solo creators who care about quality.
Industry analysts like Gartner and Forrester have noted how generative AI is moving from “cool demo” to “practical tool” in design workflows. And UX leaders like Nielsen Norman Group keep reminding us that trust comes from predictable results and transparent controls. Inpainting checks both boxes when set up right.
A setup that actually works (Automatic1111 + the right models)
You don’t need a monster rig. You do need correct settings.
- Install AUTOMATIC1111 (Stable Diffusion WebUI) and load an inpainting model:
- sd-v1-5-inpainting (great balance, 512-trained).
- stabilityai/stable-diffusion-2-inpainting (newer text encoder, crisp edges).
- Make sure your image size is divisible by 8. If you see “Sizes of tensors must match,” check width and height. 704×512? Good. 703×513? Not good.
- If you hit “NaNs in Unet” or hard crashes, enable “Upcast cross attention to float32” in settings, or run with
--no-half. - Inpainting tab settings that won’t bite you:
- Inpaint at full resolution: On
- Mask blur: 8–32 px for smooth edges.
- Sampling steps: 20–30 for v1.5; 30–40 for XL or SD2.
- Sampling method: Euler a or DPM++ 2M Karras are safe picks.
- CFG scale: 6–8 is a sweet spot. 1 ignores your prompt; 30 obeys like a robot (usually bad).
- Denoise strength: Start at 0.6–0.75. Go higher to force change, lower to keep details.
- Seed: -1 for random. Generate 4–8 at a time and pick the best.
According to the SD v1.5 Inpainting model card, those extra UNet channels—and training on synthetic masks—are what make inpainting stable across lots of edits. You’ll see that in your results when your masks and settings play nice.
Quick start: fix a face and a hand in 10 minutes
We’ll do this in AUTOMATIC1111.
- Send your image to Img2Img → Inpaint.
- Paint the area to edit. Include a little hair around a face, or a bit of sleeve near a hand, so the model can blend better.
- Prompt: include your original style keywords plus the tweak you want.
- Example: “cinematic portrait, soft light, realistic face, confident smile”
- Mask Content: Original (you want to keep the anatomy and lighting cues).
- Denoise strength: 0.65–0.75 for meaningful change without nuking detail.
- CFG: 6–8.
- Batch count: at least 4. Seed: -1 for variations.
- Optional: Face restoration (CodeFormer). Use it sparingly; it can fight your style.
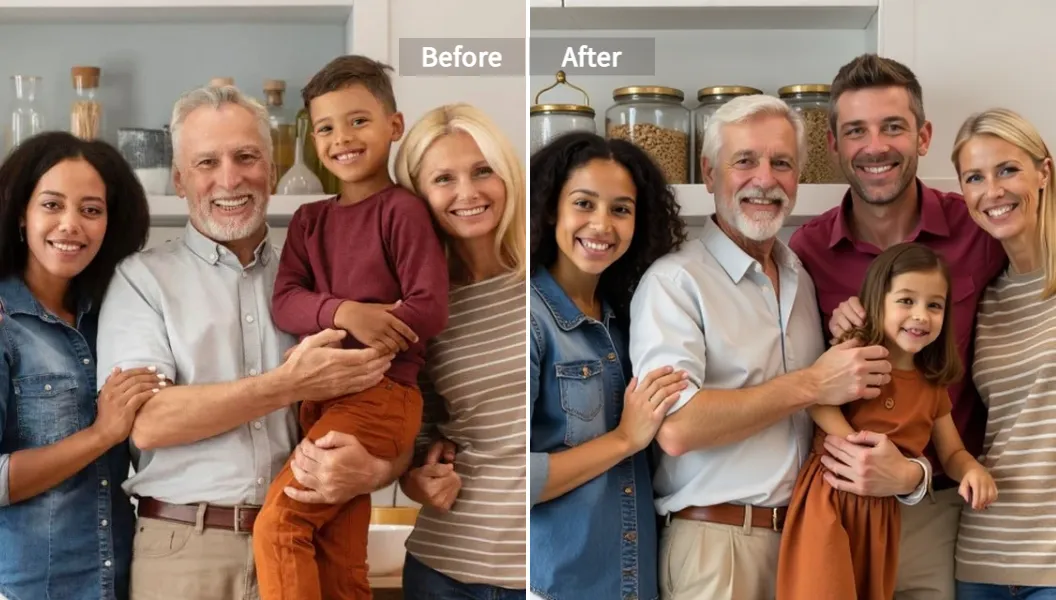
If the new hand looks better but shows an extra phantom finger? Mask just that finger. Set Mask Content to Latent Noise so the model doesn’t cling to the old shape. Denoise strength: 0.8–0.9. Generate a few and pick a winner.
Tip Expand the bounding box with a couple of tiny dots around your mask. This gives the model more context without changing the whole image. It fixes proportion mistakes and weird scale quirks.
When you just want results: Pixelfox AI does the heavy lifting
Not everyone wants to install local tools. Sometimes you just need clean, fast inpainting online with smart defaults and high‑res outputs. That’s where Pixelfox AI Inpainting fits. You drag an image, brush the area, type a short prompt, and you get pro-grade edits in seconds. You can batch, you can export in big sizes, and you don’t need to babysit denoise sliders.
Why teams lean on it:
- It’s tuned for object removal and replacement. The “Fill” behavior blends backgrounds with minimal artifacts.
- It keeps edges clean with smart mask blur and context padding.
- It handles high‑resolution output for print or marketplace uploads.
- It supports batch processing when you have lots of photos to fix.
If you need variations, try Pixelfox AI Reimagine. It creates several copyright‑safe versions of a base image. Useful when a client wants “same vibe, but three different takes” without starting over.
Inpainting settings that move the needle
A few switches matter more than others. Here’s what changes your outcome.
Mask Content: Original vs Latent Noise vs Fill
- Original: Use when you want subtle changes. It keeps shape and color cues. Best for faces and fine fixes.
- Latent Noise: Use when you want something new. It ignores the old pixels and builds fresh detail. Great for adding objects. Use high denoise (≈0.9–0.95) so the noise resolves.
- Fill: Use when removing objects and you need clean background fill. It matches nearby colors and textures to hide the cut.
Denoise strength
- 0.0: Nothing changes.
- 0.3–0.5: Tiny touch-ups, color and micro-texture.
- 0.6–0.75: Strong edits with respect for context. Good default range.
- 0.9–1.0: Big changes. Use for new objects with Latent Noise. Expect style drift.
CFG scale (Classifier-Free Guidance)
- 1–3: Chill. The model gets creative but ignores your prompt a bit.
- 6–8: Balanced. Follows your prompt and keeps natural detail.
- 12+: Too obedient. Often rigid, sometimes over-baked.
Tip If your inpaint looks “mushy,” increase mask blur (16–32 px) and lower denoise to 0.6. If it looks “too original,” reduce mask blur and raise denoise to 0.75–0.85.
Advanced techniques that pros use
1) “Latent Noise” for new objects (use high denoise)
Want a hand fan, a hat, or a prop that wasn’t there? Mask the area where it should go. Set Mask Content to Latent Noise. Denoise at ~0.95. Prompt clearly: “holding a black folding hand fan, elegant, detailed.” Generate a few. When you get the right shape, switch back to Original + denoise 0.6 and refine the blend.
2) Inpaint only the masked area
“Inpaint whole image” can spread resolution thin. “Only masked area” focuses pixels on your target. That gives you cleaner detail for small fixes. Use it for hands, faces, jewelry, and tight props.
3) ControlNet for precision
If the model keeps messing up pose or alignment, feed it guide signals. ControlNet Lineart or Depth preserves structure while you inpaint textures and style. Draw simple line hints for fingers, edges, or folds. It’s a cheat code for anatomy.
4) Recursive inpainting (but watch for collapse)
Sometimes you do two or three passes. Fix the hand. Then the sleeve. Then the shadow. Keep areas small. Don’t over-inpaint the same region or you can cause “image collapse,” where detail gets worse. Reset with the original image if that happens.
Comparison: Stable Diffusion inpainting vs Photoshop
Photoshop is a legend. But it’s slow when you need semantic changes, new objects, or style consistency.
- Photoshop wins when:
- You need pixel-perfect retouching controlled by a human hand.
- You’re matching layout grids and typography.
- Stable Diffusion inpainting wins when:
- You want to add or replace objects that look natural in scene lighting.
- You need multiple stylistic variations fast.
- You’re editing at scale with consistent art direction.
A hybrid approach is powerful. Pre-shape a rough object in Photoshop. Then use stable diffusion inpainting to add texture and lighting. Or run a clean background removal in Pixelfox, then finish color grading in Photoshop.
Comparison: Pixelfox AI vs other online tools
Most browser tools give you one button and hope for the best. That’s fine for easy tasks. It breaks on tricky edges and lighting. Pixelfox AI focuses on:
- High-quality mask blending with edge-aware fills.
- Clear control with prompt + brush, not just “remove” spray.
- High-resolution export and batch jobs so your team actually ships.
- A strong privacy posture for business use.
If you just need noise removal for footage, there’s also Pixelfox AI Video Denoiser. For motion smoothing, AI Frame Interpolation boosts FPS and makes clips feel crisp. If you want to colorize old photos for campaigns, try Pixelfox AI Photo Colorizer. These pair well with inpainting in a real content pipeline.
Pro plays: real tasks you can ship today
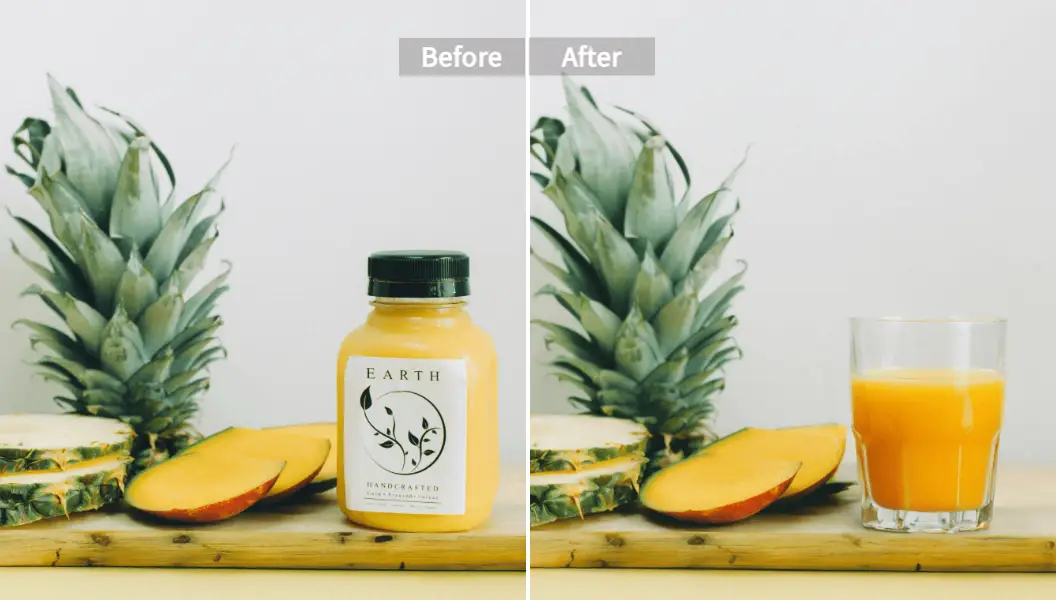
- Create white-background product images that look clean:
- Mask the background. Prompt “white seamless background, studio lighting, soft shadow.” Use Fill for a clean base and Original + denoise 0.6 for a second pass to refine the edges.
- Swap backgrounds for a YouTube cover:
- Mask around the subject and expand the bounding box a bit. Prompt “neon city backdrop, cinematic, blue and pink rim light.” Use Original at 0.65. If it won’t change enough, try Latent Noise at 0.9 once, then lock the look with Original again.
- Build a transparent logo version:
- Remove background with a tight mask. Use Fill to match edges. Export PNG with transparency in your editor. Then run a tiny inpaint on edges with Original 0.4 to kill halo artifacts.
Real‑world case studies
Case 1: E‑commerce fashion, sleeve rescue
A retailer had 120 product photos. About 15 had creased sleeves or missing cuff buttons due to AI generation. We masked cuffs with 20 px blur, prompted “tailored cuff with two black buttons, clean stitching,” used Original at 0.7, and generated 6 variations per image. Acceptance rate was 80% on first pass. The team shipped on time and didn’t need manual retouchers for those items.
Case 2: Travel blog hero image, object removal
A drone shot had a brightly colored kayak that stole focus. We masked the kayak and shadow. Used Fill, denoise 0.6. The first result looked “too smooth.” We increased mask blur to 24 px and added Original at 0.4 over the Fill result to restore micro-texture. The final looked natural enough that readers didn’t notice any edit.
Common mistakes and how to fix them
- Mask is too tight. You get hard edges or color seams.
- Fix: Add mask blur (16–32 px). Include a bit of surrounding area for context.
- Denoise too low. Nothing changes.
- Fix: Raise to 0.65–0.75 for edits. Use 0.9–0.95 for new objects with Latent Noise.
- CFG too high. Results look rigid or over‑processed.
- Fix: Keep CFG around 6–8. Let the model breathe.
- Wrong Mask Content for the job.
- Fix: Use Original for tweaks; Fill for removals; Latent Noise for additions.
- Model mismatch. Using a non-inpainting model and expecting miracles.
- Fix: Load sd-v1-5-inpainting or SD 2 Inpainting. Inpainting checkpoints matter.
- Resolution issues. You get runtime errors like “Sizes of tensors must match.”
- Fix: Make width/height divisible by 8. Use inpaint at full resolution.
- “NaNs in Unet” errors or crashes.
- Fix: Enable “Upcast cross attention to float32,” or switch model, or run with
--no-half.
- Fix: Enable “Upcast cross attention to float32,” or switch model, or run with
Why your edits fail (and the “why” behind the “how”)
Stable Diffusion runs in latent space. If your mask is too sharp, the model struggles to blend latent features across the boundary. That’s why mask blur helps. If denoise is too low, you’re not injecting enough noise for the model to “rethink” pixels. If denoise is too high with Original, it can drift from the scene and get weird. Latent Noise works only when you allow enough noise to resolve into a new object. Otherwise, you get… noise.
The inpainting checkpoints were trained with synthetic masks and “mask everything” scenarios in part of training. That builds robustness for fill operations and small edits. This is also why using an inpainting model yields better results for removals than a generic model with a hacked pipeline.
Filling the gaps: edits that competitors don’t explain well
- Background color changes are hard with Original. The model respects the old hues. To force a color change on a big area, use Fill for one pass at 0.7–0.8, then switch to Original at 0.5 to restore texture and avoid plastic looks.
- Text or logos are a weak spot. SD often can’t render crisp text. Mask the area and use Fill to match background, then add your text in a traditional editor. Don’t fight the model.
- Large inpaints can collapse detail. Break big edits into smaller masks. Work left to right or top to bottom. It’s slower but safer.
FAQs
-
How do I pick between Original, Fill, and Latent Noise?
- Use Original for subtle edits that keep shape. Use Fill to remove objects and match background. Use Latent Noise to add new props or features from scratch.
-
Why does inpainting ignore my prompt sometimes?
- CFG might be low, denoise too low, or the mask is small with little context. Raise CFG to 7–8, denoise to 0.7, and expand the mask slightly.
-
Can I do this without a GPU?
- Yes. Use a hosted editor like Pixelfox AI Inpainting. It handles compute server-side and outputs high-res results.
-
What’s the difference between SD v1.5 Inpainting and SD 2 Inpainting?
- Both add mask channels to the UNet. SD 2 uses OpenCLIP ViT/H and different training sets. SD 2 may give crisper edges and different style behavior. Try both and match to your taste.
-
How do I keep style consistent after an inpaint?
- Include your original style tokens in the prompt. Keep CFG moderate. Use Original with denoise ~0.65 so you adjust content while keeping style.
Best practice checklist (for people who like results)
- Use an inpainting checkpoint.
- Keep width/height divisible by 8.
- Mask blur: 16–32 px.
- Denoise: 0.6–0.75 for tweaks; ~0.95 for additions with Latent Noise.
- CFG: 6–8.
- Generate several seeds. Pick the best and iterate.
- If removal looks too smooth, do a second pass with Original at low denoise to add texture back.
- Use ControlNet Lineart for anatomy or object alignment when the model struggles.
Your move
You came here to fix images that Stable Diffusion broke, or to add things it forgot. You’ve got the “why,” the “how,” and the settings that keep you out of trouble. If you want clean, fast outcomes—without setup—open Pixelfox AI Inpainting and get it done. If you want several safe variations from a base image, try Pixelfox AI Reimagine. If you’re cleaning old photos for a campaign, Pixelfox AI Photo Colorizer helps a ton. Ship better images, faster. And keep “stable diffusion inpainting” as your go-to technique when you need surgical edits that look natural. ✨
Author’s note: I’ve led content strategy and creative workflows for 10+ years across AI and design tools. I favor clear, repeatable setups, and honest trade‑offs. Industry leaders like Gartner, Forrester, and Nielsen Norman Group have all pointed to predictable controls and human‑centered UX as the bridge from novelty to trust. Inpainting is that bridge when you use it right.