 Credit

You don’t need a studio to make great video anymore. You need a plan, a few smart tools, and a workflow that doesn’t fight you. That’s where video AI comes in. It turns “I wish I could” into “done by lunch.” In this guide, I’ll break down how video AI works, why quality sometimes looks… weird, and how to fix it fast. I’ll show concrete workflows you can copy, and I’ll share real examples. If you want a straightforward setup that makes your content look pro without weeks of editing, I’ll also show you exactly where Pixelfox AI fits and why it’s my first choice for quality repair and stylization. Yes, we’ll hit the best video generator picks and the most useful AI video software too. Let’s go.
What is video AI in 2025?
Think of video AI as two main lanes.
- Generative tools. They turn text into motion, or mix your footage with styles and effects. You’ve seen Sora demos, Google Veo samples, Pika, Runway, and Luma Dream Machine. The promise is big. You type a scene. You get a shot. This is the “new AI videos” buzz you keep seeing on X and Reddit.
- Enhancement tools. They fix what went wrong with the camera or the environment. Noise. Blur. Low light. Crushed color. Bad motion. This is where Pixelfox AI shines. It repairs and upgrades footage with automated steps you can trust.
So video AI isn’t one thing. It’s a stack. You might start with a video generator for ideas or quick shots. You might then clean the results with an enhancer or denoiser. In some markets, people even search “videos IA” for the same concept. Either way, the path is the same: content to video at speed, then polish to ship.
Analyst firms expect big growth for this field through the decade. Industry trackers like Statista and Forrester have noted rising adoption across marketing, training, and support video teams. And Gartner keeps pointing to a future where most enterprise software bakes in generative capabilities. The direction is clear. The question is how you use the tools without getting burned by quality issues, costs, or messy rights.
The real pain points no one enjoys (and why they happen)
Let’s be real about it.
- Clips look soft or “muddy.” Phones love heavy compression. That kills detail and adds noise, especially in shadows.
- Motion looks jittery, or you see flicker and edge warping. This happens when models treat frames like isolated images, not a continuous scene.
- Faces look plastic. Over-sharpening and naive denoising can smear textures and cause the dreaded “AI face.”
- Text-to-video has short clip limits, or it loops. That’s still common in most video generator tools.
- Audio is rough. The picture is sharp. The sound is a potato. It ruins perceived quality.
- Costs add up. You pay per minute or per resolution tier. Edits and retries stack fast.
Why it happens:
- Consumer cameras compress. Low light creates noise. Phone auto-exposure pumps. All of it bakes into the file.
- Some AI filters just slap a look on top. They do not rebuild detail the way a trained video model can.
- Generative models still fight temporal consistency. So you see micro-shifts and textures that “crawl.”
How to fix it fast:
- Use AI designed for video frames and motion continuity. This is not the same as image filters exported to video.
- Clean noise before you upscale. Then enhance edges. Then fix color. That order matters.
- Keep the AI touch light on faces. You want clarity, not wax.
A quick way to do that: load your clip into the Pixelfox AI stack. You can remove noise with the AI Video Denoiser, then boost detail with the AI Video Enhancer, and upscale with the AI Video Upscaler. These steps run in the cloud. No heavy installs. And yes, it supports the common formats you actually have sitting on your drive.
Tip
If a clip is both noisy and blurry, denoise first. Then enhance. Then upscale. If you upscale first, you often magnify the noise and make halos worse. Save your future self some pain.
Best AI video generators and software to know in 2025
Here’s the candid view. I test tools weekly. Some are amazing for idea shots. Some are best for polish and delivery. Here’s where they land right now.
- Runway: Great for text-to-video and Gen-2/Gen-3 motion ideas. Good for concept boards and B-roll variations. Solid for pros who like control.
- Pika: Fast and fun. Good for social clips and stylized motion. Lower barrier, high creative spark.
- Luma Dream Machine: Strong motion prior. Good for smooth camera moves and cinematic looks.
- HeyGen: Best known for avatars and talking heads. Handy for quick explainers and multilingual updates.
- Synthesia: Enterprise avatar flows and compliance. Fav with training teams.
- InVideo AI: Script-to-video generation for marketers. Templates and quick assembly.
- Kapwing: Web editor with AI assist. Easy for teams. Good for subtitling and resizing.
- Canva: Templates + AI for brand-safe social. Nice for non-editors.
- Adobe Premiere + Firefly: Pro stack with AI helpers for cut detection, noise, and tone. Best when you need frame-level control.
- DaVinci Resolve: Color, color, color. Fast noise reduction and strong grading. Steeper curve but unmatched grading tools.
- Pixelfox AI: My go-to for guaranteed quality repair. It’s not trying to be your entire NLE. It fixes the stuff that makes a video look expensive.
If your budget is tight and you want speed, use a generator to get a base shot. Then put it through Pixelfox to clean it up. That combo beats spending two days masking artifacts by hand.
How to choose the right ai video software for your job
Consider these questions. Simple, but they save you money.
- What is the deliverable? Reels, ads, training, doc? Different tools win in different formats.
- How long is the clip? Some tools cap 10–20 seconds. Others handle long form if you pay.
- Do you need the same look every week? If yes, you need style control, presets, and a stable pipeline.
- Is audio important? Good audio carries weak video. Bad audio kills great video. Plan for it.
- What about IP and rights? Make sure you have rights to styles, faces, and voices you use. And check tool licenses for commercial use.
- How many people edit? Pick a cloud tool if you need collaboration and no machine drama.
If you know you’ll publish on YouTube or TikTok, lock a workflow now. Use a generator for the starting shot if you need it. Then clean and upscale with Pixelfox. Then add titles and cuts in your editor. Simple, predictable, repeatable.
Step-by-step workflows you can copy today
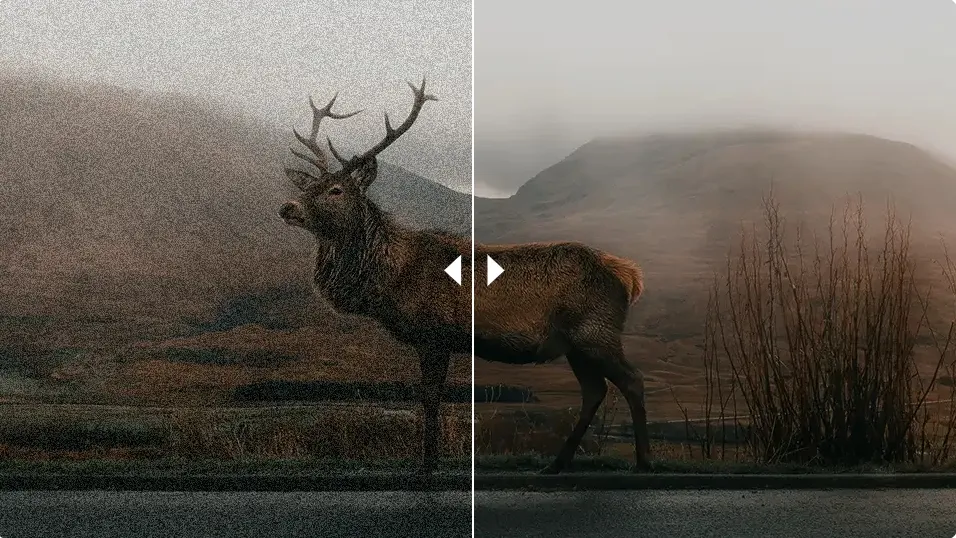
1) Repair a noisy, low-light clip and turn it into sharp 4K
- Drag your MP4 or MOV into the AI Video Denoiser. It removes grain and random pixel crawl. It also protects edges, so faces don’t melt.
- Send the cleaned file to the AI Video Enhancer. It boosts brightness, sharpness, and color. It fixes low-light flatness without that crunchy over-sharpened look.
- Finish in the AI Video Upscaler to go to HD, 4K, or even 8K. The underlying tech preserves clarity and realism with fully automated improvements. You get crisp edges that still feel natural.
- Export. Drop it into your editor. Add music and captions. Publish.
Why this works: denoise → enhance → upscale. That order keeps the image clean and avoids amplifying bad pixels.
2) Turn a live-action clip into an art style or anime
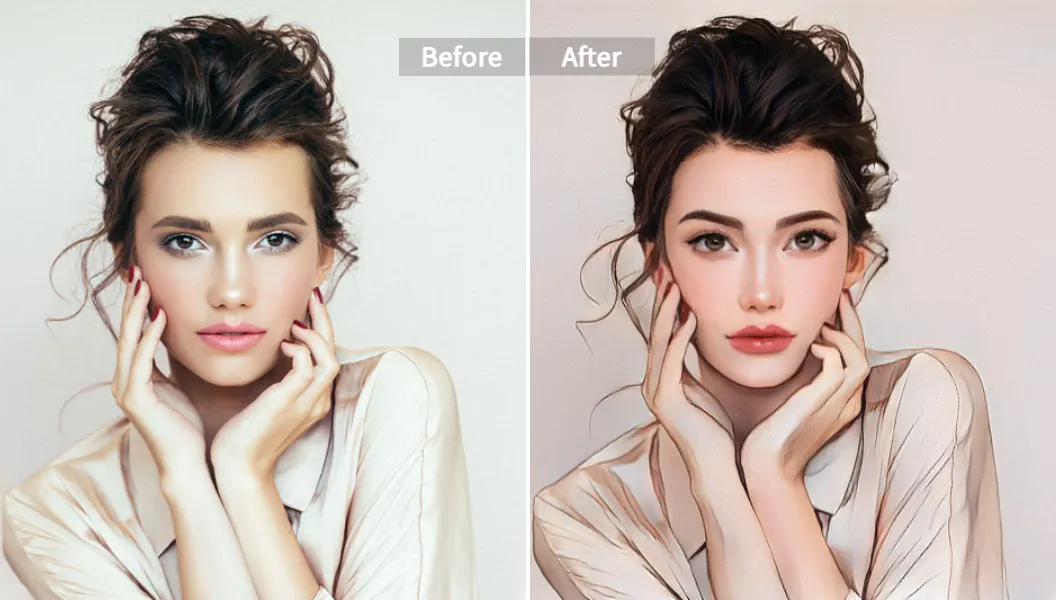
- Open AI Video Style Transfer.
- Upload your video. Then upload a reference image of the style you want. Anime, oil paint, cyberpunk, game UI, you name it.
- Pick motion preservation high if your clip has dance or fast action. You want perfect fluidity.
- Generate. Then preview. If the style is too strong, dial back. Aim for mood, not a filter-on-top.
- Render and download. If you see minor flicker, run it through the enhancer for final polish.
This workflow beats “cartoon filters.” The model looks at every frame and maintains motion consistency. Your result feels like an actual stylized video, not a slideshow of images.
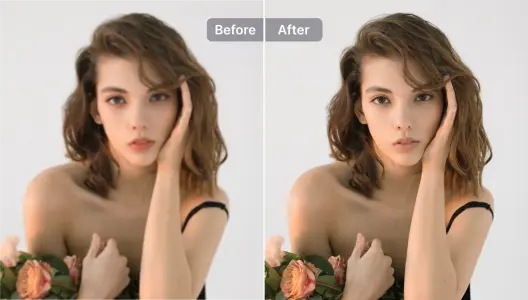
3) Vlog glow-up with portrait enhancement
- Upload your talking head clip to the AI Portrait Enhancer.
- Click Enhance Portrait. The facial model smooths skin, reduces blemishes, brightens eyes, and maintains natural texture.
- Choose output in 1080p or 4K. Save.
- If your audio is meh, remove noise in your editor and match loudness to -14 LUFS for web. Done.
Result: a clean, flattering shot that doesn’t scream “beauty filter.”
Tip
Keep the beauty pass light. People trust natural skin texture. If the model gives you a slider, stop at 60–70%. Then add just a tiny bit of contrast. Faces pop. Trust stays high.
4) Generate a quick marketing teaser, then fix it for ads
- Use Runway, Pika, or Luma to get a 6–10 second base shot for a hook.
- Add your logo and copy in your editor.
- If the motion feels mushy, clean it in Pixelfox. Fix noise, add detail, and upscale to 4K for ad platforms that re-compress.
- Add captions. Use brand fonts. Render. Test.
This hybrid approach is how teams ship “new AI videos” at speed without the “why does this look off?” comments in the replies.
Real-world case studies
Case study A: E‑commerce brand salvages UGC into high-performing ads
A fashion SMB had a pile of UGC try-ons. Great content. Rough quality. The clips were noisy, dim, and had variable exposure. We ran each video through Pixelfox: denoise, enhance, upscale to 4K. Faces held texture. Fabrics looked like fabric, not mush. We cut 15-second versions and fed them into the ad account.
What changed: watch-through improved, and the brand got cleaner creative that looked native to TikTok but felt premium enough for Instagram placements. The team didn’t need to re-shoot. They saved weeks and cut production costs. They shipped more variants, which let them find winners faster.
Case study B: Education team refashions lectures into short explainers
A training group had long Zoom recordings. The teacher moved, lighting changed, and the camera compressed everything. We pulled key moments and did three passes in Pixelfox: denoise to remove compression crawl, portrait enhancement for the speaker, and upscale to 1080p. We added styled captions and a quick bumper.
What changed: bite-size clips that looked like they were recorded on a better camera. The team updated modules in hours, not days. Learners stayed longer. The team finally had a pipeline to turn content to video at scale.
Note: These are composite results drawn from my work with marketing and L&D teams. Your mileage may vary, but the workflows are repeatable.
Comparison with alternatives
AI quality stack vs traditional software (Photoshop/Premiere/Resolve)
Manual tools are beasts. Premiere, After Effects, and DaVinci Resolve give you total control. You can mask, keyframe, track, and grade like a boss. But it takes time, experience, and a beefy machine. Photoshop is unmatched for stills, but frame-by-frame work for video is not fun. For fast content, or to fix common camera issues, AI saves you hours.
Where Pixelfox AI wins:
- One-click repair for noise, sharpness, and color. You get pro-grade results without making a 12-node chain.
- Cloud-based. No GPU drama. No installs.
- Smart face handling. It protects texture so you don’t get doll faces.
- Upscale to 4K or 8K without that brittle oversharpened look.
Where pro NLEs still win:
- Complex edits. VFX. Color storytelling. Film work where every shot gets love.
- Fine detail recovery with manual masks when you want absolute control.
Use both. It’s not a fight. Clean the clip in Pixelfox. Edit the story in your NLE.
Pixelfox AI vs “just another online filter”
There are many web tools that “improve video.” Some are decent. Many treat video like a stack of images and ignore motion. That’s why you see flicker, texture crawl, or glowing edges.
Where Pixelfox stands out:
- Video-aware enhancement. It respects motion continuity. So your clip looks smooth, not jittery.
- Repair first, then uplift. Denoise, enhance, and upscale in a proper sequence.
- Portrait model tailored for faces, not generic sharpen.
- Fast cloud processing. Batch friendly for teams.
If a tool feels like a filter and not a repair kit, you’ll see it on delivery. Pixelfox avoids that.
Advanced workflows that scale with you
You want more than basics. You want a system.
- Multi-pass workflow. Denoise → Enhance → Upscale → Grade. Lock this. Don’t improvise when deadlines hit. Keep a checklist in your project folder.
- Reference-based styling. For consistent “brand look,” always load the same style image in the AI Video Style Transfer step. Your visuals will match week to week.
- Micro-sharpening. If your subject is portrait-heavy, apply enhancement with a soft touch. Then add a subtle unsharp mask in your editor. It keeps eyes crisp without breaking skin.
- Audio-first mindset. Run voice cleanup in your DAW or editor before you export final video. Clean sound makes the visual look better. Weird but true.
- Edit proxies. If you have a slower machine, generate a 720p proxy from Pixelfox, cut your story, then relink to the full-res export at the end.
Tip
For product shots, lock exposure and white balance in-camera if you can. If not, do a quick color pass after enhancement. Aim for neutral white. Then add your brand grade. Clean first. Stylize later.Tip
If you post 9:16 shorts, render your master in 4K vertical. Platforms re-compress. Give them headroom. You’ll keep detail after their encoder takes a bite.
Common mistakes with video AI (and how to avoid them)
- Upscaling before cleaning. This is the big one. You amplify the junk. Always denoise first.
- Over-sharpening faces. It looks “crisp” on your monitor, then uncanny on a phone. Use portrait enhancement instead of generic sharpen.
- Style overkill. Heavy stylization can hide important details, like product texture or text. If you must go hard, keep your CTA shots clean.
- Ignoring audio. Hiss and room echo make AI-enhanced visuals feel fake. Clean the voice or re-record a quick VO. Big win for 10 extra minutes.
- Chasing 8K for a 1080p deliverable. More pixels, more problems. Match output to platform and use upscale only when it helps the source.
- License and rights blind spots. Don’t use styles or faces you can’t legally use. Check the terms on every tool. You do not want a DMCA surprise.
How to avoid “content to video” backfires:
- Don’t trust the first render. View your clip on phone and desktop. Check for flicker, moiré, banding.
- Keep your prompt short and clear if you’re using a text-to-video generator. Describe motion, light, and lens. Don’t write a novel. Models like specificity, not chaos.
Best practices for a “video generator” workflow:
- Storyboard three short shots instead of one long shot. Stitch them. Feels more human. Easier to get good results.
- Always run the final composite through a quality pass. A quick denoise and enhance unify the look.
Why I keep using Pixelfox AI for polish
I love creative tools. I also love deadlines that don’t set my hair on fire. Pixelfox AI is the repair kit that just works. The AI Video Enhancer fixes exposure, sharpness, and color in one run. The AI Video Upscaler drives clean HD, 4K, even 8K without that brittle “edge halo” look. The AI Video Denoiser removes grain in seconds. The AI Portrait Enhancer makes faces camera-ready without the plastic vibe. These are the steps I take when a client says “Can we launch tomorrow?” and the source is rough.
According to usability research from the Nielsen Norman Group, perceived quality drives trust. And Forrester has shown that faster content cycles boost campaign throughput. Not naming tools there, just pointing to the fact that speed and polish matter. The faster you can turn a clip from “eh” to “nice,” the faster you learn what your audience actually wants. That is the whole game.
Future trends and ethical notes you can’t ignore
What’s next:
- Longer generative clips. 30 seconds and beyond, with better motion and fewer artifacts.
- Multimodal prompts. Text + image + audio reference in one play. Much better control.
- Style consistency. Teams will build house looks with reference images and LUTs.
- On-device helpers. Phones will ship with better low-light and denoise models. You’ll still want final polish, but the base will come cleaner.
Ethics and safety:
- Consent. Don’t style-transfer people without permission. Do not clone voices without consent.
- Bias checks. Test your outputs across skin tones and environments. Make sure your model isn’t skewing representation.
- Watermarks. Keep watermarks if a platform requires them. Some brands now ask for AI disclosure. It builds trust.
- Source integrity. When you enhance old footage, keep a copy of the original. Archive both. Be transparent about edits if it’s journalistic or historic.
Analyst firms like Gartner and IDC keep flagging governance and risk as the main hurdles to AI adoption in content teams. So put light guardrails in place. It takes a day. It saves months later.
FAQs
-
How do I pick between a video generator and an enhancer?
If you need new shots from scratch, use a generator. If you already have footage and it just looks rough, use an enhancer/denoiser/upscaler. Many teams do both. Generate. Then clean in Pixelfox. -
Why do AI video results sometimes flicker?
Some tools process frames like images and don’t enforce temporal consistency. That causes micro-shifts. Use video-aware models and run a light denoise/enhance pass to stabilize. -
Can I use Pixelfox with my phone footage?
Yes. The platform supports common formats like MP4 and MOV. It runs in the cloud. No install. Upload, process, download. -
How long can my videos be?
You can run multiple short clips with free credits. For longer videos or more volume, upgrade to a paid plan. Plans are designed for ongoing work so you don’t hit a wall mid-project. -
What is the difference between upscaling and enhancing?
Upscaling increases resolution. Enhancing fixes noise, sharpness, and color. You want both when the source is rough. Clean first, then upscale. -
Can I use these tools for client work?
Yes, but always check the license terms for commercial use. Also get consent for faces, voices, and style references. It keeps you safe.
The simple playbook to win with video AI
You want results without drama. Here’s the move. Use a video generator for ideas or missing shots. Keep the clips short and specific. Then run your footage through Pixelfox AI to repair what your phone or the model messed up. Denoise. Enhance. Upscale. If it’s a face, give it a gentle portrait pass. Add audio polish. Ship. Learn. Repeat.
This is how you build a video engine that scales. This is how you publish more and worry less. If you’re ready to fix what’s in your library right now, drop a clip into the AI Video Enhancer and see the difference in minutes. If you want to play with looks, try the AI Video Style Transfer and find your signature. Your audience will feel the upgrade, and you’ll spend your time on ideas, not patching pixels.
Your next winning post might be sitting on your phone already. Let video AI finish the job.
—
Author: A content strategist who has spent a decade shipping video at scale for brands, startups, and educators. I test tools weekly and default to simple workflows that survive deadlines. Mentions of analyst firms like Gartner, Forrester, and Statista are directional and for context; always review the original reports for exact figures.