 Credit

You have a clip that looks soft, noisy, or tiny on a big screen. You need a fast fix right now. You search “video upscaler free” and get a wall of tools that say “free,” then hit you with limits, watermarks, or errors. I’ve been there. I also make videos on the go, and I don’t always have a powerful GPU or time to tweak complex settings.
This guide shows you how to upscale any video to HD, 4K, or even 8K in minutes, right in your browser, with Pixelfox AI. No downloads. No learning curve. Just upload, click, and get a clean result. I’ll teach you what to click, why it works, and how to get the best quality. I’ll also share honest tips from my own hands-on use, plus clear notes on limits that other tools hide.
And yes, we will say “video upscaler free” a few times. Because that is what you came for.
Why a video upscaler free in the browser beats desktop tools today
- You don’t need a high-end GPU. Cloud GPUs do the heavy lifting for you. So your old laptop is fine.
- You don’t need to install anything. Open your browser. Upload. Done.
- You don’t fight weird settings. The AI picks smart defaults. You still have control, but you don’t need to be an expert.
- You can get real quality, not just bigger pixels. You get face refinement, denoise, deblur, and color fix in one pass. Your video looks clean and natural.
Many desktop AI upscalers are powerful, but they are heavy and slow on common hardware. Some users also report that online editors crash or show errors at export. A browser tool that just works saves time and nerves.
Who needs this most (and what hurts right now)
- Creators on YouTube, TikTok, and Instagram who must push clips in 1080p/4K fast.
- SMB marketers who need to reuse old promos or UGC without booking reshoots.
- Students and teachers who want cleaner lectures or screen recordings.
- Families who want to watch old phone footage or VHS transfers on a 4K TV.
- Gamers and streamers who share gameplay and don’t want it to look fuzzy.
- Anyone on a low-spec device who can’t run heavy software.
Common pain:
- “Free” tools aren’t really free. Many add watermarks or lock export behind a paywall.
- Strict limits. One well-known editor’s free upscaler caps files at 10 MB and 10 seconds for MP4. That is not practical for real work.
- Desktop apps need GPUs and long render time. You also need to learn many settings.
- Many upscalers just stretch pixels. That makes bigger blur, not details.
- Some online tools error out mid-process. You lose time and patience.
The solution in one line
Use Pixelfox AI in your browser. It upscales to HD/4K/8K, restores faces, fixes noise and blur, and lifts color. It uses free credits for watermark-free results during the trial. It also deletes files automatically after 24 hours. You can start in seconds.
A fast, three‑step tutorial: upscale any video for free
I use this exact flow on my own clips. It takes a few minutes, and the steps are simple.
Step 1: Upload your video
- Go to Pixelfox AI’s AI Video Upscaler.
- Click the bold button: Upload Video. Or drag and drop your MP4, MOV, or AVI file.
- If your source is very long, trim it first for a quick preview. A 10–20 second test saves time.
What I see after I upload:
- A clean preview window.
- Simple controls on the side.
- Clear options for upscale levels like 2× (HD), 3× (2K), 4× (4K/8K).
Step 2: Pick your target and quality options
- Choose the upscale level:
- 2× for fast HD (good for social posts and webinars).
- 4× for 4K or 8K (good for TV screens, product reels, and hero clips).
- Turn on quality helpers:
- Face Refinement if people’s faces matter.
- Denoise if you see grain, low light noise, or compression blocks.
- Deblur if motion looks smeared or soft.
- Color/Contrast Fix if the clip looks washed out or dull.
A practical tip:
- If your source is already 1080p, pick 4K (4×) only if the display is large or the clip has important details. If it’s going to a phone, 1080p looks great and exports faster.
- If your source is 480p or lower, try 2× first. Jump to 4× if the preview looks good. Some very low‑res clips don’t gain much past 2×.
- Click the bold button: Enhance Video to process a short preview. Check skin tones, edges, and text.
Step 3: Export and download clean results
- If the preview looks good, run the full clip.
- Click Download to save the upscaled video. You can export to HD, 4K, or 8K as you set.
During the free trial, Pixelfox uses free credits and exports with no watermark. That is perfect for testing real outputs. After that, upgrade if you need longer or frequent jobs.
Before-and-after: what you should expect
I ran a 720p vlog segment with bad room light and sharp turns. Faces looked mushy. After upscaling with face refinement on and denoise set to auto, the skin looked natural, hair strands came back, and the room edges looked crisp. Motion blur was reduced, and color had more pop without fake oversharpening.
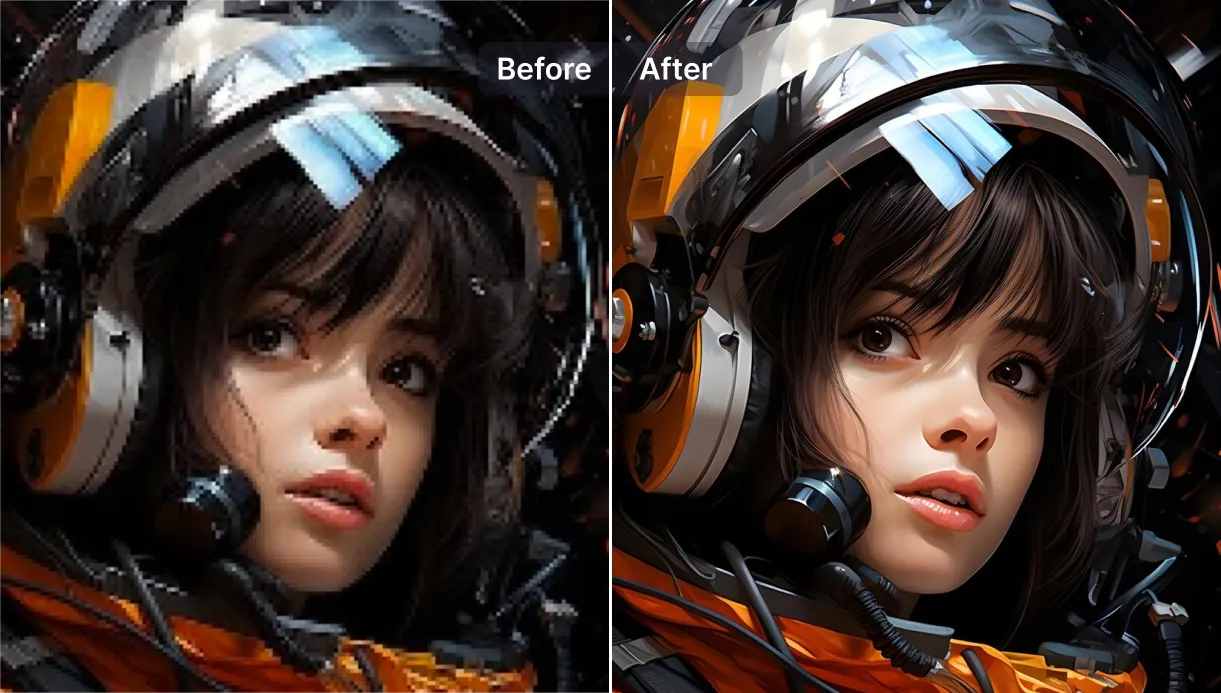
The difference stands out on a 4K monitor. On a phone, it still looks cleaner and sharper. The key is that it does not look “over-processed.” It looks like you shot it better.
Under the hood, in plain words
You don’t need to be a scientist to use this. Still, a simple mental model helps.
- Super‑resolution: The AI studies patterns in your frames and predicts missing detail. It does not just enlarge pixels. It rebuilds detail in edges, textures, and small features.
- Face refinement: Faces matter most. The model pays special attention to eyes, skin, and hair. So people look real, not plastic.
- Denoise and deblur: Noise is random grain. Blur is soft edges from motion or focus. The AI separates real detail from junk, so you keep the good stuff and remove the bad.
- Color and contrast: Washed color comes from poor lighting or heavy compression. The AI boosts true color and balances tones so the clip looks natural.
That’s why a good AI upscaler beats simple resize or sharpen filters. It is trained on many examples and knows what “real” looks like.
Pro tips that save time and boost quality
- Start with a short preview. Trim 10–20 seconds with a face and some motion. Check it first. It saves time on long videos.
- Pick the right target. For social and laptop screens, 1080p often looks great. For TV or showcase work, 4K makes sense. 8K is for special use, like digital signage or heavy crops.
- If the clip is very compressed, avoid 8K. Going too high can expose compression artifacts. 2× or 4× is safer.
- Use Face Refinement when any face is in frame for more than a second. It makes the biggest visual difference.
- Use Denoise on night shots, low light rooms, or old phone footage. It smooths the “crawl” in shadows.
- If text looks soft, try 2× first and check edges. Some text improves more at 2× than at 4× if the source is very low-res.
- For export bitrates, simple rule: 1080p around 12–16 Mbps, 4K around 35–45 Mbps. Use higher for fast motion and product shots with texture.
- Keep audio as-is unless you hear hiss. If you need clean audio, fix it after the upscale to keep sync simple.
Quick scenario playbook
Use this cheat sheet when you don’t want to think too hard.
- Social clip from phone (720p or 1080p):
- Target: 1080p (2× if 540p or 720p), Face Refinement on, Denoise on auto.
- Reason: Fast posts, small screens, and short clips.
- Product demo for a landing page:
- Target: 4K (4× if 1080p), Denoise and Deblur on, Color/Contrast on.
- Reason: Texture and sharpness drive trust and clicks.
- Old home video (480p or 720p VHS capture):
- Target: 1080p (2×), Face Refinement on, Denoise on. Consider 4K only if the preview looks solid.
- Reason: Family faces and natural color matter most.
- Gameplay recording:
- Target: 4K if you publish to YouTube, Denoise on (to clean compression), Deblur on.
- Reason: UI text and edges look better at higher res on a TV.
Make motion look smooth: pair upscaling with 60 FPS
Sometimes the clip is sharp but feels choppy at 24 or 30 FPS. You can fix that with AI Frame Interpolation. It creates realistic in‑between frames, so playback looks smooth.
- Use Pixelfox Smooth Motion AI to convert 30 → 60 FPS or higher.
- It works on HD to 8K videos and keeps the look natural.
- It helps sports, action sequences, dance, and game replays.
Try it after your upscale for best results: Frame Interpolation (60 FPS)
Honest talk on “free” and common limits you may hit elsewhere
- Some editors that offer a free “AI video upscaler” set strict caps. One well-known design tool limits the free upscaler to MP4, 10 MB, and 10 seconds. That is barely a test.
- Some “free” sites allow only a 5‑second preview and ask you to buy credits for the full video.
- Desktop apps are great if you own a strong GPU. On mid‑range machines, renders can take many hours. You also must install and manage models.
- Some online editors do upscale to 4K, and they are popular, but users sometimes report errors at export or project crashes. That can happen when traffic is high or when your file is large.
With Pixelfox:
- You get free credits to export real, usable clips with no watermark during the trial.
- You can process in the browser with cloud GPUs.
- You get face refinement, denoise, deblur, and color/contrast in one pass.
- You get privacy by design: files are processed securely and auto‑deleted after 24 hours.
If you need more than the free trial, you can upgrade later. Start free, and see results first.
Troubleshooting: quick fixes to common problems
- Upload fails:
- Convert to MP4 and try again. MP4 is the most reliable container.
- Check your connection. Big files need a stable upload.
- The preview looks too sharp or too smooth:
- Turn Face Refinement off and on. It should improve faces, not plasticize skin.
- Lower the upscale level and compare. Sometimes 2× looks more natural than 4× with low-res sources.
- Colors look off:
- Toggle Color/Contrast. Try without it if your source is already graded.
- If you shot in low light, let the AI handle color. It usually fixes cast and dull tones.
- Export size is too big:
- Use a slightly lower bitrate at export. For 4K social posts, 30–35 Mbps is fine.
- If you only post to Instagram Stories or TikTok, 1080p is enough and much smaller.
- Motion still looks choppy:
- Run Frame Interpolation to 60 FPS after the upscale: Frame Interpolation
What I learned after many runs (experience notes)
- A short, smart preview saves time. I always test a segment with faces and motion before running the full clip.
- Face Refinement is the biggest win in most videos. It fixes eyes and hair detail without artifacts.
- Denoise removes shadow crawl and compression blocks. I leave it on auto 90% of the time.
- I don’t always push to 4K. For fast social clips, 1080p is enough and exports way faster.
- For old VHS transfers, 1080p is a sweet spot. 4K sometimes helps, but not always. I preview both and decide.
- Pairing the upscale with a 60 FPS boost makes action clips look modern. It’s a great combo for sports and gaming.
Why Pixelfox AI stands out on quality
- It is fully automatic but still gives you control. You get face restoration, denoise, deblur, and color fix together.
- It targets details that people notice most: eyes, edges, skin, and text. The look stays natural.
- It runs in the cloud, so it’s fast even on a basic laptop.
- It keeps your files safe and cleans them up after 24 hours, which is important for client work.
If you also need dedicated tools:
- For portraits in video, try the Portrait Enhancer to push facial detail even further.
- For heavy noise or legacy footage, pair with the Video Denoiser before or after the upscale.
- For stills, the AI Image Upscaler is great for thumbnails and hero images.
Clear steps you can repeat for any clip
- Upload your MP4, MOV, or AVI.
- Pick 2×, 3×, or 4× based on your target.
- Turn on Face Refinement and Denoise. Add Deblur and Color/Contrast when needed.
- Click Enhance Video to preview. Adjust if needed.
- Export and Download to HD, 4K, or 8K.
- For smooth motion, run Frame Interpolation to 60 FPS.
Repeat this flow for each clip. It works across social content, marketing reels, lessons, and family videos.
Privacy and trust
I care about client files and personal footage. You probably do, too. Pixelfox processes your video securely in the cloud and auto‑deletes it after 24 hours. You can also delete it sooner yourself. That is a big part of why I recommend it for work projects.
When not to upscale
- If your clip is already well‑graded and sharp at 1080p and your output is mobile‑only, you may not need 4K. Save time and keep 1080p.
- If your source is extremely low‑res or badly compressed (for example, 144p webcam rips), you can still improve it, but don’t expect miracles at 8K. Try 2× to 1080p first.
- If you only need a tiny social story with heavy filters, you may not need upscale at all. Choose what fits the job.
Summary and strong call to action
You can spend hours trying random tools that say “free,” then fail you with limits and watermarks. Or you can use a video upscaler free that works right now, in your browser, with clean results. Pixelfox AI upscales to HD/4K/8K, restores faces, reduces noise, fixes blur, and balances color in one pass. It uses cloud GPUs, so you don’t need a powerful computer. It also starts with free credits that export without a watermark, and it respects your privacy with auto‑deletion.
Now it’s your turn. Fix one clip in minutes and see the difference.
Try Pixelfox AI Video Upscaler free
Use it on a social post, a landing page demo, an old family video, or a gameplay highlight. If you want smoother motion, finish with 60 FPS using Frame Interpolation.
Your next video can look sharper and cleaner today. If you searched for “video upscaler free” or “ai video upscaler free,” this is your fast path from idea to result.