 點數
點數

你是不是也有這種慘痛經驗:打開電腦準備「認真畫圖」,結果滑鼠畫兩筆就懷疑人生,手抖到像地震 7 級,畫完一看,主角的臉歪到比你 Monday 早上還累。😂
很多人搜尋「電腦 繪圖」跟「繪圖 軟體 學習」,心裡想的其實是同一句話:
「我想好好畫畫啦,但拜託給我一條不會痛苦到想砸鍵盤的路。」
這篇就是專門給你用的。
你會學到:
- 電腦 繪圖到底在幹嘛,跟傳統手繪差在哪
- 新手該選哪一套繪圖軟體,怎麼安排學習
- 一步一步畫出你的第一張完整電繪作品
- 怎麼用 Pixelfox AI 當你的「隱藏外掛」,把修圖、改背景、改顏色交給 AI
- 跟 Photoshop 舊派流程、其他線上工具比,到底省了你多少人生
- 真實案例、新手常見地雷、專業實戰小技巧
如果你願意把這篇慢慢看完,你會對「電腦 繪圖」這件事,從迷茫 → 有路線 → 有工具 → 有下一步。
我們來認真聊一場,但不用太嚴肅。🙂
為什麼現在學電腦 繪圖這麼重要?
不是每個人都要當商業插畫家,可是會電腦 繪圖,真的會讓你很多地方都變輕鬆。
- 你可以畫自己的 VTuber 形象、貼圖、社群頭貼
- 你可以做簡單電商圖、簡報插畫、YouTube 縮圖
- 你可以讓 AI 幫你做一半,你專心在構圖和風格
根據一些設計產業報告(像 Statista、LinkedIn 的職缺趨勢),「數位內容創作」這幾年是一直在成長。
會畫圖的人很多,但會用電腦工具又懂 AI 的人,還不算多。這就是你的機會。
Nielsen Norman Group 也提過一個重點:視覺內容會大幅影響使用者對品牌的信任感。
講人話就是:圖好看,別人才比較願意相信你。
你不一定要畫到「神作」,你只要做到「乾淨、清楚、看得懂」,你就已經贏一票人。
而這些,都可以靠一個合理的學習路線,加上一些像 Pixelfox AI 這種工具,讓你少走很多回頭路。
電腦 繪圖入門:工具、硬體、心態一次講清楚
很多人以為自己畫不好,是因為沒天分。
結果實際上,是因為:
- 工具選錯
- 設定亂七八糟
- 心態一開始就爆炸
我們先把地基鋪好。
電腦繪圖不是「作弊」,是新的畫筆
有些傳統派會說:「用電腦、用 AI 就不算真實力。」
這種說法現在聽起來有點像說「會用 Word 排版就不算會寫字」。🤷♂️
你在做的事,其實還是:
- 選構圖
- 決定光影
- 調顏色
- 設計角色或畫面故事
工具只是在幫你省下「橡皮擦擦破紙」「水彩用到整桌都是」那種痛苦而已。
AI 也一樣,它是幫你省時間,不是幫你偷人生。
繪圖板 vs 平板 vs 滑鼠:你到底該買什麼?
很多新手卡在這一關,結果一直沒開始畫。
- 用滑鼠:
可以畫,但不太建議。線條很難穩,手腕壓力也大。你會很快懷疑人生。 - 顯示繪圖板(Cintiq 那種)或 iPad + Procreate:
很直覺,直接看著螢幕畫。價格通常比較高,但體驗舒服。 - 一般繪圖板(XP-Pen、Wacom Intuos 那種):
CP 值高,蠻適合學生和剛入門的上班族。
你眼睛看螢幕,手在板子上畫,一開始會不習慣,但很快就會習慣。
如果你預算有限,我會很直接建議:
- 一般繪圖板 + 免費或便宜的繪圖軟體
- 搭配 Pixelfox AI 這種線上工具,處理你不想花時間的步驟(例如修背景、改顏色、轉風格)
這樣的組合很友善,還不會一開始就把你荷包打爆。
檔案大小、解析度:一開始就設對,少痛一次
很多新手的第一張作品,畫完放大一看:糊得跟 240p 影片一樣。
通常是這幾個問題:
- 畫布開太小(例如 1000px 以下)
- 解析度太低(72dpi 拿去印刷會慘)
- 比例亂設,導致後面做圖都歪掉
簡單版設定建議:
- 社群貼文:
2000 x 2000 px 左右,300 dpi,RGB - 要印的小卡、貼紙:
最少 2000~3000 px 邊長,300 dpi,CMYK(印刷用) - YouTube 縮圖:
1920 x 1080 px,300 dpi,RGB
軟體裡面開新檔,其實就是幾個數字要注意,但很多人懶得看。
你只要養成一個習慣:輸出前放大檢查,看線條有沒有糊掉就好。
新手用什麼軟體?繪圖 軟體 學習路線圖
你打「繪圖 軟體 學習」會看到一堆戰爭:
- 「一定要 Photoshop 才專業」
- 「不用花錢啦,Krita 就夠了」
- 「Procreate 才是王道」
其實不用吵。你先看你是什麼狀況。
常見繪圖軟體比較(新手友善版)
| 軟體 | 價格 | 優點 | 缺點 | 適合誰 |
|---|---|---|---|---|
| Krita | 免費 | 開源、筆刷多、很適合插畫 | 介面一開始有點亂 | 預算少的學生、想畫插畫的人 |
| MediBang Paint | 免費 | 輕量、雲端同步 | 功能比起大軟體少一點 | 想先試水溫、不想被嚇到的人 |
| Clip Studio Paint | 付費(常打折) | 線條穩定、漫畫功能強、素材多 | 功能多到一開始會暈 | 想認真畫漫畫、插畫的人 |
| Procreate(iPad) | 一次買斷 | 操作直覺、適合隨手畫 | 限 iPad、生態和電腦版不同 | 有 iPad 的人、喜歡躺著畫的人 |
| Photoshop | 訂閱 | 合成、後製超強,業界標配 | 貴、學習曲線陡 | 想走設計、修圖、商業插畫的人 |
你不用一次全學會。
你只要:
- 選一套你現在裝得起、打開不會太痛苦的
- 先會:開新檔、圖層、筆刷、橡皮擦、選取、匯出
- 其他功能慢慢補
這是一般繪圖軟體的部分。
接下來是「AI 外掛」的部分,也就是 Pixelfox AI。
Pixelfox AI 在整個學習裡扮演什麼角色?
你可以把傳統繪圖軟體當「主菜」,Pixelfox AI 當「外送神助手」。
它不是來搶你的位置,它是幫你解決那些很煩但又必須做的事。
Pixelfox AI 有幾個對初學者超友善的功能:
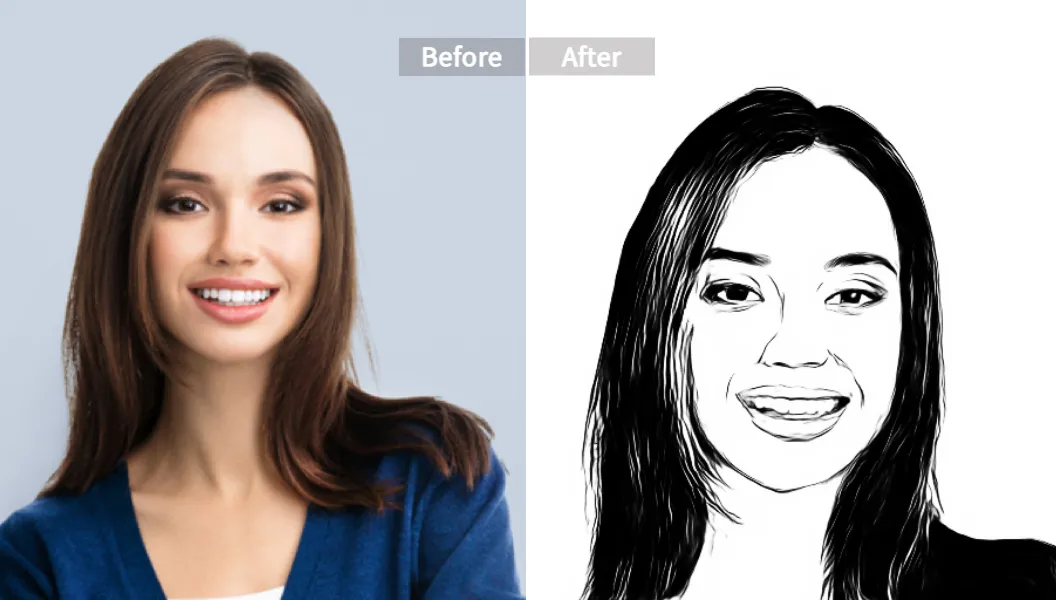
- 想把照片變手繪風?用
👉 AI 圖片轉素描工具
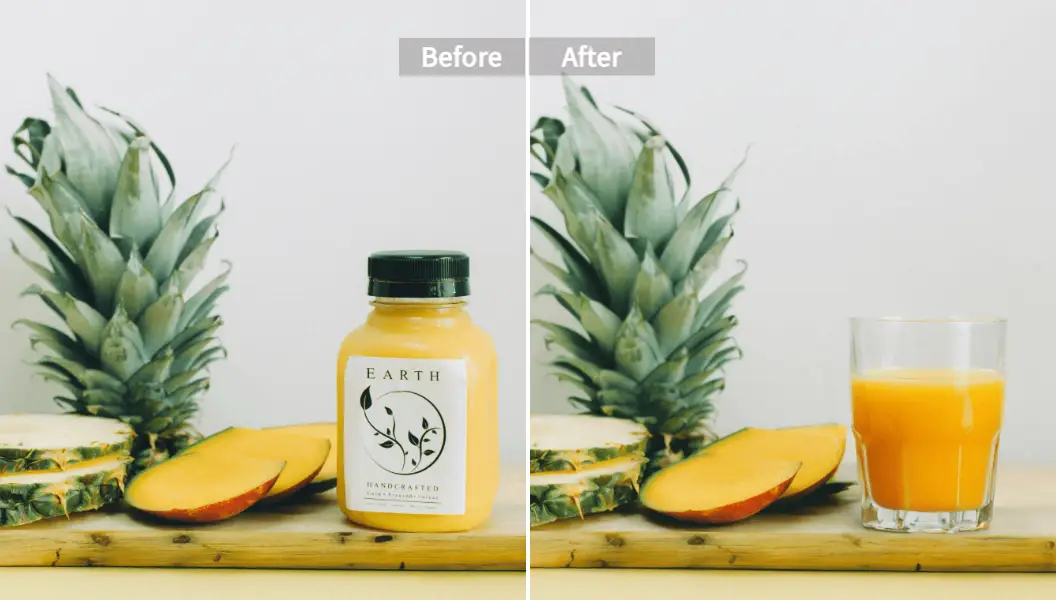
把照片轉成線稿參考,練習時壓力會小很多。 - 拍作品時桌上太亂?用
👉 AI 圖片修復塗抹工具
把不該出現的杯子、充電線、雜物擦掉,畫面立刻乾淨。 - 顏色調不出你想要的風格?用
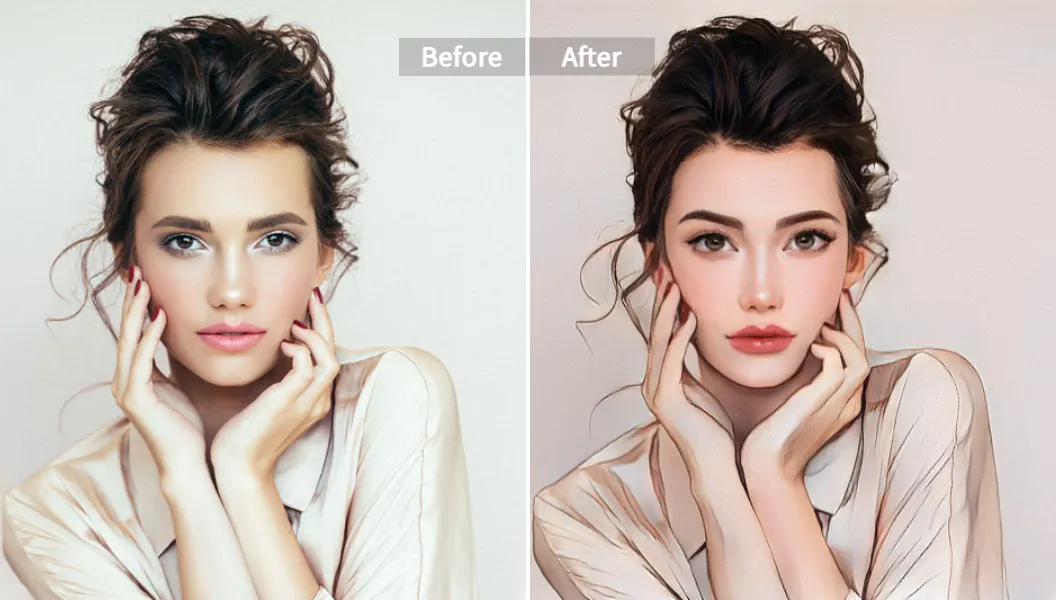
👉 AI 圖片調色工具
快速換整張圖的配色,試不同氛圍。 - 有黑白線稿或老照片,想變彩色?用
👉 AI 照片上色工具 - 想玩動漫頭像、VTuber 人設?用
👉 AI 動漫風格生成器
你不一定一開始就全用上,
但你要知道:當你遇到「修圖好煩」「背景卡關」「上色很累」,你是有 AI 可以叫來幫忙的。
從空白畫布到第一張電繪:一步一步畫出來
很多教學一開口就跟你說「多練習」。
但沒有路線圖,新手根本不知道自己在練什麼。
我們來抓一個你今天就能開始用的流程。
Step 1:決定你要畫「什麼」,不要一開始就亂開畫布
你可以先選一個很單純的主題:
- 自己的頭像
- 一杯飲料
- 一隻貓
- 一個很簡單的角色半身像
不要一開始就挑「五個角色+城市夜景+煙火+科幻機甲」。
那種東西拿來欣賞就好,拿來入門會直接爆開。
在你決定主題後,去找 3~5 張參考圖。
根據很多繪師分享和像 DrawABox 這類教學網站的經驗,新手如果不看參考,進步會慢非常多。
你可以看,但不要全抄,把構圖、姿勢、顏色當參考就好。
Step 2:打草稿跟線稿——線條抖很正常
打草稿時,你可以:
- 用淡色的筆刷
- 先抓整體比例(頭身比例、物體大小)
- 不要急著拉直線,先把大形狀畫出來
線稿階段很多人會超挫折,
因為「手根本畫不出那種又細又穩的線」。
這裡有兩個超實際的方法:
- 把軟體裡的「筆刷穩定」或「平滑度」開高一點
Clip Studio、Krita、MediBang 都有類似的功能。 - 多用身體大動作畫線,不要只用手指關節
想像你在畫「手臂」,不是畫「手指」。
Tip:
如果你真的抖到不行,你可以先用 Pixelfox 的 AI 圖片轉素描工具
把一張人物或物體照片轉成素描線稿,拿這張線稿來觀察線條怎麼轉折、怎麼省略。
你不是用它來「假裝自己畫」,你是用它當「線稿老師」。
Step 3:上色——不要一開始就挑戰超複雜光影
上色對很多人來說是痛點。
顏色一亂,整張圖看起來會「很髒」。
一個簡單的做法:
- 先把線稿放在最上面圖層,設定成「正片疊底」或透明度降低
- 新開一個「底色」圖層,把大色塊先填上去
- 再開一個「陰影」圖層,用一種顏色(例如冷灰)先統一刷陰影
- 最後再加一些高光跟重點色
很多專業繪師也會建議新手先做「灰階練習」。
也就是你先只用黑、白、灰畫出光影,確保立體感沒問題,
再用像 Pixelfox 的 AI 圖片調色工具 試不同配色。
你可以拿 AI 幫你試風格,找出你想追的方向。
進階應用:讓 Pixelfox AI 幫你加速創作(專業級玩法)
當你能畫出一張完整的圖,你會發現下一個問題來了:
- 背景很醜
- 桌面雜物太多
- 顏色怪怪的
- 想做版本 A/B 測試,但懶得重畫
這時候 AI 就是你的加速器。
技巧 1:快速做出電商白色背景圖(不用再跟魔術棒互相傷害)
場景:你畫了一個超可愛角色或商品,想拿去做簡單電商圖。
但你:
- 不會抠圖
- 不知道怎麼把亂七八糟的背景處理掉
- Photoshop 對你來說像黑魔法
你可以這樣做:
- 把你畫好的角色或拍好的實物,用手機或螢幕截圖存成圖片
- 上傳到 Pixelfox 的 AI 圖片修復塗抹工具
- 用刷子把你不要的背景塗掉,簡單打一個提示(例如「white clean studio background」)
- 讓 AI 補出乾淨背景,再下載
你就得到一張很乾淨的白底或素背景圖。
你可以再拿回你的繪圖軟體裡,加字或再微調。
Tip:
如果你要做電商圖,不要讓背景太複雜。
根據很多電商平台的實測,商品清楚、對比明顯,點擊率和轉換率都會比較高。
簡單說:看得懂最重要,花俏可以放後面。
技巧 2:幫 YouTube 封面做背景替換與色調統一
YouTube 縮圖有一個鐵則:
「小小一張,也要看得出主角是誰」。
你可以先畫或拍一張主角人物圖,
再用 Pixelfox AI 做幾件事:
- 把雜亂背景用 inpaint 擦掉,換成簡單漸層或模糊場景
- 用 AI 圖片調色工具 讓整張圖的色系接近你的頻道主色
- 再用你的繪圖軟體加粗字、加箭頭、加表情等
這樣你不用每次都從零開始畫整張縮圖。
你把時間留給「構圖跟文字」,而不是一直在那裡修背景。
技巧 3:做透明背景 Logo 或 Icon(用在簡報、履歷、社群)
很多人做完一個小圖標或 Logo 之後,會卡在:
- 背景是白色或灰色
- 貼到簡報或其他底色上會出白框
你可以:
- 在繪圖軟體裡,先把 Logo 畫在單一色背景上
- 輸出成圖片
- 用 Pixelfox 的 inpainting 或其他去背功能,把背景塗掉
- 輸出 PNG 檔,背景就透明了
再把這個 Logo 貼到簡報、履歷、自我介紹卡上,你整個人會立刻「看起來很專業」。
跟 Photoshop 這類傳統方法比,有什麼差別?
你可能會好奇:那我是不是一定得學 Photoshop?
答案是:看你要做什麼。
舊派流程:全靠 Photoshop,什麼都自己來
Photoshop 的優點很多:
- 功能超全,可以從修圖到合成都包辦
- 是很多公司、設計團隊的標準工具
- 線上教學資源非常多
但對新手來說,也有幾個很硬的地方:
- 介面複雜,開一堆面板會讓人頭痛
- 要訂閱,長期下來價格不算低
- 很多 AI 功能有,卻埋在深處,要學好一輪才用得順
如果你是要走設計產業,長遠還是值得學。
不過當你只是想開始電腦 繪圖、畫插畫或角色,
你完全可以用其他軟體 + Pixelfox AI 撐很久。
新派流程:免費或輕量繪圖軟體 + Pixelfox AI
現在很多創作者會選:
- 用 Krita、Clip Studio、Procreate 當主要繪圖工具
- 再用 Pixelfox AI 處理這幾種事情:
- 物件移除、背景修正(inpainting)
- 整體調色或風格測試(recolor / colorizer)
- 照片轉素描參考、動漫頭像生成
這樣有幾個好處:
- 入門門檻低:你可以先用免費軟體
- 學習壓力小:你不需要一次學會所有功能
- AI 幫你 cover 你還不熟的部分,你可以先專注在基礎(結構、光影、顏色)
跟其他線上 AI 工具比,Pixelfox AI 有什麼優勢?
市面上 AI 修圖網站很多,
但很多是「什麼都做一點,什麼都不太精」,
或是介面看起來像 2008 年的網頁。
Pixelfox AI 比較明確:
- 功能分得很清楚:圖片轉素描、修復塗抹、調色、上色、動漫生成,各自有專頁
- 介面很直覺,新手不用看說明書也知道下一步要按哪裡
- 對電腦 繪圖使用者很友善,可以把你畫的圖拿來當素材,再做延伸或後製
簡單說,你不用學半天,只是為了把一根線擦掉。
你可以把腦力留給「創意」,而不是「軟體怎麼用」。
實戰案例:兩個真實的電腦 繪圖學習故事
案例 1:大學生阿哲——3 個月從「線條崩壞」到畫出像樣同人圖
背景:
- 大二,平常有在看動畫和漫畫
- 手繪幾乎零經驗
- 只會用 PowerPoint 畫簡單圖案
他的做法:
- 裝了免費的 Krita,買了一塊入門款繪圖板
- 每天 30 分鐘,照著 DrawABox 類型的練習,畫直線、箱子、簡單透視
- 把喜歡角色的照片或官方圖丟進 Pixelfox 的 AI 圖片轉素描工具,看線稿怎麼處理頭髮、衣服皺褶
- 開始畫自己的角色,不求完美,先求畫完
- 完成後,把圖丟到 Pixelfox 的調色工具玩不同色調,挑一個看起來比較舒服的配色
3 個月後:
- 線條還是有點抖,但角色比例穩了
- 可以畫出完整半身像同人圖
- 在社群上發圖,朋友開始留言「欸你進步很多欸」
他後來說:「最重要的其實不是技術,是我終於有東西可以發,不再只是在想像自己很會畫。」
案例 2:上班族 Amber——用下班時間練電繪,變成接小案的副業
背景:
- 上班族,白天做行政工作
- 下班前腦袋會關機
- 從小喜歡畫畫,但被考試打斷十幾年
她的做法:
- 買了 Clip Studio Paint 打折版,搭配入門繪圖板
- 設一個規則:平日每天畫 20 分鐘,假日畫 1 小時
- 練習內容分成三種:
- 練線稿(角色頭部、表情)
- 練色塊和光影
- 臨摹自己喜歡的插畫風格
- 作品完成後,用 Pixelfox 的 AI 圖片修復塗抹工具 把邊邊角角的雜線、塗錯地方擦乾淨,再輸出成乾淨版
- 偶爾用 AI 動漫風格生成器 生一些不同風格的頭像,當成靈感板
半年後:
- 她開始幫朋友畫頭像,收一點小費
- 有人找她畫簡單封面和貼圖
- 她說:「AI 沒有幫我取代畫畫,它只是讓我在有限時間裡,多產出幾張可以見人的作品。」
這就是「工具加持」的真實差別。
新手在電腦 繪圖最常犯的 6 個錯誤(以及怎麼救)
錯誤 1:一開始就畫超複雜構圖
很多人一上來就想畫「多人合照+豪華背景」。
結果比例全崩,背景像謎之迷宮,畫完直接心灰意冷。
解法:
- 一開始只畫單一主角或簡單物體
- 背景先用單色或簡單形狀,慢慢加細節
- 有需要複雜背景,可以先畫簡單版本,再用 Pixelfox 的調色或 inpaint 做延伸
錯誤 2:線稿狂按 Ctrl+Z,永遠畫不完
你可能很熟這個模式:
- 畫一筆
- 覺得怪
- Ctrl+Z
- 無限循環
解法:
- 一條線允許自己畫 3 次就好,第三次不管怎樣都先留下
- 先看整體,再回來修細節
- 線稿真的太崩,可以先輸出,丟進 Pixelfox 當參考,重畫一次時會比較冷靜
錯誤 3:完全不用參考圖,自以為在練創意
很多人怕「看參考就不算自己畫」。
結果畫出來的東西,比例怪、光影怪、姿勢僵。
根據很多專業繪師的訪談,新手如果硬要「無參考創作」,
進步速度會比有參考的人慢很多。
解法:
- 每張作品都看 3~5 張參考:姿勢、顏色、服裝、背景都可以看
- 不要一張圖全部抄,只取局部元素
- 你也可以用 Pixelfox 的 AI 動漫生成器生一些構圖,當參考版
錯誤 4:畫布解析度開太小,畫完才發現糊掉
這個真的很常見。
畫完才發現放大後都是鋸齒,心會很痛。
解法:
- 一開始就用 2000px 以上邊長、300 dpi
- 社群圖不用太怕檔案大,現在網路都扛得住
- 如果你拿到一張舊圖或低解析圖片,想救一下,可以試 Pixelfox 的上色或調色工具,讓質感好看一點
錯誤 5:把 AI 當「自動完成」,自己不思考
有些人會直接丟一張糊圖給 AI,然後說「AI 都畫不好,好爛」。
這比較像你丟一袋材料給師傅,叫他猜你要煮什麼。
解法:
- 先自己決定:畫面主角是誰、情緒是什麼、顏色大方向是什麼
- 再讓 AI 幫你「修邊」、「試版本」,而不是「幫你決定全部」
- 你可以先畫粗稿,再丟進 Pixelfox 做風格測試,決定你要走哪個方向
錯誤 6:一遇到瓶頸就停畫,結果永遠卡在新手村
很多人會這樣想:
- 「最近畫得好糟,我先停一陣子。」
- 然後這一陣子就是半年。
解法:
- 把練習切小塊:每天 10~20 分鐘就好
- 有一兩天很忙就畫線條或涂色小練習,不要完全斷掉
- 可以找一兩個朋友一起打卡,或加入繪圖社群,有人一起卡關會比較好笑一點,不會那麼孤單
FAQ:關於電腦 繪圖,你可能也會問這些
Q1:完全零基礎,可以直接從電腦 繪圖開始嗎?
可以,而且很多人都是這樣。
你不一定要先練傳統手繪再轉電繪。
你可以直接從簡單的線條、幾何形體、簡單物體開始,
搭配一套順手的軟體和便宜繪圖板。
如果你真的很怕一開始畫得很崩,可以用 Pixelfox 的 AI 工具做一些參考線稿或色彩版本,當「範本」。
你再照著畫或做變形,會比較有安全感。
Q2:為什麼我照著教學畫,還是很像小學生塗鴉?
有幾個常見原因:
- 練習量還不夠(這很正常,不是你一個人這樣)
- 你只是在「跟著畫」,而不是在想為什麼這裡要這樣畫
- 你沒有把自己的作品跟參考圖做對照分析
你可以試這樣做:
- 找一張你很喜歡的插畫
- 把它轉成灰階,對照你自己的作品
- 看光影分布哪裡不一樣
- 用 Pixelfox 的調色工具試著統一顏色,看看哪種色系比較接近你想要的感覺
這樣你會比較知道差在哪裡,而不是只覺得「好醜」。
Q3:我能不能只靠 AI,不自己畫,就做出好作品?
你可以靠 AI 做出看起來不錯的圖片,
但如果你想要:
- 穩定做出特定風格
- 幫客戶或自己的專案做精準畫面
- 做長期創作(漫畫、系列插畫、IP)
你還是會需要基本的構圖感、光影理解、色彩概念。
AI 可以幫你加速,但你要當「導演」,而不是完全交給它亂拍。
很多專家也提到,未來更有價值的,是「會用 AI 的創作者」,而不是「被 AI 完全取代的操作員」。
簡單說,你還是要練,但可以練得更聰明。
Q4:繪圖 軟體 學習要先學哪一套比較好?
如果你是:
- 學生、預算有限 → Krita 或 MediBang
- 想走漫畫、插畫 → Clip Studio Paint
- 有 iPad,喜歡躺著畫 → Procreate
- 想進設計公司、做商業修圖 → Photoshop 遲早會用到
不過不管哪一套,基礎概念都很像:
圖層、筆刷、選取、蒙版、輸出。
你先學會這幾個,再慢慢往深的地方走。
AI 相關的部分,你可以一開始就把 Pixelfox 當成「外掛軟體」,
需要修圖、改色、轉風格時叫它上場就好。
Q5:Pixelfox AI 適合專業創作者嗎?還是只有新手用得到?
兩邊都適合,只是用法不同。
- 新手:
用 Pixelfox 當「教練 + 修圖小幫手」,
像照片轉素描、快速調色、擦掉背景這些,都能幫你省一堆時間。 - 專業創作者:
可以用它做風格測試、版本提案、修圖加速、批次處理素材。
例如你有一組商品圖,要改成不同色系,你可以用 AI 圖片調色工具 快速試色。
AI 不是只給新手用,也不是只給專業用。
它比較像是:你畫畫這條路上的 Uber,你要叫一台來載你一段,就叫。
把話說白:現在就是開始電腦 繪圖的最好時間
你現在看的每一張漂亮插畫、角色設計、VTuber 立繪,
背後的創作者幾乎都在用電腦 繪圖,再加上一些工具和工作流程。
你不需要一開始就跟大神比。
你只需要比昨天的自己多畫一點,多試一點,多犯幾個可控的錯。
如果你想要:
- 有一條清楚的繪圖 軟體 學習路線
- 少踩一些「畫完才發現解析度錯」這種雷
- 讓 AI 幫你處理掉那些很煩的修圖、改色、去背景的工作
那你很適合現在就試一下 Pixelfox AI:
- 想把照片變成可以練習的素描線稿 → 用 AI 圖片轉素描工具
- 想擦掉畫面裡礙眼的東西、換背景 → 用 AI 圖片修復塗抹工具
- 想玩配色、試氣氛 → 用 AI 圖片調色工具
- 想讓黑白圖或老照片重生 → 用 AI 照片上色工具
- 想做自己的動漫頭像、角色靈感 → 用 AI 動漫風格生成器
你可以從今天開始,
開一個新檔,畫一個很簡單的小東西,
再丟進 Pixelfox AI 玩玩看。
不需要等你「準備好」才開始練電腦 繪圖。
老實說,你開始畫的那一天,就是你真正準備好的那一天。😉
關於作者 & 小小聲說的話
這篇內容是由長期研究數位內容策略、也常跟插畫師、設計師合作的人整理。
文章裡提到的工具和建議,都是站在「新手真的用得到、也不會被嚇跑」的角度設計。
你可以把這篇當作參考路線,而不是聖旨。
每個人節奏不一樣,你可以調整順序,
但有一件事不要改:
那就是「持續畫下去,哪怕每天只是多兩筆線條」。