 Credit

In today’s fast-paced digital world, high-quality video is more important than ever. Whether you’re shooting cinematic footage, working on a YouTube video, or doing a little nostalgia editing, smooth and silky motion is crucial. These are the times when one can rely on AI frame interpolation and frame interpolation online tools. Thanks to AI smooth video technology, you can also turn choppy, low-frame-rate videos into silky-smooth, professional-looking masterpieces without the need for advanced editing techniques.
In this piece, we’re going to explain what AI interpolation is, how video interpolation functions, and the top AI frame interpolation online platforms, wherever you are, getting your videos upped in quality thanks to smart motion technology.
What Is AI Frame Interpolation?
AI frame interpolation is a high-quality video processing algorithm based on artificial intelligence and is used to insert frames into video to improve smoothness.
The classical frame interpolation-based methods either with artifacts or blurring between frames. But with the AI interpolation, the deep learning networks look at the motions in each frame and imagine the natural movement, resulting in the most likely in-between.
Why We Need AI Smooth Video Tech?
Thanks for these great AI Smooth Video tools. Thanks to them, now I can have smooth video even can't rent expensive cameras like others and costly software. Here’s what to consider:
Better Motion Clarity: Less motion blur/stutter/judder in fast-moving images.
Good viewing experience: Ideal for action shots, game footage, or slow-motion replay.
Improvement of old footage: Raise obsolete 24 or 30 FPS videos to higher frame rates up to 60/120.Fundamentals: Crop, cut, rotate, reverse your video, add text, images, and audio.
Convenience: You can use most free frame interpolation online utilities directly from your browser without any special knowledge.
How Does AI Interpolation Work?
AI interpolation applies machine learning models to study video frames and derive how objects are moving between them. It then adds new interframes to replicate the natural motion for a smoother video.
The key steps include:
Frame Analysis: On the original frames, AI recognizes motion patterns.
Frame Interpolation: More frames are generated according to predicted motion.
Playback Optimized: Video is rendered with higher FPS for smooth effect.
AI frame interpolation gives creators the ability to quickly create film-like slow-motion and smooth out the motion in a couple of clicks.
Best Tools for AI Frame Interpolation Online
Here are the best websites to do frame interpolation online for free with premium facilities:
Flowframes (AI Smooth Video Tool)
Highlights: It is “popular for its robust, AI-based interpolation algorithms”.
Why Use It: Can turn low-FPS videos into super-smooth 60+ FPS clips with few artifacts.
Who’s it for: Gamers and content creators in need of professional-quality video interpolation.
RIFE (Real-Time Intermediate Flow Estimation)
Features: This is an open source AI framework application that has been insisted by a lot for its accuracy of in-between.
Advantages: Lightweight, fast, and customizable.
Why It Made The Cut: The best for developers or anyone looking for free AI smooth video solutions.
DAIN (Depth-Aware Video Frame Interpolation)
Notable Features: Utilizes depth maps for precise video interpolation.
When to Use It: Particularly useful for complex motion scenes or 3D material.
MotionInterpolation.com
Type: An Internet-based frame interpolation service.
Why It’s Great: No downloads, so it’s new player-friendly.
Features: Various format conversions are supported, quick conversion of FPS, and easy to achieve the perfect AI smooth video enhancement.
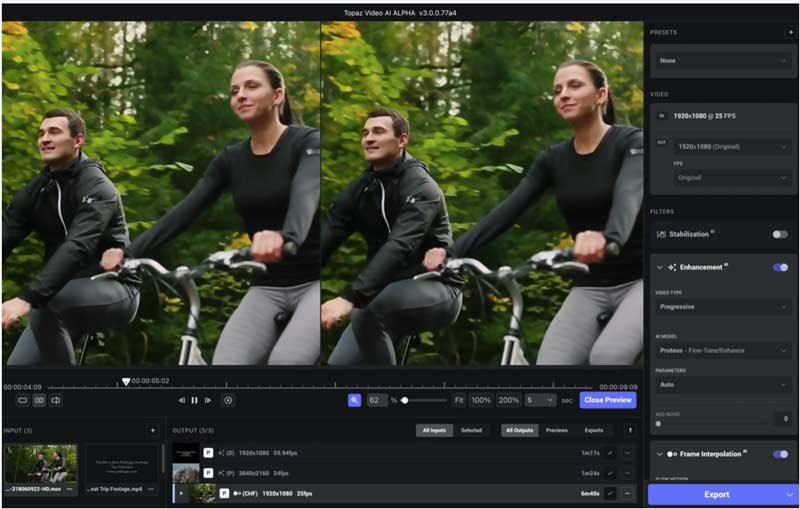
Topaz Video AI
Pros: A high-end AI-based editor that supports online frame interpolation.
Why You Should Go With It: Has a reputation for both video upscaling and AI frame interpolation skills.
Ideal For: Professionals looking for a cinematic-like video interpolation.
Advantages of Video Frame Decimation for Content Creators
Video interpolation can take the quality of your content to the next level.
For Filmmaker: Capture cinematic slow-motion shots without shooting your action at high speeds.
For Video Enhancement: Resurrect video recorded in the early days of film and bring it into the 21st century.
For Gamers: for streaming live videos.
All of that can be done without complex video editing software, with AI frame interpolation online.
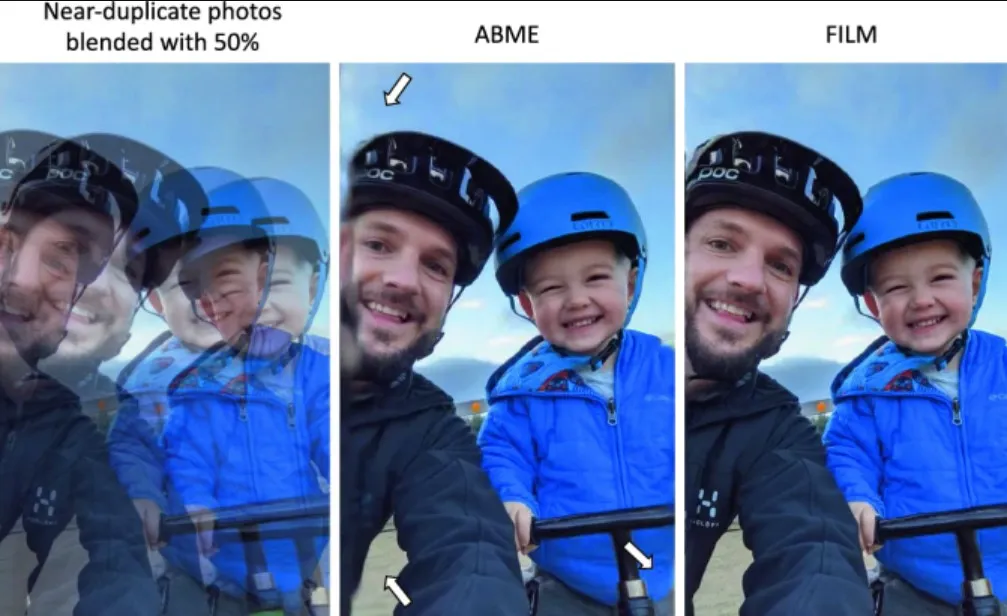
AI Interpolation vs. Traditional Frame Blending
Most established video editors tend to resort to frame-blending in this instance to create the illusion of fluid motion. But this process can result in ghosting or blurring effects. AI interpolation bypasses all of these issues by being able to predict motion between frames, meaning audiences get:
Sharper transitions.
Accurate motion paths.
Less visual distortion.
This, in turn, makes AI smooth video tools orders of magnitude better than for professional content creation.
Steps to Use Online AI Frame Interpolation
The majority of online frame interpolation tools are quite simple:
Upload your video: Launch with a clip you want to impress.
Choose your FPS: You can also decide how many frames per second you want to use - 60 FPS, 120 FPS, or Custom.
Let AI roll: The video is handled by the AI frame interpolation engine.
Download the result: Now you have your AI smooth video ready for sharing.
Important things you should consider when selecting a video interpolation software package.
Preservation of Output Quality: The platform should not have artifacts or distortions.
Rendering Vs Speed works fast for big files.
Works with your files: Only use (or pay for) the software that works with your file format.
Price: Some online AI frame interpolation tools can be used for free; however, the premium ones can deliver better output.
Future of AI Frame Interpolation
The future of AI interpolation is bright, with the progress made in real-time artificial intelligence, smooth videoprocessings and integration on video streaming platforms. With the advancement of machine learning models, video interpolation will not only get faster and more accurate, but it will also be able to work with 8K.
Final Thoughts
AI frame interpolation online tools are changing the video editing game, making silky-smooth, high frame rate content available to everybody. Whether it's you're a filmmaker, game enthusiast, or casual content creator, using your high-end editing software to smooth or enhance your video with stabilization effects using Acmetoolz, Topaz Video AI, Flowframes, or MotionInterpolation greatly reduces the sharpness and adds motion blur to your video. Content can take your content quality to the next level.
Give it a shot, one of the listed AI frame interpolation tools today, and see your videos turn into cinematic experiences.