 Credit

You type a few words.
You wait.
The AI spits out… a cursed, six‑fingered mess that looks like your photo went through a blender. 🤡
If that sounds familiar, you’re exactly who this guide is for.
We’re going to unpack how to actually get useful results out of [?????? ????], how to pick the right appli image for your needs, and why tools like Pixelfox AI make this way less painful and way more fun. By the end, you’ll know how to go from “AI chaos” to “wow, did a pro designer do this?” using the right workflow.
Yes, we’ll keep it real. And yes, we’ll talk about Photoshop too, because someone will ask.
What is [?????? ????] really doing behind the scenes?
Let’s clear something up.
When people say “[?????? ????]” or start searching things like appli image, they usually mean one of three things:
- An AI that creates new images from text (AI image generator)
- An AI that edits existing photos (beauty, reshape, background, etc.)
- A mix of both, wrapped in an “easy” app
Under the hood, most modern tools use deep learning models trained on millions of images. They learn patterns like:
- What a human face looks like
- How shadows fall on objects
- How skin texture should look at different resolutions
Then, when you type something like “cinematic portrait, soft lighting, 4K, realistic”, or upload a selfie, the AI tries to predict what pixels should go where.
So far so good.
The problem? A lot of [?????? ????] tools stop at “good enough to impress you once”, not “good enough to use in real work”.
According to multiple industry reports (think Statista, Gartner, Forrester style), more than half of marketers say they now use AI for visuals. But a big chunk of them are still not happy with quality, control, and… the hands. Always the hands.
That’s where better tools and smarter workflows come in.
The real problems people hit with [?????? ????]
AI image tools are not magic. They are picky, biased, and sometimes dumb. Let’s call them out.
1. Great… until you zoom in
You know that moment when the preview looks fine, but you open the image and see:
- Blurry skin
- Smudged edges around hair
- Weird artifacts around eyes
For quick social posts, maybe you ignore it. For ads, thumbnails, or client work, it’s a problem.
This is why tools that only “generate” but don’t enhance are limited. You still need a proper enhancer to clean up noise, sharpen edges, and fix colors.
Pixelfox AI’s AI Video Enhancer and image enhancement tech exist for exactly that reason: take a “meh” visual and push it to something you can actually publish.
AI Video Enhancer upgrading blurry to clear video – same logic applies when you care about quality in a [?????? ????] workflow.
2. Faces that look like wax or NPCs 🧟
A lot of AI tools break the moment you try to:
- Fix skin without making it plastic
- Shape the face a bit (slimmer jaw, smaller nose, bigger eyes)
- Keep the person still looking like… themselves
If you’ve ever used a random appli image that turned you into a wax filter, you know the pain.
Pixelfox leans hard into face-specific AI, like:
- AI Face Beauty for skin smoothing, glow, and facial enhancement
- AI Face Reshape to slim the face, tweak the nose, eyes, and mouth without breaking identity
So you get “I woke up like this” energy, not “I am a generated NPC from a 2012 mobile game”.
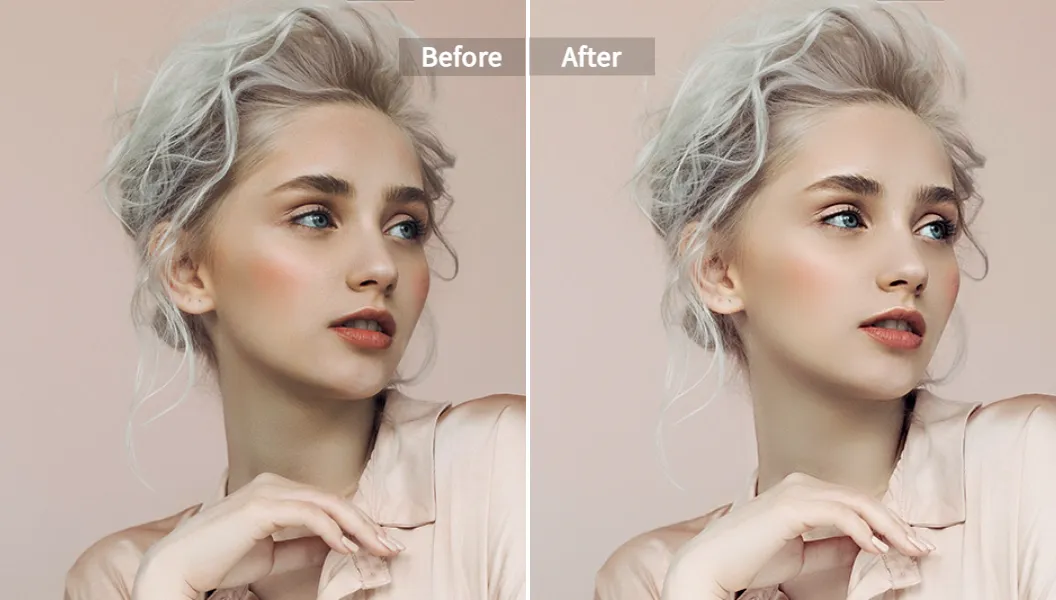
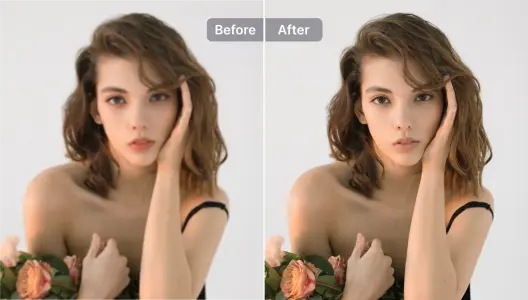
AI Face Beauty turns rough portraits into clean, glowing shots you can actually post.
3. Clunky interfaces and no real guidance
A lot of [?????? ????] tools assume you already know:
- Prompt engineering
- Lighting terms
- Aspect ratios
- Style keywords
Reality check: most people just want “make this selfie look good” or “give my product a white background”.
If the app throws 50 sliders at you with zero guidance, you bounce.
This is where Pixelfox AI leans toward simple UI + focused features. Instead of a thousand options with no help, you get:
- Clear tools like “Face Beauty”, “Face Reshape”, “Video Enhancer”
- Real-time preview
- No need to understand pro-editing jargon to get good output
4. Privacy paranoia (for good reason)
You’re uploading your face. Or your client’s face. Or your kid’s face. You should be picky.
Many users simply don’t trust that some random “free [?????? ????] appli image” is not farming their data.
Pixelfox AI is explicit about this part:
Uploaded images are only used for real-time processing and are neither stored nor shared.
That’s the kind of line you want in 2025. Anything less should worry you.
How Pixelfox AI turns [?????? ????] into a real workflow
Let’s talk about how to actually use this in a way that doesn’t waste your time.
Say you’re a content creator, marketer, or small brand owner. Your real problems are:
- “I need better photos and videos, like, yesterday.”
- “I don’t have time to learn Photoshop.”
- “I don’t want everything to look like the same basic AI filter.”
So your [?????? ????] stack needs to do three things:
- Fix faces
- Fix overall image/video quality
- Be fast and idiot-proof
That’s basically the design brief for Pixelfox AI.
Core tools in Pixelfox that matter for [?????? ????]
-
AI Face Beauty
For automatic facial enhancement. It smooths skin, adds a soft glow, and fixes minor flaws while keeping texture. Perfect for selfies, creator portraits, and profile photos. -
AI Face Reshape
For precise facial feature changes. You can slim the face, enlarge eyes, tweak the nose contour, and adjust mouth shape. Very handy when the AI generator got the face shape wrong, or you want a subtle “beauty” touch. -
AI Video Enhancer
For turning blurry or low-light footage into something close to 4K quality. It improves clarity, sharpens detail, and enhances colors. Great if you shoot on your phone and don’t always have perfect lighting. -
AI Video Portrait Enhancer
For video selfies and talking-head content. It cleans skin, fixes lighting on faces, and makes you look camera-ready in a few seconds. Ideal for vloggers and short-form creators.
You can think of Pixelfox as the “AI finishing studio” for your [?????? ????] workflow. Generate or capture something rough → feed it into Pixelfox → get something you can ship.
Step-by-step: from raw selfie to post-ready visual with Pixelfox AI
Let’s walk through a clean, simple flow.
Step 1: Start with any image (AI or normal)
You can:
- Use a normal photo from your phone
- Use an AI generated picture from any [?????? ????] app
- Use a frame from a video if you like the expression
Step 2: Fix the face first
Upload to Pixelfox AI and open AI Face Beauty.
- Let the auto enhancement run
- Check skin texture, under-eye area, and overall glow
- If it is too strong, dial it back a bit so it still looks like you
If the face shape is off (AI made your jaw huge, or nose too wide), open AI Face Reshape.
- Adjust jawline / face width
- Tweak nose contour slightly
- Adjust mouth corners if the smile looks odd
You don’t want to build a new face from scratch. You just nudge it.
Tip
If you ever look at the edit and think “this is not me anymore”, you went too far. Roll back 20–30%. Subtle edits almost always look more expensive and more “real”.
Step 3: Upgrade overall quality
If you’re working with video or low-res frames, send it through AI Video Enhancer.
- It boosts clarity
- Cleans noise
- Fixes flat colors
For static images, you can get a similar effect with image enhancement inside Pixelfox’s pipeline. Sharper edges + better color means your [?????? ????] result stops looking like a demo and starts looking like brand content.
Step 4: Export and reuse everywhere
Use your polished output for:
- Social posts
- Ads
- Thumbnails
- Profile pics
Save your settings so you can repeat the look. That’s how you build a consistent style without a design degree.
How to choose the right [?????? ????] or appli image for you
The app store is full of AI image stuff. Most of it is… not good. So let’s make this easy.
Here’s a simple decision frame.
Key things to look at
-
Output quality
Does the tool give you clean edges, natural skin, and good color? Or does everything look smudged and over-filtered? -
Control over faces
Can you fix facial features in a precise way?
If it only has one giant “beautify 100%” slider, that’s a red flag. -
Speed
You shouldn’t wait minutes for one simple enhancement in 2025. -
Privacy
Look for clear lines like “images are not stored” and “no sharing without consent”. -
Ease of use
If you need a course just to find how to smooth skin, skip it. -
Price vs time saved
Free tools are nice. But if you spend 30 extra minutes per image fixing bad output, that “free” cost is fake.
Simple comparison: [?????? ????] with Pixelfox vs Photoshop vs generic online tools
| Feature / Need | Pixelfox AI ([?????? ????] workflow) | Photoshop (traditional) | Random online appli image |
|---|---|---|---|
| Learning curve | Very low, simple UI | High, complex but powerful | Low, but often confusing |
| Face beauty + reshape | Built-in, AI driven, face-specific tools | Manual, time-consuming | Often one-click, but plastic |
| Video enhancement | Native AI Video Enhancer / Portrait Enhancer | Possible but complex workflows | Rare or very basic |
| Speed | Fast, web-based | Depends on device | Varies, often slow with ads |
| Privacy stance | Clear “process only, no storage” policy | Local files, you control storage | Often unclear, data may be stored |
| Best for | Creators, marketers, small teams, non-designers | Designers, retouchers, advanced editors | Casual play, low-stakes experimenting |
Photoshop is still the king if you need pixel-level edits and have time and skills. But if what you want is good-looking images fast, especially face-focused, a Pixelfox-style [?????? ????] setup is way more practical.
[?????? ????] vs Photoshop: what actually changes?
Let’s be blunt.
Photoshop is a beast. You can do almost anything.
You can also lose an hour trying to remember where one tool lives.
Where [?????? ????] beats Photoshop
- Speed: One upload, one click, done. No layers, no masks, no blending modes.
- No learning wall: You don’t need to understand curves, frequency separation, or luminosity masks.
- Face intelligence: Pixelfox’s AI Face Beauty and AI Face Reshape understand facial structure in a way default Photoshop filters do not, unless you stack plugins.
Where Photoshop still wins
- Complex composites
- Very manual, detailed retouching
- Design for print / advanced layouts
You don’t have to pick a side though. A lot of pros use a [?????? ????] + Pixelfox flow to get 80% of the work done, then finish in Photoshop if needed.
[?????? ????] vs other online tools
You’ve seen them:
- “Free AI beautify app, no signup!”
- “Best appli image for filters!”
Most of them are:
- Ad-heavy
- Over-smoothing everything
- Vague on what they do with your photos
Where Pixelfox pulls ahead:
- It focuses on actual quality: 4K-level enhancement, skin that still has pores, video tools built for creators.
- Clear, focused tools instead of random gimmicks.
- Transparent privacy stance, which is not optional anymore.
If you care about long-term brand, not just one viral post, that difference matters.
Advanced tricks to make your [?????? ????] look pro
Now we go past the basics. This is the part that makes your stuff look “expensive” without a big team.
1. Create clean white background product images
You sell products? You know the pain of:
- Messy backgrounds
- Different lighting across shots
- Inconsistent shadows
Here’s a simple way to fix it using an AI-first flow:
- Take product photos with your phone near a window.
- Use a background remover (Pixelfox has automatic image cutout tools behind the scenes for this kind of job).
- Place the product on a clean white or light gray background.
- Run the image through Pixelfox enhancement to sharpen and clean noise.
You just built the kind of product image that usually needs a lightbox and a DSLR.
Tip
If white looks too harsh, try a very light gray or soft pastel. It still feels “clean” but often makes the product pop more, especially on mobile screens.
2. Build YouTube or TikTok thumbnails that actually get clicks
You know those thumbnails with sharp faces, bold colors, and clean edges? That’s not an accident.
Try this flow:
- Take a clear photo or frame from your video.
- Run it through AI Face Beauty so your face is clear and bright.
- Use AI Face Reshape if the angle distorted your face.
- Remove or blur the background and place yourself on a color block or simple graphic.
- Enhance contrast and sharpness through your [?????? ????] stack (Pixelfox or your design app).
Now you don’t look like a random frame. You look like the main character.
3. Make a transparent logo that doesn’t look cheap
So many small brands still use logos with ugly white boxes around them. You can fix that in minutes:
- Start with your logo on any background.
- Use background removal to isolate it.
- Sharpen the edges using image enhancement.
- Export as PNG with transparency.
Now you can drop that logo anywhere – product shots, videos, social posts – and it actually looks like you know what you’re doing.
Real-world case studies: [?????? ????] in action
Time for some real stories. No fairy dust.
Case Study 1: Solo creator upgrading video quality overnight
Profile:
Emma, 26, runs a TikTok and YouTube Shorts account. She films everything on her phone in her apartment. Lighting? Sometimes decent, sometimes tragic.
Old workflow:
- Record on phone
- Toss a basic filter over everything
- Post and hope viewers don’t notice the noise
Problems:
- Grainy footage in low light
- Skin looks flat or orange with random filters
- Harder to repurpose clips for brand deals
New [?????? ????] + Pixelfox flow:
- Emma records as usual.
- Before posting, she runs her raw clips through AI Video Enhancer to fix low light and sharpen detail.
- For close-up talking segments, she uses AI Video Portrait Enhancer so her face looks clean and evenly lit.
- She grabs key frames from the enhanced video and uses those as base for thumbnails.
Result:
- Videos look like she added a softbox, not a filter.
- Engagement goes up because the content feels more polished.
- When brands ask for “high-quality deliverables”, she already has them.
Is she a color grading expert? Not even close. She just plugged Pixelfox into her [?????? ????] stack and moved on with her life.
Case Study 2: Small e‑commerce brand fixing their catalog
Profile:
Luis runs a small online store selling handmade accessories. His early product photos were… not helping.
Old workflow:
- Shoot products on random surfaces
- Try free appli image tools
- Get inconsistent colors and weird shadows
Problems:
- Store looked amateur
- Hard to run clean ads
- Couldn’t afford a pro photographer every month
New [?????? ????] flow with Pixelfox:
- Luis shoots his products near a window on a simple background.
- He uses AI background tools to put everything on a clean white or soft beige background.
- He runs each photo through Pixelfox-style enhancement to sharpen details and boost color.
- For lifestyle photos with models, he uses AI Face Beauty so faces look fresh but natural.
Result:
- Catalog looks consistent and “brand-level”.
- Ad CTR improves because photos finally match user expectations.
- He builds trust just by not looking like a random low-res shop.
No studio. No expensive gear. Just a smarter [?????? ????] setup.
Common mistakes with [?????? ????] (and how to avoid them)
Everyone makes these at the start. You can skip a few years of trial and error.
Mistake 1: Going full plastic mode
You open an appli image, drag “beauty” to 100%, and think “wow, I look smooth”.
Then you see it on a bigger screen and realize you look like an AI Barbie.
Fix:
- Keep sliders in the 20–60% range.
- Use tools like AI Face Beauty that keep texture instead of flattening everything.
- Zoom in. If your skin has no texture at all, it’s too much.
Mistake 2: Ignoring lighting and only trusting the AI
Bad lighting is still bad lighting. [?????? ????] can’t fully fix:
- Heavy shadows across the face
- Strong mixed color temperatures
- Overexposed highlights
Fix:
- Try to shoot near a window or soft, even light.
- Use AI enhancement to polish, not rescue a disaster.
Mistake 3: Using one tool for everything
A random [?????? ????, appli image, ] tool might be fun, but it’s usually not a full workflow.
Fix:
- Generate or shoot with whatever you like.
- Then run final images or videos through a focused enhancer like Pixelfox.
- Treat [?????? ????] as a pipeline, not one shiny app.
Mistake 4: Not thinking about privacy
Uploading your face to ten shady apps is not smart.
Fix:
- Check if the tool clearly states how they handle data.
- Prefer tools that say images are only used for real-time processing and not stored.
- Be extra strict if you work with client content.
Mistake 5: No consistency across outputs
Every image uses a different filter. Every video has a different look. Your “brand” is chaos.
Fix:
- Pick one main [?????? ????] flow.
- Save presets or remember the settings you like.
- Use the same style across platforms, so people recognize you.
Tip
Take screenshots of settings that worked well. That’s your low-tech preset system. Future you will thank you.
FAQ about [?????? ????] and appli image tools
How do I pick the best [?????? ????] app if I’m a complete beginner?
Look for three things: simple interface, good sample results, and clear privacy terms. If you can upload a photo and get a good result in under a minute without reading a guide, that’s a good sign. Tools like Pixelfox AI are built with that kind of user in mind.
Why do some [?????? ????] tools make my face look fake?
Most basic apps use aggressive smoothing and generic filters. They don’t understand your facial structure. Tools like AI Face Beauty and AI Face Reshape work better because they are trained to enhance faces in a more controlled way, not just blur everything.
Can I replace Photoshop completely with [?????? ????]?
For many everyday tasks, yes. For heavy design, print work, or complex composites, no. The sweet spot is to use [?????? ????] tools for fast enhancement and beauty work, then only jump into Photoshop for special cases.
What is the difference between an AI image generator and an appli image editor?
An AI image generator makes new images from prompts, even from nothing. An appli image editor takes your existing photo or video and improves it. Your best results come when you combine both: generate or shoot, then enhance with something like Pixelfox AI.
Can [?????? ????] help with video as well, or is it just for photos?
It can absolutely help with video. Pixelfox has AI Video Enhancer to improve clarity and color, and AI Video Portrait Enhancer to polish faces in clips. If you make any kind of short-form video, this matters a lot.
Time to make [?????? ????] work for you, not against you
You don’t need to worship every new AI image trend. You just need a setup that gives you:
- Clean, natural faces
- Sharp, high-quality images and videos
- Fast results with low effort
- Clear privacy and control
That’s exactly where a [?????? ????] workflow powered by Pixelfox AI shines. You get focused tools like AI Face Beauty, AI Face Reshape, AI Video Enhancer, and AI Video Portrait Enhancer that actually solve the real problems you face, instead of just giving you more gimmick filters.
So here’s the move:
- Pick one or two images or clips you wish “looked better”.
- Run them through Pixelfox AI.
- Compare before and after on a big screen.
If you like the result, you just found your new default [?????? ????] stack.
Ready to see what your content looks like when your tools finally keep up with you?
Head over to Pixelfox AI, drop in a photo or video, and let it do the heavy lifting for your next post, ad, or thumbnail.