 Credit

Suggested URL: /ai-outpainting-2025-guide
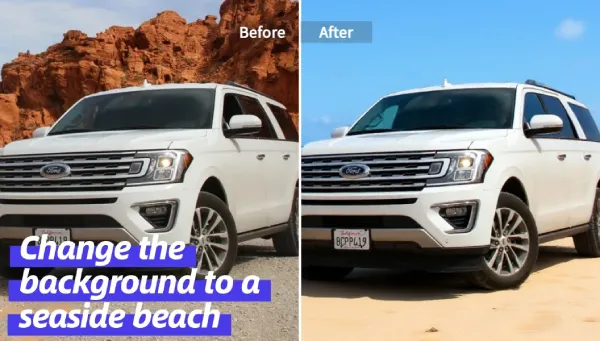
If you’ve ever tried to turn one “perfect” photo into a YouTube banner, an IG Story, and a product hero image… you already know the pain: cropping ruins the shot, and stretching looks like a bad meme. AI outpainting fixes that by creating believable pixels outside your original frame, so your image can breathe again (and your design doesn’t look like it’s gasping for air). This guide shows what it is, why it sometimes fails, and how to get clean results fast—using Pixelfox AI as the go-to outpainting workflow.
What is AI outpainting (and why people keep calling it “uncrop”)?
AI outpainting is when an AI model extends an image beyond its original borders. It studies what’s already there—lighting, texture, perspective, style—and then generates new background (or scene) that should exist outside the frame.
People call it “uncrop” because it feels like reversing a crop. In reality, the AI is making educated guesses. Sometimes it’s spooky-good. Sometimes it invents a third hand. That’s life.
How AI image outpainting works (plain English version)
An outpainting model typically does three things:
- Understands context: “This is a beach, horizon line here, light comes from the left.”
- Matches style: color palette, grain, brush strokes, lens blur, anime shading… whatever your image uses.
- Generates continuation: it predicts what could exist beyond the edge and paints it in.
Google’s own documentation for image outpainting (Vertex AI / Imagen) describes it as mask-based expansion, and even notes practical limits like distortion when expanding too aggressively (their docs mention issues when going far beyond the original size). That’s not marketing fluff—this is a real constraint of generative image models.
Outpainting vs inpainting (stop mixing them up 😅)
They’re cousins, not twins:
- Image outpainting: adds new pixels outside the original frame.
- Inpainting: edits pixels inside the existing frame (remove objects, replace items, fix holes).
If you outpaint a scene and get one weird lamp or broken tile near the edge, that’s where inpainting becomes your cleanup crew.
If you want a strong, simple add-on for that cleanup step, Pixelfox has a dedicated tool: Pixelfox AI Inpaint.
The real problem: why resizing images still feels like suffering in 2025
You don’t need more “creative inspiration.” You need assets that fit.
Here’s what actually happens on real teams:
- E-commerce marketplaces demand different ratios (square for listings, wide for ads).
- Social platforms punish “almost-right” crops with awkward framing.
- Designers waste hours doing “just one more version.”
- Founders and marketers end up playing Photoshop roulette at midnight.
And yep, it matters. Stanford’s Web Credibility research famously found that people judge credibility heavily based on design presentation. Translation: if your visuals look off, your brand looks off—even if your product is great.
So online outpainting isn’t just a fun toy. It’s a workflow fix.
Why AI outpainting fails (and how to spot it early)
Bad outpainting usually isn’t random. It’s predictable.
1) Your source image has no “signal”
Low-res, heavily compressed JPEGs, motion blur, messy noise… the model has less to match. It guesses harder. Results get weird faster.
2) You expanded too much in one jump
When you try to go from a tight portrait to a 3x wider banner in one shot, the model has to invent a whole world. It will. It just won’t be your world.
3) Style drift (the silent killer)
The original is warm, the outpaint becomes cool. The grain changes. Shadows don’t line up. Your brain notices even if you can’t name it.
This is why matching lighting and color matters more than “detail.” And it’s also why I often pair outpainting with style/lighting matching.
Pixelfox has a tool for that: AI Color and Lighting Transfer.
Tip: If your outpaint looks “technically fine” but still feels fake, it’s usually lighting direction or contrast curve mismatch. Fix those and the whole thing suddenly clicks.
The solution path (that doesn’t make you hate your life): Pixelfox AI workflow
Most competitor pages stop at “Upload → Generate → Download.” Cool. That’s like saying cooking is “Buy food → Heat → Eat.” True, but not helpful.
Here’s a workflow that gets you consistently clean results using Pixelfox AI as the main hub: Pixelfox AI.
Why Pixelfox AI is my default outpainting setup
From a strategy angle (and yes, I’ve shipped content and creative at scale for years), the best outpainting tool is the one that:
- keeps the original sharp
- gives you fast iterations
- lets you repair artifacts without switching tools
- helps you maintain style consistency across a campaign
Pixelfox is strong here because it’s built like a practical editor suite, not a single gimmick page.
How to do image outpainting step-by-step (clean, repeatable)
This is the part you’ll actually use.
Step 1: Pick your target size before you touch anything
Decide where the image will live:
- YouTube thumbnail
- website hero banner
- Amazon main image
- IG Story / Reel cover
When you know the final ratio, your outpainting becomes controlled. When you don’t, you generate chaos and call it “creative.”
Step 2: Expand in passes (small wins > big hallucinations)
Instead of expanding 200% in one go, do something like:
- expand 15–30% left/right
- generate
- expand again if needed
- generate again
This keeps the scene consistent and reduces the “AI invented a new universe” problem.
Tip: Treat outpainting like walking in the fog with a flashlight. You move forward a little, you check, then you move again. Sprinting just makes you trip over a mystery chair.
Step 3: Use simple prompts (if your tool supports them)
If your outpainting tool takes prompts, don’t write a novel.
Good prompt:
- “extend the beach and sky, keep same lighting, realistic”
Bad prompt:
- “extend into a majestic cinematic sunset with dramatic volumetric god rays and ultra detailed clouds…”
That second one is how you summon chaos. Fun chaos, but chaos.
Step 4: Fix weird edges with inpainting (this is the pro move)
Outpainting often fails at the seam: where the real pixels meet generated pixels.
Use Pixelfox AI Inpaint to patch:
- doubled patterns
- warped tiles
- broken fingers (classic)
- text-like artifacts
Step 5: Lock style across a batch (so your campaign doesn’t look random)
If you’re creating a set of images for a shop or social series, your backgrounds and tones should match.
Two Pixelfox helpers that make this less painful:
- AI Color and Lighting Transfer (match tone/lighting)
- AI Style Transfer (match an art style across outputs)
Free AI outpainting: what “free” really means (and what to watch)
A lot of “free ai outpainting” tools mean:
- free trial credits
- free with watermark
- free but low-res download
- free but you need an account
- free… and your results look like a dream you can’t explain
That doesn’t make them bad. It just means you should pick based on your real goal:
- If you need quick social content, free tools can be enough.
- If you need e-commerce consistency, you want repeatability and cleanup tools.
Best outpainting tool options in 2025 (Pixelfox vs others)
Most top-ranking pages are tool landing pages. They show steps. They don’t tell you what happens when your photo is hard: interiors, products, text, repeating patterns, or brand consistency.
Here’s a more useful comparison.
Quick comparison table (real-world oriented)
| Tool | Best for | Strengths | Common limits |
|---|---|---|---|
| Pixelfox AI | Practical workflows | Suite approach (edit + fix + style match), good for repeatable results | You still need taste—AI won’t save bad composition |
| Pixelcut | Beginners, fast uncrop | Very simple UX, fast outputs | Less control for tricky scenes |
| getimg.ai | Prompt-driven control | Good for creators who like prompting | Can take tuning; results vary by prompt skill |
| Fotor | Variations & presets | Multiple outputs to choose from | Some results can feel “generic” |
| OpenArt | Creative expansion | Good for art/illustration | Can drift in realism for photos |
| X-Design | E-commerce resizing | Multi-options, practical | Quality depends on source image |
| PxBee | Simple online expansion | Easy, direction controls | Expansion limits, occasional artifacts |
Pixelfox AI vs Photoshop (the honest take)
Photoshop is powerful. It’s also a time tax.
Photoshop manual methods (clone stamp, content-aware fill, generative expand) can produce perfect results, but:
- you need skill
- you need time
- you need consistency across dozens of assets (good luck)
- you still end up doing repetitive work
AI outpainting with Pixelfox AI is faster for 80% of marketing tasks because the “draft” is instant, and the cleanup is built into the same workflow (inpaint + style/lighting matching). Photoshop still wins when you need pixel-level art direction across complex scenes, but for day-to-day production? AI outpainting is the new default.
Pro-level “玩法” (advanced tricks that actually work)
These are the moves that make people go: “Wait… you can do that?” (Yes. You can.)
1) E-commerce hero images: create breathing room for copy without reshooting
Goal: You have a great product shot, but no space for price, benefit text, or badges.
Workflow:
- Outpaint the background to the left/right to create negative space
- Keep the product centered and untouched
- If the background tone shifts, run color/lighting transfer to match
- Add text overlay after (don’t ask the AI to generate text, unless you like fake alphabets)
Result: one product shot becomes a banner, an ad, and a storefront hero.
2) YouTube thumbnails: expand to 16:9 without making faces look weird
Faces are sacred. Don’t stretch them.
Workflow:
- Outpaint the sides to reach 16:9
- Keep the face area inside the original pixels
- Use inpainting to fix edge artifacts (hair and shoulders are common fail zones)
- Use lighting transfer so the new background doesn’t look pasted
This is how you keep that “creator look” consistent across a channel.
Real-world case studies (2 examples, no fairy tales)
Case Study #1: Marketplace-ready product images without reshoots
Scenario: A small seller has 30 product photos shot for Instagram (4:5). Now they need square crops for listings and wide banners for ads.
What usually happens: They crop too tight, product feels cramped, CTR drops, and they blame “the algorithm.” Sure.
Outpainting approach with Pixelfox AI:
- Use outpainting to extend neutral backgrounds
- Maintain the product edges clean
- Patch repeated texture glitches with inpainting
- Apply consistent lighting across the set for a unified storefront look
Impact: Faster asset production, fewer reshoots, and a more consistent brand feel. And consistency is not “nice to have” in e-commerce. It’s how you look legit.
Case Study #2: One photoshoot → a week of social formats
Scenario: A creator has one strong portrait photo. They need:
- IG Story (9:16)
- Reel cover
- YouTube community post (square)
- X/Twitter header (wide)
Outpainting approach:
- Expand top/bottom for vertical formats (don’t crop the chin, ever)
- Expand sides for headers
- Use lighting transfer to keep skin tones stable across versions
- Inpaint any seam issues near hair strands
Result: Same face, same vibe, many formats. Less “content treadmill,” more actual content.
Common mistakes beginners make with ai outpainting (and fixes)
Mistake 1: Expanding 2–3x in one click
Fix: Expand in small passes. Check seams each time.
Mistake 2: Starting with a low-quality screenshot
Fix: Use the highest-res original you can. AI can’t invent detail that matches what isn’t there.
Mistake 3: Ignoring perspective lines (interiors, streets, buildings)
Fix: Expand less in those scenes. Generate multiple options. Patch with inpainting.
Mistake 4: Prompting like you’re writing a fantasy novel
Fix: Simple prompt. Describe materials and lighting, not “epic.”
Mistake 5: Letting style drift across a set
Fix: Run lighting/color matching across outputs. Consistency beats “one cool image.”
Mistake 6: Trusting the first generation because you’re tired
Fix: Make 3–6 variations. Pick the best. You’re the art director, not the AI.
Mistake 7: Forgetting usage rights and privacy basics
Fix: Don’t upload sensitive client images to random tools with unclear policies. Use vendors you trust and keep your workflow tight.
How to avoid online outpainting that backfires (the “looks AI” problem)
“Looks AI” usually means:
- repeated textures
- strange micro-details
- inconsistent shadows
- fake depth-of-field
Best practice (what pros do):
- keep expansion subtle
- maintain a clear subject in original pixels
- clean seams with inpainting
- unify tone with lighting transfer
- export high quality, then compress for web after
If you do those, your image outpainting stops looking like a trick and starts looking like… a normal photo. Which is the whole point.
FAQ (quick answers that people actually search)
1) How does AI outpainting work?
It analyzes the existing image (style, lighting, objects), then generates new pixels outside the original frame that match the scene. Many systems use mask-based generation to expand the canvas in a controlled way.
2) Can I use free ai outpainting for commercial work?
Sometimes yes, but check each tool’s license terms, watermark rules, and output limits. “Free” can still come with restrictions.
3) What’s the difference between image outpainting and inpainting?
Outpainting adds content outside the image borders. Inpainting edits or replaces content inside the image. They work best as a combo.
4) Why does my ai image outpainting look blurry or fake?
Usually because the source image is low quality, the expansion is too large, or lighting/style shifts between original and generated areas. Expand in passes and match lighting.
5) How can I get better results with an outpainting tool for products?
Use clean, high-res product shots, expand the background in small steps, avoid complex prompts, and fix seams with inpainting. Keep the product itself inside the original area when possible.
The part nobody wants to hear (but helps): AI won’t fix weak composition 🙃
AI outpainting can give you space. It can’t give you taste.
If the subject is already awkwardly cropped, or the lighting is messy, outpainting will extend the mess. Start with the strongest base image you can, then use AI to scale it across formats.
And if you want one workflow that covers outpainting + cleanup + style consistency, use Pixelfox AI as your main setup. Start here: Pixelfox AI. When you hit edge glitches, patch them with Pixelfox AI Inpaint. When your set needs the same vibe, match it with AI Color and Lighting Transfer or AI Style Transfer.
You’ll ship faster, and your visuals will stop looking like you glued them together at 2 a.m. That’s the real win. And yeah—this is exactly why ai outpainting is now a serious production tool, not just a party trick. (•̀ᴗ•́)و
Author note / disclaimer
I’m writing this as a long-time content strategist who’s spent years watching creative teams fight deadlines and format requirements. Tools and model quality change fast, and results can vary by image type and prompt. Always test with your real assets before you commit to a full workflow.