 Credit

In a digital world where everything from branding to telling a story is led by digital content, the capacity to speedily and convincingly edit images is fundamental. Whether you’re crafting marketing images, enhancing social media posts, or just playing around with your favorite snaps, the ability to swap out objects within photos thanks to AI is a whole new ball game. This is where your all-in-one AI photo toolkit, PixelFox, comes in.
With the machine learning powered AI image replacer doing its job in PixelFox, you can manually add or replace objects in photos with AI for free, without requiring intricate photo editing skills. Whether you’re replacing backgrounds, adding new props, or taking away unwanted objects, you can now do it directly from your browser.
So let’s find out how AI photo replacement works, how our client has been able to utilize this to his advantage, and how PixelFox makes it better than ever.
What Is an AI Photo Replacer?
AI photo replacer is a program that allows you to change a picture, add or remove objects from a photo, swap one object for another, etc. With the help of artificial intelligence. Rather than copying, pasting, and adjusting items (in the manner we do with traditional editing programs), AI is looking at this image, understanding what’s around it, and blending in the new, altered elements, so it looks like it’s part of the photograph from the start.
Whether you want to:
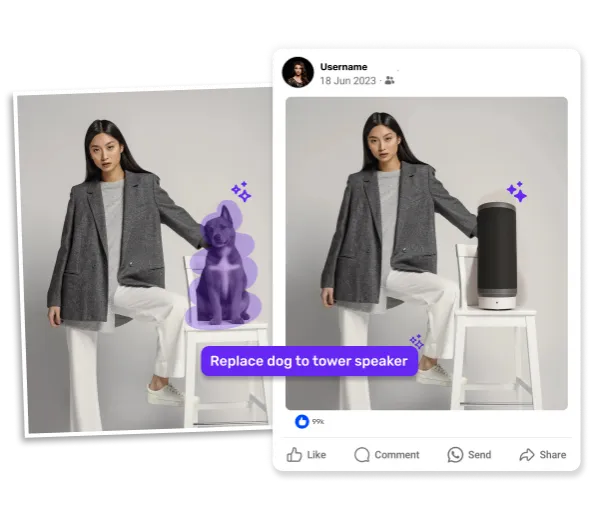
Swap a cup of coffee for a bunch of blooms
Include a pet in your family photo
Trade one gray sky for one sunny one
Or add some fantasy, dragons, neon signs, and so on.
With an AI image replacer like PixelFox, you can make shit up however you want, fast and free.
Why Use AI to Remove Photos or Add Objects?
Here are countless reasons you may want to swap photos or add objects to photos:
Clean up imperfections: Get rid of photo-bombers or unwelcome objects.
Develop social media posts: Integrate some popular features to ensure that your posts are engaging.
Enhance e-commerce listings: Put your product in a more appealing or more relevant setting.
Make memories personal: Find and add details or people meaningful to your family to old family photos.
Visual storytelling: Create fantastic and futuristic scenes, then produce a final image or rendering of your concept for art or storytelling projects.
With traditional tools, this is a process that takes time, skill, and an expensive software package. But with AI-based photo editing, you can do it in seconds, even if you’re not a professional designer.
How PixelFox Will Make AI Photo Replacement Easy
PixelFox is a simple and free AI bot that helps you upload your images to AI and then make replacements with precision without the technical hassle. Here’s what makes it special:
AI Replace Free:
For those editors who do not charge extra, PixelFox is one of the ones that do offer free AI image replacement. No watermarks. No downloads. Just load your portrait image and start editing your portrait directly in your browser.
Use Objects in Photos Accurately:
Whether you’re adding a lamp to your living room photo or an à la carte grilled cheese to your mouth, the tool conveys lighting, angles, and shadows so new objects look like they fit in, with the right color and perspective, even if you don’t have a good camera to capture that lighting yourself.
Create the Addition of Stuff on the Photos:
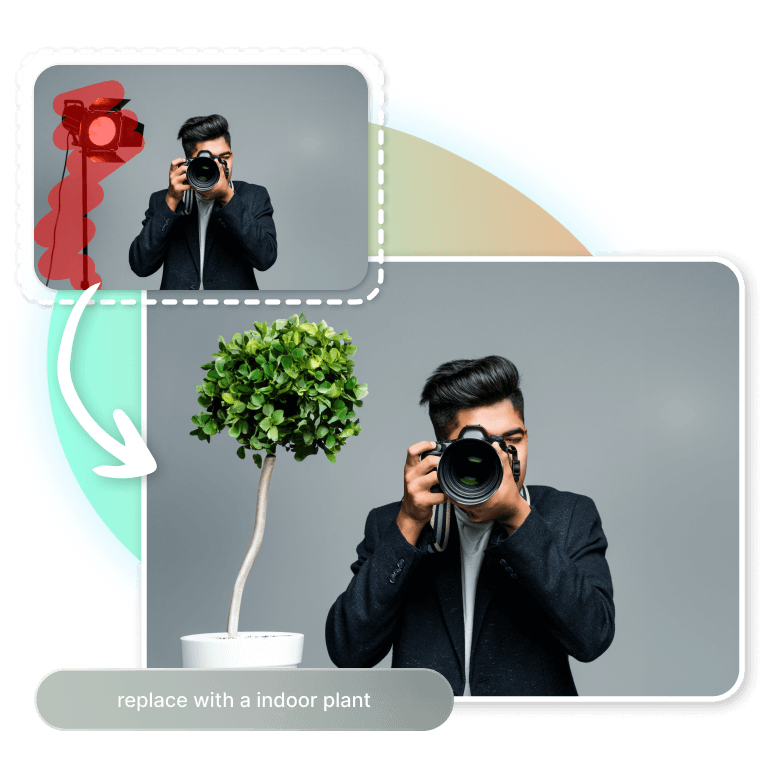
The AI image replacement engine does more than just copy-paste. It creates new details that are consistent with the style and lighting of the original image. For example, if you were to insert a pizza box onto a dining room table, the AI will factor in placement, size, and perspective in order to create a believable result.
Place Object on Photo Online Free:
Simply upload your photo to the AI photo editor here on PixelFox, type what you want to be added or replaced (e.g., “replace the dog with a cat,” or “add a surfboard”), and within seconds, your updated photo will be created.
Use Cases: Practical applications of AI Image Replace in real life
Social Media Glow-Up:
PixelFox is a favorite tool for influencers and content creators who want to add cool stuff to their photos, whether it be surfboards and designer bags, or graffiti walls and floating sparkles.
E-Commerce Product Swaps:
E-commerce sellers adopt the AI-replaced photo editor to demonstrate the ideal setting of their product. For instance, a sneaker can be “photographed” on a beach, in a gym, or on a city street; a physical photo shoot isn’t necessary.
Creative Projects and Posters:
Designers, students, and digital artists who love the ability to add surreal objects, such as flying cars or fantasy animals, without mastering Photoshop.
Family Photos and Memories:
Want to put grandma in the family portrait she missed? Or take out a stranger in the background? PixelFox lets you tell stories with realism and heart.
Begin to Add Objects to Your Photos with AI—Free
And, with tools like PixelFox, you no longer have to have Photoshop skills (or any prior editing experience, for that matter) to bring your ideas to life. Whether you need to make fun memes, add a little flair to your images, or simply perfect product shots for your online store, the AI pic replace feature from us can help you do it in a few clicks!
So go ahead and upload your photos to AI to test out the possibilities and everything your creativity can help you come up with. Throw a giraffe on top of your building, substitute fireworks for a cloudy sky, or trade morning coffee in for a crystal ball.