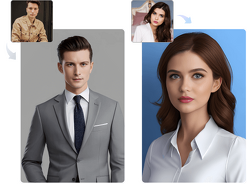
\nOpen /image/enhancer/edit and drop your photo. The app analyzes edges, faces, and texture.\u003C/p>\n\u003Cp>2) Click AI Enhance\u003Cbr />\nLet the model sharpen edges, reduce noise, and lift micro-contrast. This is the fastest path when you need an app to make blurry image clear in seconds.\u003C/p>\n\u003Cp>3) Compare and tweak \u003C/p>\n\u003Cul>\n\u003Cli>If the photo had noise, keep the denoise the app applied. It prevents crunchy halos. \u003C/li>\n\u003Cli>If the photo looks too crisp, reduce sharpness a bit. Back off until skin looks natural. \u003C/li>\n\u003Cli>If the image was small, use the upscale option to get more pixels before final sharpening.\u003C/li>\n\u003C/ul>\n\u003Cp>4) Download in full resolution\u003Cbr />\nPixelfox offers watermark‑free download. This is rare among free tools and helps if the file goes to a client or an e‑store.\u003C/p>\n\u003Cp>Pro tips for better results\u003C/p>\n\u003Cul>\n\u003Cli>Always denoise before heavy sharpening. Noise sharpens too and ruins skin and text.\u003C/li>\n\u003Cli>Crop distractions. A cleaner frame looks “sharper” to the eye.\u003C/li>\n\u003Cli>For faces, prefer an apps to make photos clear with face-aware models. They keep eyes and lips natural.\u003C/li>\n\u003Cli>For text screenshots, raise contrast, then sharpen. Text needs edge contrast more than texture.\u003C/li>\n\u003C/ul>\n\u003Cp>\u003Cimg loading=\"lazy\" src=\"https://api.pixelfox.ai/template/image-enhancer/feat_1.webp\" alt=\"AI photo enhancement before and after\" />\u003C/p>\n\u003Ch2 id=\"OhBcrk\">How to fix blurry pictures on iPhone for free\u003C/h2>\n\u003Cp>You can fix a lot inside Apple Photos without buying a fix blurry photos app.\u003C/p>\n\u003Cp>Edit with Apple Photos (iOS 16/17/18)\u003C/p>\n\u003Cul>\n\u003Cli>Open Photos > pick an image > Edit.\u003C/li>\n\u003Cli>Tap Adjust and try these sliders:\n\u003Cul>\n\u003Cli>Sharpen: adds edge contrast. Move slowly. Stop when lines look crisp but not jagged.\u003C/li>\n\u003Cli>Noise Reduction: smooths grain. Add a little, then re-check sharpness.\u003C/li>\n\u003Cli>Brilliance and Contrast: add pop and midtone clarity without overdoing highlights.\u003C/li>\n\u003C/ul>\u003C/li>\n\u003Cli>If highlights glow, lower Highlights. If the shot is dim, raise Exposure a little and try Brilliance again.\u003C/li>\n\u003Cli>Tap Done.\u003C/li>\n\u003C/ul>\n\u003Cp>Use Google Photos on iPhone (free)\u003C/p>\n\u003Cul>\n\u003Cli>Open Google Photos > select your image > Edit > Tools.\u003C/li>\n\u003Cli>Use Sharpen and Denoise. Tap Auto to see a quick baseline, then tweak.\u003C/li>\n\u003Cli>Save a copy so you can undo.\u003C/li>\n\u003C/ul>\n\u003Cp>Use a free unblur photo app when you need more\u003C/p>\n\u003Cul>\n\u003Cli>For hard cases or tiny files, try Pixelfox (web), Adobe Express (web/app), or Picsart (web/app). Each has a free path with fast results.\u003C/li>\n\u003C/ul>\n\u003Ch2 id=\"pRgdue\">How do you fix a blurry picture? Nine workflows that work\u003C/h2>\n\u003Cp>This section covers real edits that help most files. It also uses the language people search for, so you can spot your scenario fast.\u003C/p>\n\u003Cp>1) One-click AI enhance\u003Cbr />\nWhen someone asks “how do you fix a blurry picture,” the fastest answer is a free AI enhance. It lifts edges, reduces noise, and improves micro-contrast in one move. This works well as a first pass in a fix blurry pictures app.\u003C/p>\n\u003Cp>2) Denoise first, then sharpen\u003Cbr />\nNoise ruins detail when you push the sharpen slider. Add a light denoise, then a moderate sharpen. This two-step often beats a single heavy sharpen.\u003C/p>\n\u003Cp>3) Upscale before sharpening\u003Cbr />\nSmall files need more pixels. Use an upscaler (Pixelfox, Canva, or YouCam Enhance) to 2x the size. Then do a subtle sharpen. This is the best app to fix blurry photos tactic for social posts and listings.\u003C/p>\n\u003Cp>4) Recover motion blur with targeted sharpening\u003Cbr />\nMotion blur is hard. Smart Sharpen or AI sharpen works better than Unsharp Mask on streaks. If the streaks are strong, limit the sharpen to the face or the subject only.\u003C/p>\n\u003Cp>5) Sharpen edges, not skin\u003Cbr />\nUse a brush to sharpen hair, eyes, and clothes but skip smooth skin. Many apps to make blurry photos clear add overall crispness. Brush control keeps portraits real.\u003C/p>\n\u003Cp>6) Raise midtone contrast\u003Cbr />\nClarity or “Structure” makes edges stand out without jagged halos. Add a little clarity after sharpening for a natural look.\u003C/p>\n\u003Cp>7) For text and screenshots\u003Cbr />\nBoost contrast and black level first. Then sharpen. This helps when people ask, “can you fix blurry photos with text?” Yes, but prioritize contrast.\u003C/p>\n\u003Cp>8) For product photos\u003Cbr />\nEven light, clean white balance, denoise, and a moderate sharpen. If the item has fine texture (fabric/leather), do a small micro‑contrast bump. That beats heavy sharpening.\u003C/p>\n\u003Cp>9) For old photos\u003Cbr />\nDenoise, dust removal (if available), light sharpen, then optional colorization. Color can add perceived clarity. You can also use an AI colorizer to revive faded tones.\u003C/p>\n\u003Cp>\u003Cimg loading=\"lazy\" src=\"https://api.pixelfox.ai/template/colorizeimage/feature_3.webp\" alt=\"Colorize and revive old photos with AI\" />\u003C/p>\n\u003Ch2 id=\"DwVbvU\">“Best app to unblur photos”: what to expect and what to avoid\u003C/h2>\n\u003Cul>\n\u003Cli>No app can rebuild detail that was never captured. AI can infer it. That helps social images. It may not be faithful to the original face in a forensic sense.\u003C/li>\n\u003Cli>Some apps “beautify” faces by default. Users report this in public reviews for several tools, including Remini. If true-to-life identity matters, keep face enhancement subtle.\u003C/li>\n\u003Cli>The best app to fix blurry pictures is the one that matches the problem. Use face-aware tools for portraits, upscalers for tiny files, and careful manual edits for motion blur.\u003C/li>\n\u003Cli>Free versions may show ads or limit batch use. Plan your workflow accordingly.\u003C/li>\n\u003C/ul>\n\u003Ch2 id=\"noEdJi\">How to unfocus a picture (the creative flip side)\u003C/h2>\n\u003Cp>You came here to make photos clear. Sometimes you also want the reverse: a soft, shallow look. That is “how to unfocus a picture” on purpose. Add background blur to isolate a subject. Use a portrait mode in-camera or a background blur tool in your editor. Softening the background often makes the subject appear sharper without extra sharpening.\u003C/p>\n\u003Ch2 id=\"jylrxD\">Fair expectations: can you fix blurry pics fully?\u003C/h2>\n\u003Cp>People ask, “can you fix blurry pics” and expect magic. The honest answer:\u003C/p>\n\u003Cul>\n\u003Cli>Light blur: often yes, and it can look great.\u003C/li>\n\u003Cli>Moderate blur: often yes, but only after denoise, sharpen, and maybe upscale.\u003C/li>\n\u003Cli>Heavy motion or big focus miss: you can improve it, but you cannot make it truly sharp.\u003C/li>\n\u003C/ul>\n\u003Cp>This is not a knock on any clear picture app. It is how optics and sensors work. Adobe, Canva, Picsart, Fotor, and YouCam all set similar expectations in their docs. You can review their guidance here:\u003C/p>\n\u003Cul>\n\u003Cli>Adobe Express Unblur: \u003Ca href=\"https://www.adobe.com/express/feature/image/unblur\" rel=\"nofollow\" target=\"_blank\" >https://www.adobe.com/express/feature/image/unblur\u003C/a>\u003C/li>\n\u003Cli>Canva Unblur and Upscaler: \u003Ca href=\"https://www.canva.com/features/unblur-image/\" rel=\"nofollow\" target=\"_blank\" >https://www.canva.com/features/unblur-image/\u003C/a>\u003C/li>\n\u003Cli>Picsart AI Enhance Unblur: \u003Ca href=\"https://picsart.com/ai-image-enhancer/unblur/\" rel=\"nofollow\" target=\"_blank\" >https://picsart.com/ai-image-enhancer/unblur/\u003C/a>\u003C/li>\n\u003Cli>Fotor Unblur: \u003Ca href=\"https://www.fotor.com/features/unblur-image/\" rel=\"nofollow\" target=\"_blank\" >https://www.fotor.com/features/unblur-image/\u003C/a>\u003C/li>\n\u003Cli>Perfect Corp’s 4K guide: \u003Ca href=\"https://www.perfectcorp.com/consumer/blog/online-photo-editing/blurry-picture-clear-online\" rel=\"nofollow\" target=\"_blank\" >https://www.perfectcorp.com/consumer/blog/online-photo-editing/blurry-picture-clear-online\u003C/a>\u003C/li>\n\u003C/ul>\n\u003Ch2 id=\"JxIUBz\">When to reshoot instead of repair\u003C/h2>\n\u003Cp>If the photo is a key asset and you can reshoot, do it. Use a faster shutter for moving subjects, stabilize the camera, and check focus in-camera. This beats any app to clear up blurry photos, because good capture wins every time.\u003C/p>\n\u003Cul>\n\u003Cli>Use a faster shutter (1/250s or faster for people, faster for sports).\u003C/li>\n\u003Cli>Raise ISO rather than letting shutter drag.\u003C/li>\n\u003Cli>Use a tripod or brace the camera for low light.\u003C/li>\n\u003Cli>Use continuous AF and burst for moving subjects.\u003C/li>\n\u003Cli>Tap focus on a face and review a zoomed preview.\u003C/li>\n\u003C/ul>\n\u003Ch2 id=\"8hSzPs\">Free workflows for common use cases\u003C/h2>\n\u003Cp>Apps to make blurry photos clear for portraits \u003C/p>\n\u003Cul>\n\u003Cli>Start with Pixelfox AI Enhance. Then, if needed, use a light skin retouch to remove noise without plastic skin. If the eyes still look soft, brush in a small sharpen to the lashes and iris only. This keeps the look natural.\u003C/li>\n\u003C/ul>\n\u003Cp>Fix blurry product shots \u003C/p>\n\u003Cul>\n\u003Cli>Even lighting, clean white balance, denoise, then sharpen. Upscale 2x if the original is small. Add a tiny clarity bump to fabric or metal edges.\u003C/li>\n\u003C/ul>\n\u003Cp>Clear up old family scans \u003C/p>\n\u003Cul>\n\u003Cli>Denoise, remove dust if your tool supports it, then sharpen lightly. Optional: colorize to increase perceived clarity and vibrance. For colorization, you can try an AI Photo Colorizer: /image/colorizer\u003C/li>\n\u003C/ul>\n\u003Cp>Make text screenshots readable \u003C/p>\n\u003Cul>\n\u003Cli>Raise contrast and blacks, then sharpen once. If needed, upscale 2x for cleaner edges, then sharpen again very lightly.\u003C/li>\n\u003C/ul>\n\u003Cp>Fix social photos fast \u003C/p>\n\u003Cul>\n\u003Cli>Use a fix blurry pictures app with one‑tap AI enhance and export. This is where a free app to fix blurry photos shines.\u003C/li>\n\u003C/ul>\n\u003Ch2 id=\"5v2ske\">iPhone checklist: how to fix blurry pictures on iPhone for free\u003C/h2>\n\u003Cul>\n\u003Cli>Edit in Photos with Sharpen, Noise Reduction, and Brilliance.\u003C/li>\n\u003Cli>If that is not enough, open Google Photos, use Sharpen and Denoise, then save a copy.\u003C/li>\n\u003Cli>For harder cases, open a browser and run Pixelfox AI Photo Enhancer. It takes one click and avoids a login friction in many cases.\u003C/li>\n\u003C/ul>\n\u003Ch2 id=\"kwj6cB\">FAQ: quick answers to the most-searched questions\u003C/h2>\n\u003Cp>How can you fix a blurry picture?\u003Cbr />\nStart with AI enhance to lift edges and reduce noise. Upscale if the file is small. Then apply a mild sharpen. This three-step gives the best balance of clarity and realism.\u003C/p>\n\u003Cp>How do you fix a fuzzy photo without artifacts?\u003Cbr />\nDenoise first. Then add a small sharpen and a touch of midtone contrast. Avoid big, global clarity moves on faces. Brush-in sharpening where it helps.\u003C/p>\n\u003Cp>What is the best app to unblur photos right now?\u003Cbr />\nFor a free path on the web, Pixelfox AI Photo Enhancer is fast and watermark‑free. Adobe Express and Canva are strong, trusted choices. Picsart and YouCam Enhance are solid for portraits and screenshots. On mobile, Remini is popular for faces but can alter identity on tiny, old files, so use it with care.\u003C/p>\n\u003Cp>Which fix blurry pictures app is safest for client work?\u003Cbr />\nUse tools that export clean, watermark‑free files and allow fine control. Pixelfox, Adobe Express, Canva, and Picsart each fit, depending on your workflow.\u003C/p>\n\u003Cp>Is there a free app to fix blurry photos that keeps things natural?\u003Cbr />\nYes. Use modest settings in Pixelfox, Adobe Express, and Canva. Resist pushing sliders to 100. Natural beats brittle.\u003C/p>\n\u003Cp>Can you fix blurry photos from old phones?\u003Cbr />\nOften, yes. Upscale 2x, denoise, and sharpen lightly. If colors are faded, add a small vibrance bump or try gentle colorization.\u003C/p>\n\u003Cp>What about “app to make pictures clear” for e‑commerce?\u003Cbr />\nUse a clean, even light, then denoise and sharpen, and keep the background simple. A clear picture app helps, but good lighting and a steady camera do more than any slider.\u003C/p>\n\u003Cp>Is there an app to clear up blurry photos of documents?\u003Cbr />\nYes. Raise contrast, lower blacks, and sharpen slightly. Many AI enhancers do this fine. You can also try text‑focused filters in general photo editors.\u003C/p>\n\u003Cp>I need an app to make blurry image clear for Instagram. What is the fastest path?\u003Cbr />\nUse an AI enhance on the web, export, and post. Keep the file around 2048 px on the long edge for good clarity on most phones.\u003C/p>\n\u003Cp>Are there apps to make blurry photos clear that also help video?\u003Cbr />\nIf you also have shaky, soft clips, use an AI Video Enhancer to sharpen and denoise footage before posting short-form content: /video/enhancer/edit\u003C/p>\n\u003Ch2 id=\"Bgm62R\">Balanced look at paid vs free\u003C/h2>\n\u003Cp>Paid tiers can give batch processing, higher upscales, and more face controls. But you do not need to pay to fix many everyday images. The free flows in Pixelfox, Adobe Express, Canva, Picsart, Fotor, and YouCam Enhance are strong in 2025. Start free. If you process large batches, then consider an upgrade.\u003C/p>\n\u003Ch2 id=\"pe8XyT\">Ethics, accuracy, and trust\u003C/h2>\n\u003Cul>\n\u003Cli>Be transparent if AI changed a face or important detail. This matters in journalism, research, and any case where identity must remain accurate.\u003C/li>\n\u003Cli>Do not remove watermarks or logos from images you do not own.\u003C/li>\n\u003Cli>Do not use AI “fixes” as evidence in legal contexts. AI can invent plausible detail. This is a known risk in image restoration.\u003C/li>\n\u003C/ul>\n\u003Cp>If you want guidance on what vendors say about limits and use, review their pages. Adobe, Canva, Picsart, Fotor, and Perfect Corp all provide clear notes on realistic outcomes:\u003C/p>\n\u003Cul>\n\u003Cli>Adobe Express Unblur: \u003Ca href=\"https://www.adobe.com/express/feature/image/unblur\" rel=\"nofollow\" target=\"_blank\" >https://www.adobe.com/express/feature/image/unblur\u003C/a>\u003C/li>\n\u003Cli>Canva Unblur and Upscaler: \u003Ca href=\"https://www.canva.com/features/unblur-image/\" rel=\"nofollow\" target=\"_blank\" >https://www.canva.com/features/unblur-image/\u003C/a>\u003C/li>\n\u003Cli>Picsart AI Enhance Unblur: \u003Ca href=\"https://picsart.com/ai-image-enhancer/unblur/\" rel=\"nofollow\" target=\"_blank\" >https://picsart.com/ai-image-enhancer/unblur/\u003C/a>\u003C/li>\n\u003Cli>Fotor Unblur: \u003Ca href=\"https://www.fotor.com/features/unblur-image/\" rel=\"nofollow\" target=\"_blank\" >https://www.fotor.com/features/unblur-image/\u003C/a>\u003C/li>\n\u003Cli>Perfect Corp’s 4K unblur guide: \u003Ca href=\"https://www.perfectcorp.com/consumer/blog/online-photo-editing/blurry-picture-clear-online\" rel=\"nofollow\" target=\"_blank\" >https://www.perfectcorp.com/consumer/blog/online-photo-editing/blurry-picture-clear-online\u003C/a>\u003C/li>\n\u003C/ul>\n\u003Ch2 id=\"qWI1Dl\">Advanced desktop methods (when you need more control)\u003C/h2>\n\u003Cp>Photoshop \u003C/p>\n\u003Cul>\n\u003Cli>Filter > Noise > Reduce Noise. Start light. \u003C/li>\n\u003Cli>Filter > Sharpen > Smart Sharpen. Use Remove: Lens Blur for defocus or Remove: Motion Blur if the smear direction is clear. Keep Amount modest and watch edges. \u003C/li>\n\u003Cli>Optional: Filter > Sharpen > Unsharp Mask for a small micro‑contrast boost after Smart Sharpen.\u003C/li>\n\u003C/ul>\n\u003Cp>GIMP (free) \u003C/p>\n\u003Cul>\n\u003Cli>Filters > Enhance > Sharpen (Unsharp Mask). \u003C/li>\n\u003Cli>Filters > Enhance > Noise Reduction. \u003C/li>\n\u003Cli>Use masks to sharpen only what needs it.\u003C/li>\n\u003C/ul>\n\u003Cp>These tools help when “apps to make blurry photos clear” give you 80% of the way but you need precision on edges, motion direction, or skin.\u003C/p>\n\u003Ch2 id=\"KQZr2n\">Why Pixelfox is a strong first choice\u003C/h2>\n\u003Cp>When people search for best app to fix blurry pictures, they want speed, clean output, and simple steps. Pixelfox AI Photo Enhancer was built for that.\u003C/p>\n\u003Cul>\n\u003Cli>One‑click HD upgrade with automatic sharpen and denoise.\u003C/li>\n\u003Cli>Works online, so no install or heavy learning curve.\u003C/li>\n\u003Cli>Watermark‑free download in the free flow.\u003C/li>\n\u003Cli>Good balance for portraits, products, and screenshots.\u003C/li>\n\u003C/ul>\n\u003Cp>If you also handle video, the AI Video Enhancer is the same idea for clips. It sharpens details, fixes low light, and lifts color with one click: /video/enhancer/edit\u003C/p>\n\u003Ch2 id=\"GQ7agy\">Calls to action you can use today\u003C/h2>\n\u003Cul>\n\u003Cli>Try a one‑click AI enhance on a tough image. Start here: /image/enhancer/edit \u003C/li>\n\u003Cli>If you have an older family photo, revive tones with an AI Photo Colorizer, then sharpen lightly: /image/colorizer \u003C/li>\n\u003Cli>If your clips look dull or soft, use an AI Video Enhancer to clean and sharpen them before posting: /video/enhancer/edit\u003C/li>\n\u003C/ul>\n\u003Ch2 id=\"pPbrOv\">Summary: the honest path to clarity\u003C/h2>\n\u003Cp>If you came here asking how to make blurry pictures clear app free, you now have a set of reliable tools and a plan. Start with AI enhance, denoise first, then sharpen, and upscale if the file is small. Use a clear picture app that keeps files watermark‑free. On iPhone, use Photos for basic fixes and a free web app when you need more. You can fix many images well. You can improve most of the rest. And you will know when a reshoot beats any slider.\u003C/p>\n\u003Cp>If you want the fastest route, open Pixelfox AI Photo Enhancer, upload once, click once, and download. Then share your result. And if you have tips or a favorite fix blurry pictures app, add your voice and keep the learning going.\u003C/p>","how-to-make-blurry-pictures-clear-app-free-2025-guide",1756918582,1756918542,{"id":104,"lang":11,"author_id":12,"image":74,"title":105,"keywords":15,"description":106,"content":107,"url":108,"views":109,"publishtime":110,"updatetime":111,"status":22,"publishtime_text":24,"status_text":25},1548,"How to Create a Laggy Video Using Pixelfox: Step-by-Step Guide (2025)","Learn how to create a laggy video using Pixelfox in this detailed 2025 guide. Discover step-by-step instructions, tips for enhancing lag in video and how to perfect glitchy effects for your project.","\u003Cp dir=\"ltr\" style=\"line-height:1.38;margin-top:0pt;margin-bottom:0pt;\">\u003Cspan style=\"font-size:11pt;font-family:Arial,sans-serif;color:#000000;background-color:transparent;font-weight:400;font-style:normal;font-variant:normal;text-decoration:none;vertical-align:baseline;white-space:pre;white-space:pre-wrap;\">Have you ever seen a video that seemed like it was waiting to do something to you? That is the charm of a \u003C/span>\u003Cspan style=\"font-size:11pt;font-family:Arial,sans-serif;color:#000000;background-color:transparent;font-weight:700;font-style:normal;font-variant:normal;text-decoration:none;vertical-align:baseline;white-space:pre;white-space:pre-wrap;\">laggy video \u003C/span>\u003Cspan style=\"font-size:11pt;font-family:Arial,sans-serif;color:#000000;background-color:transparent;font-weight:400;font-style:normal;font-variant:normal;text-decoration:none;vertical-align:baseline;white-space:pre;white-space:pre-wrap;\">effect which has become a popular trend in music videos, social media edits and experimental cinema. \u003C/span>\u003C/p>\u003Cp dir=\"ltr\" style=\"line-height:1.38;margin-top:0pt;margin-bottom:0pt;\">\u003Cspan style=\"font-size:11pt;font-family:Arial,sans-serif;color:#000000;background-color:transparent;font-weight:400;font-style:normal;font-variant:normal;text-decoration:none;vertical-align:baseline;white-space:pre;white-space:pre-wrap;\">Pixelfox is a free phone video editing app capable of producing significantly glitchy, choppy and deliberately laggy effects in videos. In this step-by-step guide we will show you how to use Pixelfox to create a \u003C/span>\u003Cspan style=\"font-size:11pt;font-family:Arial,sans-serif;color:#000000;background-color:transparent;font-weight:700;font-style:normal;font-variant:normal;text-decoration:none;vertical-align:baseline;white-space:pre;white-space:pre-wrap;\">laggy video\u003C/span>\u003Cspan style=\"font-size:11pt;font-family:Arial,sans-serif;color:#000000;background-color:transparent;font-weight:400;font-style:normal;font-variant:normal;text-decoration:none;vertical-align:baseline;white-space:pre;white-space:pre-wrap;\">. \u003C/span>\u003C/p>\u003Ch2 dir=\"ltr\" style=\"line-height:1.38;margin-top:18pt;margin-bottom:6pt;\" id=\"cXySUQ\">\u003Cspan style=\"font-size:16pt;font-family:Arial,sans-serif;color:#000000;background-color:transparent;font-weight:700;font-style:normal;font-variant:normal;text-decoration:none;vertical-align:baseline;white-space:pre;white-space:pre-wrap;\">Understanding Laggy Videos: What Are They?\u003C/span>\u003C/h2>\u003Cp dir=\"ltr\" style=\"line-height:1.38;margin-top:0pt;margin-bottom:0pt;\">\u003Cspan style=\"font-size:11pt;font-family:Arial,sans-serif;color:#000000;background-color:transparent;font-weight:400;font-style:normal;font-variant:normal;text-decoration:none;vertical-align:baseline;white-space:pre;white-space:pre-wrap;\">Laggy video is not about technical problems; it is a stylistic decision. It is accomplished by manipulating the playback of a video so that it appears to be delayed or stuttering, typically achieved through the insertion of freeze frames, acceleration and deceleration or skipping frames altogether. \u003C/span>\u003Cspan style=\"font-size:11pt;font-family:Arial,sans-serif;color:#000000;background-color:transparent;font-weight:700;font-style:normal;font-variant:normal;text-decoration:none;vertical-align:baseline;white-space:pre;white-space:pre-wrap;\">Lag in video\u003C/span>\u003Cspan style=\"font-size:11pt;font-family:Arial,sans-serif;color:#000000;background-color:transparent;font-weight:400;font-style:normal;font-variant:normal;text-decoration:none;vertical-align:baseline;white-space:pre;white-space:pre-wrap;\"> is a factor that plays an important role in achieving this effect where the normal flow of action ends to give a seemingly broken-up appearance.\u003C/span>\u003C/p>\u003Ch2 dir=\"ltr\" style=\"line-height:1.38;margin-top:18pt;margin-bottom:6pt;\" id=\"sonWGr\">\u003Cspan style=\"font-size:16pt;font-family:Arial,sans-serif;color:#000000;background-color:transparent;font-weight:700;font-style:normal;font-variant:normal;text-decoration:none;vertical-align:baseline;white-space:pre;white-space:pre-wrap;\">Why Choose Pixelfox for Creating Laggy Videos?\u003C/span>\u003C/h2>\u003Cp dir=\"ltr\" style=\"line-height:1.38;margin-top:0pt;margin-bottom:0pt;\">\u003Cspan style=\"font-size:11pt;font-family:Arial,sans-serif;color:#000000;background-color:transparent;font-weight:400;font-style:normal;font-variant:normal;text-decoration:none;vertical-align:baseline;white-space:pre;white-space:pre-wrap;\">There are a number of video editing programs out there but one of the best ones to use in this case is Pixelfox. Here’s why:\u003C/span>\u003C/p>\u003Ch3 dir=\"ltr\" style=\"line-height:1.38;margin-top:16pt;margin-bottom:4pt;\">\u003Cspan style=\"font-size:13.999999999999998pt;font-family:Arial,sans-serif;color:#434343;background-color:transparent;font-weight:700;font-style:normal;font-variant:normal;text-decoration:none;vertical-align:baseline;white-space:pre;white-space:pre-wrap;\">1. Free and User-Friendly Platform\u003C/span>\u003C/h3>\u003Cp dir=\"ltr\" style=\"line-height:1.38;margin-top:0pt;margin-bottom:0pt;\">\u003Cspan style=\"font-size:11pt;font-family:Arial,sans-serif;color:#000000;background-color:transparent;font-weight:400;font-style:normal;font-variant:normal;text-decoration:none;vertical-align:baseline;white-space:pre;white-space:pre-wrap;\">Pixelfox is the only free and user-friendly mobile platform that doesn’t sacrifice functionality. If you’re experimenting with \u003C/span>\u003Cspan style=\"font-size:11pt;font-family:Arial,sans-serif;color:#000000;background-color:transparent;font-weight:700;font-style:normal;font-variant:normal;text-decoration:none;vertical-align:baseline;white-space:pre;white-space:pre-wrap;\">lag in video\u003C/span>\u003Cspan style=\"font-size:11pt;font-family:Arial,sans-serif;color:#000000;background-color:transparent;font-weight:400;font-style:normal;font-variant:normal;text-decoration:none;vertical-align:baseline;white-space:pre;white-space:pre-wrap;\"> effects, Pixelfox offers a clear interface that lets novices and experienced editors dive right in. You don’t need to spend a ton of money on fancy software; it’s a cost-effective tool for budget creators who want to turn out high-quality lag-free videos.\u003C/span>\u003C/p>\u003Ch3 dir=\"ltr\" style=\"line-height:1.38;margin-top:16pt;margin-bottom:4pt;\">\u003Cspan style=\"font-size:13.999999999999998pt;font-family:Arial,sans-serif;color:#434343;background-color:transparent;font-weight:700;font-style:normal;font-variant:normal;text-decoration:none;vertical-align:baseline;white-space:pre;white-space:pre-wrap;\">2. Freeze Frame Tool\u003C/span>\u003C/h3>\u003Cp dir=\"ltr\" style=\"line-height:1.38;margin-top:0pt;margin-bottom:0pt;\">\u003Cspan style=\"font-size:11pt;font-family:Arial,sans-serif;color:#000000;background-color:transparent;font-weight:400;font-style:normal;font-variant:normal;text-decoration:none;vertical-align:baseline;white-space:pre;white-space:pre-wrap;\">The Freeze Frame tool is one of the tools that make Pixelfox the perfect program to create a \u003C/span>\u003Cspan style=\"font-size:11pt;font-family:Arial,sans-serif;color:#000000;background-color:transparent;font-weight:700;font-style:normal;font-variant:normal;text-decoration:none;vertical-align:baseline;white-space:pre;white-space:pre-wrap;\">laggy video\u003C/span>\u003Cspan style=\"font-size:11pt;font-family:Arial,sans-serif;color:#000000;background-color:transparent;font-weight:400;font-style:normal;font-variant:normal;text-decoration:none;vertical-align:baseline;white-space:pre;white-space:pre-wrap;\">. This tool will enable you to place still frames at particular sections within your video effectively pausing the action at any given moment. This generates the traditional \u003C/span>\u003Cspan style=\"font-size:11pt;font-family:Arial,sans-serif;color:#000000;background-color:transparent;font-weight:700;font-style:normal;font-variant:normal;text-decoration:none;vertical-align:baseline;white-space:pre;white-space:pre-wrap;\">lag in video \u003C/span>\u003Cspan style=\"font-size:11pt;font-family:Arial,sans-serif;color:#000000;background-color:transparent;font-weight:400;font-style:normal;font-variant:normal;text-decoration:none;vertical-align:baseline;white-space:pre;white-space:pre-wrap;\">effect where the video will freeze then jump to the other scene giving a hitchy content or glitchy look. \u003C/span>\u003C/p>\u003Ch3 dir=\"ltr\" style=\"line-height:1.38;margin-top:16pt;margin-bottom:4pt;\">\u003Cspan style=\"font-size:13.999999999999998pt;font-family:Arial,sans-serif;color:#434343;background-color:transparent;font-weight:700;font-style:normal;font-variant:normal;text-decoration:none;vertical-align:baseline;white-space:pre;white-space:pre-wrap;\">3. Speed Adjustment for Customizable Effects\u003C/span>\u003C/h3>\u003Cp dir=\"ltr\" style=\"line-height:1.38;margin-top:0pt;margin-bottom:0pt;\">\u003Cspan style=\"font-size:11pt;font-family:Arial,sans-serif;color:#000000;background-color:transparent;font-weight:400;font-style:normal;font-variant:normal;text-decoration:none;vertical-align:baseline;white-space:pre;white-space:pre-wrap;\">One of the reasons Pixelfox excels at creating \u003C/span>\u003Cspan style=\"font-size:11pt;font-family:Arial,sans-serif;color:#000000;background-color:transparent;font-weight:700;font-style:normal;font-variant:normal;text-decoration:none;vertical-align:baseline;white-space:pre;white-space:pre-wrap;\">laggy\u003C/span>\u003Cspan style=\"font-size:11pt;font-family:Arial,sans-serif;color:#000000;background-color:transparent;font-weight:400;font-style:normal;font-variant:normal;text-decoration:none;vertical-align:baseline;white-space:pre;white-space:pre-wrap;\"> \u003C/span>\u003Cspan style=\"font-size:11pt;font-family:Arial,sans-serif;color:#000000;background-color:transparent;font-weight:700;font-style:normal;font-variant:normal;text-decoration:none;vertical-align:baseline;white-space:pre;white-space:pre-wrap;\">videos\u003C/span>\u003Cspan style=\"font-size:11pt;font-family:Arial,sans-serif;color:#000000;background-color:transparent;font-weight:400;font-style:normal;font-variant:normal;text-decoration:none;vertical-align:baseline;white-space:pre;white-space:pre-wrap;\"> is its ability to adjust playback speed. You can accelerate or decelerate parts of your video thus creating a disproportional rhythm that enhances the video lag effect. \u003C/span>\u003C/p>\u003Ch3 dir=\"ltr\" style=\"line-height:1.38;margin-top:16pt;margin-bottom:4pt;\">\u003Cspan style=\"font-size:13.999999999999998pt;font-family:Arial,sans-serif;color:#434343;background-color:transparent;font-weight:700;font-style:normal;font-variant:normal;text-decoration:none;vertical-align:baseline;white-space:pre;white-space:pre-wrap;\">4. Enhanced Editing Flexibility\u003C/span>\u003C/h3>\u003Cp dir=\"ltr\" style=\"line-height:1.38;margin-top:0pt;margin-bottom:0pt;\">\u003Cspan style=\"font-size:11pt;font-family:Arial,sans-serif;color:#000000;background-color:transparent;font-weight:400;font-style:normal;font-variant:normal;text-decoration:none;vertical-align:baseline;white-space:pre;white-space:pre-wrap;\">You aren't just stuck with freeze frames and speed changes using Pixelfox. The service also has a number of other editing tools which let you play with other video effects such as transitions, filters and overlays. \u003C/span>\u003C/p>\u003Ch3 dir=\"ltr\" style=\"line-height:1.38;margin-top:16pt;margin-bottom:4pt;\">\u003Cspan style=\"font-size:13.999999999999998pt;font-family:Arial,sans-serif;color:#434343;background-color:transparent;font-weight:700;font-style:normal;font-variant:normal;text-decoration:none;vertical-align:baseline;white-space:pre;white-space:pre-wrap;\">5. Perfect for Mobile Editing\u003C/span>\u003C/h3>\u003Cp dir=\"ltr\" style=\"line-height:1.38;margin-top:0pt;margin-bottom:0pt;\">\u003Cspan style=\"font-size:11pt;font-family:Arial,sans-serif;color:#000000;background-color:transparent;font-weight:400;font-style:normal;font-variant:normal;text-decoration:none;vertical-align:baseline;white-space:pre;white-space:pre-wrap;\">Unlike desktop editors, Pixelfox is created with mobile in mind making it easier to touch up on the go. If you are creating a small project or a complex video, you can record a \u003C/span>\u003Cspan style=\"font-size:11pt;font-family:Arial,sans-serif;color:#000000;background-color:transparent;font-weight:700;font-style:normal;font-variant:normal;text-decoration:none;vertical-align:baseline;white-space:pre;white-space:pre-wrap;\">laggy video\u003C/span>\u003Cspan style=\"font-size:11pt;font-family:Arial,sans-serif;color:#000000;background-color:transparent;font-weight:400;font-style:normal;font-variant:normal;text-decoration:none;vertical-align:baseline;white-space:pre;white-space:pre-wrap;\"> anywhere without needing a bulky workstation. \u003C/span>\u003C/p>\u003Ch3 dir=\"ltr\" style=\"line-height:1.38;margin-top:16pt;margin-bottom:4pt;\">\u003Cspan style=\"font-size:13.999999999999998pt;font-family:Arial,sans-serif;color:#434343;background-color:transparent;font-weight:700;font-style:normal;font-variant:normal;text-decoration:none;vertical-align:baseline;white-space:pre;white-space:pre-wrap;\">6. Simple Export Options\u003C/span>\u003C/h3>\u003Cp dir=\"ltr\" style=\"line-height:1.38;margin-top:0pt;margin-bottom:0pt;\">\u003Cspan style=\"font-size:11pt;font-family:Arial,sans-serif;color:#000000;background-color:transparent;font-weight:400;font-style:normal;font-variant:normal;text-decoration:none;vertical-align:baseline;white-space:pre;white-space:pre-wrap;\">After finishing your video, Pixelfox provides convenient export options where you can select the resolution and the file format based on your needs. Pixelfox also supports high-quality exports so the lag effects in your video will retain their density and their integrity in your captured video should you desire to share your\u003C/span>\u003Cspan style=\"font-size:11pt;font-family:Arial,sans-serif;color:#000000;background-color:transparent;font-weight:700;font-style:normal;font-variant:normal;text-decoration:none;vertical-align:baseline;white-space:pre;white-space:pre-wrap;\"> laggy video\u003C/span>\u003Cspan style=\"font-size:11pt;font-family:Arial,sans-serif;color:#000000;background-color:transparent;font-weight:400;font-style:normal;font-variant:normal;text-decoration:none;vertical-align:baseline;white-space:pre;white-space:pre-wrap;\"> on social media or upload it on a video platform.\u003C/span>\u003C/p>\u003Ch2 dir=\"ltr\" style=\"line-height:1.38;margin-top:18pt;margin-bottom:6pt;\" id=\"trGUCm\">\u003Cspan style=\"font-size:16pt;font-family:Arial,sans-serif;color:#000000;background-color:transparent;font-weight:700;font-style:normal;font-variant:normal;text-decoration:none;vertical-align:baseline;white-space:pre;white-space:pre-wrap;\">Step-by-Step Guide to Creating a Laggy Video in Pixelfox\u003C/span>\u003C/h2>\u003Ch3 dir=\"ltr\" style=\"line-height:1.38;margin-top:16pt;margin-bottom:4pt;\">\u003Cspan style=\"font-size:13.999999999999998pt;font-family:Arial,sans-serif;color:#434343;background-color:transparent;font-weight:700;font-style:normal;font-variant:normal;text-decoration:none;vertical-align:baseline;white-space:pre;white-space:pre-wrap;\">Step 1: Install and Open Pixelfox\u003C/span>\u003C/h3>\u003Cp dir=\"ltr\" style=\"line-height:1.38;margin-top:0pt;margin-bottom:0pt;\">\u003Cspan style=\"font-size:11pt;font-family:Arial,sans-serif;color:#000000;background-color:transparent;font-weight:400;font-style:normal;font-variant:normal;text-decoration:none;vertical-align:baseline;white-space:pre;white-space:pre-wrap;\">Find the Pixelfox app in your device store and install it. Launch the app and load the video to edit.\u003C/span>\u003C/p>\u003Ch3 dir=\"ltr\" style=\"line-height:1.38;margin-top:16pt;margin-bottom:4pt;\">\u003Cspan style=\"font-size:13.999999999999998pt;font-family:Arial,sans-serif;color:#434343;background-color:transparent;font-weight:700;font-style:normal;font-variant:normal;text-decoration:none;vertical-align:baseline;white-space:pre;white-space:pre-wrap;\">Step 2: Insert Freeze Frames\u003C/span>\u003C/h3>\u003Cp dir=\"ltr\" style=\"line-height:1.38;margin-top:0pt;margin-bottom:0pt;\">\u003Cspan style=\"font-size:11pt;font-family:Arial,sans-serif;color:#000000;background-color:transparent;font-weight:400;font-style:normal;font-variant:normal;text-decoration:none;vertical-align:baseline;white-space:pre;white-space:pre-wrap;\">Go to the moment in your clip where you want to have a freeze frame. Use the freeze when you want to export a still shot at that point. Repeat this on different timers along your video to have a \u003C/span>\u003Cspan style=\"font-size:11pt;font-family:Arial,sans-serif;color:#000000;background-color:transparent;font-weight:700;font-style:normal;font-variant:normal;text-decoration:none;vertical-align:baseline;white-space:pre;white-space:pre-wrap;\">laggy video \u003C/span>\u003Cspan style=\"font-size:11pt;font-family:Arial,sans-serif;color:#000000;background-color:transparent;font-weight:400;font-style:normal;font-variant:normal;text-decoration:none;vertical-align:baseline;white-space:pre;white-space:pre-wrap;\">with a stuttering effect.\u003C/span>\u003C/p>\u003Ch3 dir=\"ltr\" style=\"line-height:1.38;margin-top:16pt;margin-bottom:4pt;\">\u003Cspan style=\"font-size:13.999999999999998pt;font-family:Arial,sans-serif;color:#434343;background-color:transparent;font-weight:700;font-style:normal;font-variant:normal;text-decoration:none;vertical-align:baseline;white-space:pre;white-space:pre-wrap;\">Step 3: Adjust Clip Speed\u003C/span>\u003C/h3>\u003Cp dir=\"ltr\" style=\"line-height:1.38;margin-top:0pt;margin-bottom:0pt;\">\u003Cspan style=\"font-size:11pt;font-family:Arial,sans-serif;color:#000000;background-color:transparent;font-weight:400;font-style:normal;font-variant:normal;text-decoration:none;vertical-align:baseline;white-space:pre;white-space:pre-wrap;\">Select the clips between your freeze frames and set their speed. Accelerating or decelerating these clips can intensify the\u003C/span>\u003Cspan style=\"font-size:11pt;font-family:Arial,sans-serif;color:#000000;background-color:transparent;font-weight:700;font-style:normal;font-variant:normal;text-decoration:none;vertical-align:baseline;white-space:pre;white-space:pre-wrap;\"> lag in the video\u003C/span>\u003Cspan style=\"font-size:11pt;font-family:Arial,sans-serif;color:#000000;background-color:transparent;font-weight:400;font-style:normal;font-variant:normal;text-decoration:none;vertical-align:baseline;white-space:pre;white-space:pre-wrap;\">. Vary speeds to set the right rhythm.\u003C/span>\u003C/p>\u003Ch3 dir=\"ltr\" style=\"line-height:1.38;margin-top:16pt;margin-bottom:4pt;\">\u003Cspan style=\"font-size:13.999999999999998pt;font-family:Arial,sans-serif;color:#434343;background-color:transparent;font-weight:700;font-style:normal;font-variant:normal;text-decoration:none;vertical-align:baseline;white-space:pre;white-space:pre-wrap;\">Step 4: Fine-Tune Transitions\u003C/span>\u003C/h3>\u003Cp dir=\"ltr\" style=\"line-height:1.38;margin-top:0pt;margin-bottom:0pt;\">\u003Cspan style=\"font-size:11pt;font-family:Arial,sans-serif;color:#000000;background-color:transparent;font-weight:400;font-style:normal;font-variant:normal;text-decoration:none;vertical-align:baseline;white-space:pre;white-space:pre-wrap;\">Adjust the timing and transitions to make the transitions between the freeze frames and clips more gradual or abrupt. This will help in producing a smoother, connected and lag-free video effect.\u003C/span>\u003C/p>\u003Ch3 dir=\"ltr\" style=\"line-height:1.38;margin-top:16pt;margin-bottom:4pt;\">\u003Cspan style=\"font-size:13.999999999999998pt;font-family:Arial,sans-serif;color:#434343;background-color:transparent;font-weight:700;font-style:normal;font-variant:normal;text-decoration:none;vertical-align:baseline;white-space:pre;white-space:pre-wrap;\">Step 5: Export your Video\u003C/span>\u003C/h3>\u003Cp dir=\"ltr\" style=\"line-height:1.38;margin-top:0pt;margin-bottom:0pt;\">\u003Cspan style=\"font-size:11pt;font-family:Arial,sans-serif;color:#000000;background-color:transparent;font-weight:400;font-style:normal;font-variant:normal;text-decoration:none;vertical-align:baseline;white-space:pre;white-space:pre-wrap;\">Once you are comfortable with your editing workload, you can export your video in the resolution and format of your choice. Pixelfox gives multiple export options to meet your needs.\u003C/span>\u003C/p>\u003Ch2 dir=\"ltr\" style=\"line-height:1.38;margin-top:18pt;margin-bottom:6pt;\" id=\"0DL1TK\">\u003Cspan style=\"font-size:16pt;font-family:Arial,sans-serif;color:#000000;background-color:transparent;font-weight:700;font-style:normal;font-variant:normal;text-decoration:none;vertical-align:baseline;white-space:pre;white-space:pre-wrap;\">Tips for Enhancing the Laggy Effect\u003C/span>\u003C/h2>\u003Cul style=\"margin-top:0;margin-bottom:0;padding-inline-start:48px;\">\u003Cli dir=\"ltr\" style=\"list-style-type:disc;font-size:11pt;font-family:Arial,sans-serif;color:#000000;background-color:transparent;font-weight:400;font-style:normal;font-variant:normal;text-decoration:none;vertical-align:baseline;white-space:pre;\" aria-level=\"1\">\u003Cp dir=\"ltr\" style=\"line-height:1.38;margin-top:0pt;margin-bottom:0pt;\" role=\"presentation\">\u003Cspan style=\"font-size:11pt;font-family:Arial,sans-serif;color:#000000;background-color:transparent;font-weight:700;font-style:normal;font-variant:normal;text-decoration:none;vertical-align:baseline;white-space:pre;white-space:pre-wrap;\">Vary Freeze Frame Durations:\u003C/span>\u003Cspan style=\"font-size:11pt;font-family:Arial,sans-serif;color:#000000;background-color:transparent;font-weight:400;font-style:normal;font-variant:normal;text-decoration:none;vertical-align:baseline;white-space:pre;white-space:pre-wrap;\"> Changing the length of each freeze frame can add unpredictability to the laggy video effect.\u003C/span>\u003C/p>\u003C/li>\u003C/ul>\u003Cul style=\"margin-top:0;margin-bottom:0;padding-inline-start:48px;\">\u003Cli dir=\"ltr\" style=\"list-style-type:disc;font-size:11pt;font-family:Arial,sans-serif;color:#000000;background-color:transparent;font-weight:400;font-style:normal;font-variant:normal;text-decoration:none;vertical-align:baseline;white-space:pre;\" aria-level=\"1\">\u003Cp dir=\"ltr\" style=\"line-height:1.38;margin-top:0pt;margin-bottom:0pt;\" role=\"presentation\">\u003Cspan style=\"font-size:11pt;font-family:Arial,sans-serif;color:#000000;background-color:transparent;font-weight:700;font-style:normal;font-variant:normal;text-decoration:none;vertical-align:baseline;white-space:pre;white-space:pre-wrap;\">Combine with Audio Manipulation:\u003C/span>\u003Cspan style=\"font-size:11pt;font-family:Arial,sans-serif;color:#000000;background-color:transparent;font-weight:400;font-style:normal;font-variant:normal;text-decoration:none;vertical-align:baseline;white-space:pre;white-space:pre-wrap;\"> Syncing the laggy video with distorted or slowed-down audio can amplify the overall impact.\u003C/span>\u003C/p>\u003C/li>\u003C/ul>\u003Cul style=\"margin-top:0;margin-bottom:0;padding-inline-start:48px;\">\u003Cli dir=\"ltr\" style=\"list-style-type:disc;font-size:11pt;font-family:Arial,sans-serif;color:#000000;background-color:transparent;font-weight:400;font-style:normal;font-variant:normal;text-decoration:none;vertical-align:baseline;white-space:pre;\" aria-level=\"1\">\u003Cp dir=\"ltr\" style=\"line-height:1.38;margin-top:0pt;margin-bottom:0pt;\" role=\"presentation\">\u003Cspan style=\"font-size:11pt;font-family:Arial,sans-serif;color:#000000;background-color:transparent;font-weight:700;font-style:normal;font-variant:normal;text-decoration:none;vertical-align:baseline;white-space:pre;white-space:pre-wrap;\">Use Visual Effects:\u003C/span>\u003Cspan style=\"font-size:11pt;font-family:Arial,sans-serif;color:#000000;background-color:transparent;font-weight:400;font-style:normal;font-variant:normal;text-decoration:none;vertical-align:baseline;white-space:pre;white-space:pre-wrap;\"> Incorporate glitch effects, color shifts or distortion filters to complement the \u003C/span>\u003Cspan style=\"font-size:11pt;font-family:Arial,sans-serif;color:#000000;background-color:transparent;font-weight:700;font-style:normal;font-variant:normal;text-decoration:none;vertical-align:baseline;white-space:pre;white-space:pre-wrap;\">lag in video\u003C/span>\u003Cspan style=\"font-size:11pt;font-family:Arial,sans-serif;color:#000000;background-color:transparent;font-weight:400;font-style:normal;font-variant:normal;text-decoration:none;vertical-align:baseline;white-space:pre;white-space:pre-wrap;\"> style.\u003C/span>\u003C/p>\u003C/li>\u003C/ul>\u003Ch2 dir=\"ltr\" style=\"line-height:1.38;margin-top:18pt;margin-bottom:6pt;\" id=\"4qJc8H\">\u003Cspan style=\"font-size:16pt;font-family:Arial,sans-serif;color:#000000;background-color:transparent;font-weight:700;font-style:normal;font-variant:normal;text-decoration:none;vertical-align:baseline;white-space:pre;white-space:pre-wrap;\">Common Mistakes to Avoid\u003C/span>\u003C/h2>\u003Cul style=\"margin-top:0;margin-bottom:0;padding-inline-start:48px;\">\u003Cli dir=\"ltr\" style=\"list-style-type:disc;font-size:11pt;font-family:Arial,sans-serif;color:#000000;background-color:transparent;font-weight:400;font-style:normal;font-variant:normal;text-decoration:none;vertical-align:baseline;white-space:pre;\" aria-level=\"1\">\u003Cp dir=\"ltr\" style=\"line-height:1.38;margin-top:0pt;margin-bottom:0pt;\" role=\"presentation\">\u003Cspan style=\"font-size:11pt;font-family:Arial,sans-serif;color:#000000;background-color:transparent;font-weight:700;font-style:normal;font-variant:normal;text-decoration:none;vertical-align:baseline;white-space:pre;white-space:pre-wrap;\">Overusing Freeze Frames:\u003C/span>\u003Cspan style=\"font-size:11pt;font-family:Arial,sans-serif;color:#000000;background-color:transparent;font-weight:400;font-style:normal;font-variant:normal;text-decoration:none;vertical-align:baseline;white-space:pre;white-space:pre-wrap;\"> Putting too many freeze frames can make the video look choppy. Use them sparingly to make a lasting impact.\u003C/span>\u003C/p>\u003C/li>\u003C/ul>\u003Cul style=\"margin-top:0;margin-bottom:0;padding-inline-start:48px;\">\u003Cli dir=\"ltr\" style=\"list-style-type:disc;font-size:11pt;font-family:Arial,sans-serif;color:#000000;background-color:transparent;font-weight:400;font-style:normal;font-variant:normal;text-decoration:none;vertical-align:baseline;white-space:pre;\" aria-level=\"1\">\u003Cp dir=\"ltr\" style=\"line-height:1.38;margin-top:0pt;margin-bottom:0pt;\" role=\"presentation\">\u003Cspan style=\"font-size:11pt;font-family:Arial,sans-serif;color:#000000;background-color:transparent;font-weight:700;font-style:normal;font-variant:normal;text-decoration:none;vertical-align:baseline;white-space:pre;white-space:pre-wrap;\">Ignoring Audio Sync: \u003C/span>\u003Cspan style=\"font-size:11pt;font-family:Arial,sans-serif;color:#000000;background-color:transparent;font-weight:400;font-style:normal;font-variant:normal;text-decoration:none;vertical-align:baseline;white-space:pre;white-space:pre-wrap;\">Avoid exceeding the audio syncing limit to keep what you see and what you hear aligned.\u003C/span>\u003C/p>\u003C/li>\u003C/ul>\u003Cul style=\"margin-top:0;margin-bottom:0;padding-inline-start:48px;\">\u003Cli dir=\"ltr\" style=\"list-style-type:disc;font-size:11pt;font-family:Arial,sans-serif;color:#000000;background-color:transparent;font-weight:400;font-style:normal;font-variant:normal;text-decoration:none;vertical-align:baseline;white-space:pre;\" aria-level=\"1\">\u003Cp dir=\"ltr\" style=\"line-height:1.38;margin-top:0pt;margin-bottom:0pt;\" role=\"presentation\">\u003Cspan style=\"font-size:11pt;font-family:Arial,sans-serif;color:#000000;background-color:transparent;font-weight:700;font-style:normal;font-variant:normal;text-decoration:none;vertical-align:baseline;white-space:pre;white-space:pre-wrap;\">Neglecting Export Settings:\u003C/span>\u003Cspan style=\"font-size:11pt;font-family:Arial,sans-serif;color:#000000;background-color:transparent;font-weight:400;font-style:normal;font-variant:normal;text-decoration:none;vertical-align:baseline;white-space:pre;white-space:pre-wrap;\"> Incorrect export settings can affect the post-video quality. Make sure you double-check the resolution, frame rate and format before you export.\u003C/span>\u003C/p>\u003C/li>\u003C/ul>\u003Ch2 dir=\"ltr\" style=\"line-height:1.38;margin-top:18pt;margin-bottom:6pt;\" id=\"IkRXDo\">\u003Cspan style=\"font-size:16pt;font-family:Arial,sans-serif;color:#000000;background-color:transparent;font-weight:700;font-style:normal;font-variant:normal;text-decoration:none;vertical-align:baseline;white-space:pre;white-space:pre-wrap;\">Conclusion\u003C/span>\u003C/h2>\u003Cp dir=\"ltr\" style=\"line-height:1.38;margin-top:0pt;margin-bottom:0pt;\">\u003Cspan style=\"font-size:11pt;font-family:Arial,sans-serif;color:#000000;background-color:transparent;font-weight:400;font-style:normal;font-variant:normal;text-decoration:none;vertical-align:baseline;white-space:pre;white-space:pre-wrap;\">The method of making a \u003C/span>\u003Cspan style=\"font-size:11pt;font-family:Arial,sans-serif;color:#000000;background-color:transparent;font-weight:700;font-style:normal;font-variant:normal;text-decoration:none;vertical-align:baseline;white-space:pre;white-space:pre-wrap;\">laggy video\u003C/span>\u003Cspan style=\"font-size:11pt;font-family:Arial,sans-serif;color:#000000;background-color:transparent;font-weight:400;font-style:normal;font-variant:normal;text-decoration:none;vertical-align:baseline;white-space:pre;white-space:pre-wrap;\"> is a fun and innovative method to add a personal touch and style to your videos. Pixelfox will allow you to do this with ease. Now, with the steps to follow and the mistakes to avoid, you can create videos that truly captivate your audience! \u003C/span>\u003C/p>\u003Cp>\u003Cspan style=\"font-size: 11pt; font-family: Arial, sans-serif; color: rgb(0, 0, 0); background-color: transparent; font-variant-numeric: normal; font-variant-east-asian: normal; font-variant-alternates: normal; font-variant-position: normal; font-variant-emoji: normal; vertical-align: baseline; white-space-collapse: preserve;\">The secrets to good \u003C/span>\u003Cspan style=\"font-size: 11pt; font-family: Arial, sans-serif; color: rgb(0, 0, 0); background-color: transparent; font-weight: 700; font-variant-numeric: normal; font-variant-east-asian: normal; font-variant-alternates: normal; font-variant-position: normal; font-variant-emoji: normal; vertical-align: baseline; white-space-collapse: preserve;\">laggy video\u003C/span>\u003Cspan style=\"font-size: 11pt; font-family: Arial, sans-serif; color: rgb(0, 0, 0); background-color: transparent; font-variant-numeric: normal; font-variant-east-asian: normal; font-variant-alternates: normal; font-variant-position: normal; font-variant-emoji: normal; vertical-align: baseline; white-space-collapse: preserve;\"> are experimentation. Feel free to experiment with various freeze frame intervals, clip speeds and transitions to see which works best for your project. \u003C/span>\u003C/p>","how-to-create-a-laggy-video-using-pixelfox-step-by-step-guide-2025",115,1756204198,1756204298,{"id":113,"lang":11,"author_id":73,"image":74,"title":114,"keywords":15,"description":115,"content":116,"url":117,"views":118,"publishtime":119,"updatetime":120,"status":22,"publishtime_text":24,"status_text":25},1596,"Best AI Background Changer Tools of 2025 — Featuring PixelFox.ai","Looking for the best AI background changer tools in 2025? Discover top apps and editors for free image background removal and replacement—including why PixelFox.ai’s Background Generator leads the pack for ease, quality, and speed.","\u003Cp>\u003C/p>\u003Cdiv aria-hidden=\"true\" data-edge=\"true\" class=\"pointer-events-none h-px w-px\">\u003C/div>\u003Cp>\u003C/p>\u003Carticle class=\"text-token-text-primary w-full focus:outline-none scroll-mt-[calc(var(--header-height)+min(200px,max(70px,20svh)))]\" tabindex=\"-1\" dir=\"auto\" data-turn-id=\"request-68a7d0e8-31f8-832a-b0dc-0d6f6e2d1118-8\" data-testid=\"conversation-turn-18\" data-scroll-anchor=\"true\" data-turn=\"assistant\">\u003Cdiv class=\"text-base my-auto mx-auto pb-10 [--thread-content-margin:--spacing(4)] @[37rem]:[--thread-content-margin:--spacing(6)] @[72rem]:[--thread-content-margin:--spacing(16)] px-(--thread-content-margin)\">\u003Cdiv class=\"[--thread-content-max-width:32rem] @[34rem]:[--thread-content-max-width:40rem] @[64rem]:[--thread-content-max-width:48rem] mx-auto max-w-(--thread-content-max-width) flex-1 group/turn-messages focus-visible:outline-hidden relative flex w-full min-w-0 flex-col agent-turn\" tabindex=\"-1\">\u003Cdiv class=\"flex max-w-full flex-col grow\">\u003Cdiv data-message-author-role=\"assistant\" data-message-id=\"39323b77-3253-443a-be6a-4e2b1eba02a7\" dir=\"auto\" class=\"min-h-8 text-message relative flex w-full flex-col items-end gap-2 text-start break-words whitespace-normal [.text-message+&]:mt-5\" data-message-model-slug=\"gpt-5\">\u003Cdiv class=\"flex w-full flex-col gap-1 empty:hidden first:pt-[3px]\">\u003Cdiv class=\"markdown prose dark:prose-invert w-full break-words light markdown-new-styling\">\u003Ch2 data-start=\"380\" data-end=\"440\" id=\"9VlYq5\">\u003Cstrong data-start=\"383\" data-end=\"440\">Why AI Background Changers Are More Popular Than Ever\u003C/strong>\u003C/h2>\r\n\u003Cp data-start=\"442\" data-end=\"716\">Removing or replacing image backgrounds used to require Photoshop or complex layer masking. Thanks to AI advancements, even beginners can now effortlessly swap backgrounds, enhance visuals, or create stunning product photos with just a few clicks. Popular use cases include:\u003C/p>\r\n\u003Cul data-start=\"718\" data-end=\"885\">\r\n\u003Cli data-start=\"718\" data-end=\"752\">\r\n\u003Cp data-start=\"720\" data-end=\"752\">E-commerce product photography\u003C/p>\r\n\u003C/li>\r\n\u003Cli data-start=\"753\" data-end=\"785\">\r\n\u003Cp data-start=\"755\" data-end=\"785\">Social media profile updates\u003C/p>\r\n\u003C/li>\r\n\u003Cli data-start=\"786\" data-end=\"845\">\r\n\u003Cp data-start=\"788\" data-end=\"845\">Creative visual content (e.g., marketing, storytelling)\u003C/p>\r\n\u003C/li>\r\n\u003Cli data-start=\"846\" data-end=\"885\">\r\n\u003Cp data-start=\"848\" data-end=\"885\">Streamlined photo editing workflows\u003C/p>\r\n\u003C/li>\r\n\u003C/ul>\r\n\u003Cp data-start=\"887\" data-end=\"1054\">Let’s look at the best tools available—and discover why \u003Cstrong data-start=\"943\" data-end=\"1029\">\u003Ca data-start=\"945\" data-end=\"1027\" rel=\"noopener\" target=\"_new\" class=\"decorated-link\" href=\"https://pixelfox.ai/image/background-generator\">PixelFox.ai Background Generator\u003Cspan aria-hidden=\"true\" class=\"ms-0.5 inline-block align-middle leading-none\">\u003Csvg width=\"20\" height=\"20\" viewBox=\"0 0 20 20\" fill=\"currentColor\" xmlns=\"http://www.w3.org/2000/svg\" data-rtl-flip=\"\" class=\"block h-[0.75em] w-[0.75em] stroke-current stroke-[0.75]\">\u003Cpath d=\"M14.3349 13.3301V6.60645L5.47065 15.4707C5.21095 15.7304 4.78895 15.7304 4.52925 15.4707C4.26955 15.211 4.26955 14.789 4.52925 14.5293L13.3935 5.66504H6.66011C6.29284 5.66504 5.99507 5.36727 5.99507 5C5.99507 4.63273 6.29284 4.33496 6.66011 4.33496H14.9999L15.1337 4.34863C15.4369 4.41057 15.665 4.67857 15.665 5V13.3301C15.6649 13.6973 15.3672 13.9951 14.9999 13.9951C14.6327 13.9951 14.335 13.6973 14.3349 13.3301Z\">\u003C/path>\u003C/svg>\u003C/span>\u003C/a>\u003C/strong> might be your new go-to.\u003C/p>\r\n\u003Ch2 data-start=\"1061\" data-end=\"1107\" id=\"kcgeHy\">\u003Cstrong data-start=\"1064\" data-end=\"1107\">Top AI Background Changer Tools of 2025\u003C/strong>\u003C/h2>\r\n\u003Cp data-start=\"1109\" data-end=\"1172\">Here’s a breakdown of standout AI tools for background editing:\u003C/p>\r\n\u003Cdiv class=\"_tableContainer_sk2ct_1\">\u003Cdiv tabindex=\"-1\" class=\"_tableWrapper_sk2ct_13 group flex w-fit flex-col-reverse\">\u003Ctable data-start=\"1174\" data-end=\"2832\" class=\"w-fit min-w-(--thread-content-width)\">\u003Cthead data-start=\"1174\" data-end=\"1264\">\u003Ctr data-start=\"1174\" data-end=\"1264\">\u003Cth data-start=\"1174\" data-end=\"1205\" data-col-size=\"sm\">Tool\u003C/th>\u003Cth data-start=\"1205\" data-end=\"1223\" data-col-size=\"sm\">Platform\u003C/th>\u003Cth data-start=\"1223\" data-end=\"1244\" data-col-size=\"sm\">Free / Paid\u003C/th>\u003Cth data-start=\"1244\" data-end=\"1264\" data-col-size=\"md\">Standout Feature\u003C/th>\u003C/tr>\u003C/thead>\u003Ctbody data-start=\"1358\" data-end=\"2832\">\u003Ctr data-start=\"1358\" data-end=\"1475\">\u003Ctd data-start=\"1358\" data-end=\"1389\" data-col-size=\"sm\">\u003Cstrong data-start=\"1360\" data-end=\"1388\">PixelFox.ai BG Generator\u003C/strong>\u003C/td>\u003Ctd data-col-size=\"sm\" data-start=\"1389\" data-end=\"1408\">Web\u003C/td>\u003Ctd data-col-size=\"sm\" data-start=\"1408\" data-end=\"1430\">Free + Paid\u003C/td>\u003Ctd data-col-size=\"md\" data-start=\"1430\" data-end=\"1475\">AI-generated custom backgrounds instantly\u003C/td>\u003C/tr>\u003Ctr data-start=\"1476\" data-end=\"1631\">\u003Ctd data-start=\"1476\" data-end=\"1507\" data-col-size=\"sm\">\u003Cstrong data-start=\"1478\" data-end=\"1495\">Adobe Express\u003C/strong>\u003C/td>\u003Ctd data-start=\"1507\" data-end=\"1526\" data-col-size=\"sm\">Web\u003C/td>\u003Ctd data-start=\"1526\" data-end=\"1548\" data-col-size=\"sm\">Free tier available\u003C/td>\u003Ctd data-col-size=\"md\" data-start=\"1548\" data-end=\"1631\">Wide stock library + background swap ease\u003C/td>\u003C/tr>\u003Ctr data-start=\"1632\" data-end=\"1784\">\u003Ctd data-start=\"1632\" data-end=\"1663\" data-col-size=\"sm\">\u003Cstrong data-start=\"1634\" data-end=\"1661\">Canva (AI BG Generator)\u003C/strong>\u003C/td>\u003Ctd data-col-size=\"sm\" data-start=\"1663\" data-end=\"1682\">Web\u003C/td>\u003Ctd data-col-size=\"sm\" data-start=\"1682\" data-end=\"1704\">Free + Pro\u003C/td>\u003Ctd data-col-size=\"md\" data-start=\"1704\" data-end=\"1784\">Fast prompt-to-background replacements\u003Cspan class=\"\" data-state=\"closed\">\u003Cspan class=\"ms-1 inline-flex max-w-full items-center relative top-[-0.094rem] animate-[show_150ms_ease-in]\" data-testid=\"webpage-citation-pill\">\u003C/span>\u003C/span>\u003C/td>\u003C/tr>\u003Ctr data-start=\"1785\" data-end=\"1942\">\u003Ctd data-start=\"1785\" data-end=\"1816\" data-col-size=\"sm\">\u003Cstrong data-start=\"1787\" data-end=\"1813\">Photoshop (Firefly AI)\u003C/strong>\u003C/td>\u003Ctd data-start=\"1816\" data-end=\"1835\" data-col-size=\"sm\">Desktop/Web\u003C/td>\u003Ctd data-start=\"1835\" data-end=\"1857\" data-col-size=\"sm\">Subscription\u003C/td>\u003Ctd data-start=\"1857\" data-end=\"1942\" data-col-size=\"md\">Powerful prompt-based background generation \u003Cspan class=\"\" data-state=\"closed\">\u003Cspan class=\"ms-1 inline-flex max-w-full items-center relative top-[-0.094rem] animate-[show_150ms_ease-in]\" data-testid=\"webpage-citation-pill\">\u003C/span>\u003C/span>\u003C/td>\u003C/tr>\u003Ctr data-start=\"1943\" data-end=\"2089\">\u003Ctd data-start=\"1943\" data-end=\"1974\" data-col-size=\"sm\">\u003Cstrong data-start=\"1945\" data-end=\"1973\">Fotor Background Changer\u003C/strong>\u003C/td>\u003Ctd data-col-size=\"sm\" data-start=\"1974\" data-end=\"1993\">Web/Mobile\u003C/td>\u003Ctd data-col-size=\"sm\" data-start=\"1993\" data-end=\"2015\">Free + Paid\u003C/td>\u003Ctd data-col-size=\"md\" data-start=\"2015\" data-end=\"2089\">Preset and AI custom backgrounds \u003Cspan class=\"\" data-state=\"closed\">\u003Cspan class=\"ms-1 inline-flex max-w-full items-center relative top-[-0.094rem] animate-[show_150ms_ease-in]\" data-testid=\"webpage-citation-pill\">\u003C/span>\u003C/span>\u003C/td>\u003C/tr>\u003Ctr data-start=\"2090\" data-end=\"2241\">\u003Ctd data-start=\"2090\" data-end=\"2121\" data-col-size=\"sm\">\u003Cstrong data-start=\"2092\" data-end=\"2105\">Photoroom\u003C/strong>\u003C/td>\u003Ctd data-start=\"2121\" data-end=\"2140\" data-col-size=\"sm\">Web\u003C/td>\u003Ctd data-start=\"2140\" data-end=\"2162\" data-col-size=\"sm\">Free + Paid\u003C/td>\u003Ctd data-col-size=\"md\" data-start=\"2162\" data-end=\"2241\">Realistic, studio-style scene builder \u003Cspan class=\"\" data-state=\"closed\">\u003Cspan class=\"ms-1 inline-flex max-w-full items-center relative top-[-0.094rem] animate-[show_150ms_ease-in]\" data-testid=\"webpage-citation-pill\">\u003C/span>\u003C/span>\u003C/td>\u003C/tr>\u003Ctr data-start=\"2242\" data-end=\"2387\">\u003Ctd data-start=\"2242\" data-end=\"2273\" data-col-size=\"sm\">\u003Cstrong data-start=\"2244\" data-end=\"2270\">Picsart AI Backgrounds\u003C/strong>\u003C/td>\u003Ctd data-col-size=\"sm\" data-start=\"2273\" data-end=\"2292\">Web/Mobile\u003C/td>\u003Ctd data-col-size=\"sm\" data-start=\"2292\" data-end=\"2314\">Free tier\u003C/td>\u003Ctd data-col-size=\"md\" data-start=\"2314\" data-end=\"2387\">Prompt-driven AI BG replacement \u003Cspan class=\"\" data-state=\"closed\">\u003Cspan class=\"ms-1 inline-flex max-w-full items-center relative top-[-0.094rem] animate-[show_150ms_ease-in]\" data-testid=\"webpage-citation-pill\">\u003C/span>\u003C/span>\u003C/td>\u003C/tr>\u003Ctr data-start=\"2388\" data-end=\"2532\">\u003Ctd data-start=\"2388\" data-end=\"2419\" data-col-size=\"sm\">\u003Cstrong data-start=\"2390\" data-end=\"2410\">Phot.AI Replacer\u003C/strong>\u003C/td>\u003Ctd data-start=\"2419\" data-end=\"2438\" data-col-size=\"sm\">Web\u003C/td>\u003Ctd data-start=\"2438\" data-end=\"2460\" data-col-size=\"sm\">Free + Paid\u003C/td>\u003Ctd data-start=\"2460\" data-end=\"2532\" data-col-size=\"md\">One-tap background replacement \u003Cspan class=\"\" data-state=\"closed\">\u003Cspan class=\"ms-1 inline-flex max-w-full items-center relative top-[-0.094rem] animate-[show_150ms_ease-in]\" data-testid=\"webpage-citation-pill\">\u003C/span>\u003C/span>\u003C/td>\u003C/tr>\u003Ctr data-start=\"2533\" data-end=\"2680\">\u003Ctd data-start=\"2533\" data-end=\"2564\" data-col-size=\"sm\">\u003Cstrong data-start=\"2535\" data-end=\"2560\">Cutout.Pro Background\u003C/strong>\u003C/td>\u003Ctd data-start=\"2564\" data-end=\"2583\" data-col-size=\"sm\">Web\u003C/td>\u003Ctd data-start=\"2583\" data-end=\"2605\" data-col-size=\"sm\">Free + Paid\u003C/td>\u003Ctd data-col-size=\"md\" data-start=\"2605\" data-end=\"2680\">Text-to-art background generation \u003Cspan class=\"\" data-state=\"closed\">\u003Cspan class=\"ms-1 inline-flex max-w-full items-center relative top-[-0.094rem] animate-[show_150ms_ease-in]\" data-testid=\"webpage-citation-pill\">\u003C/span>\u003C/span>\u003C/td>\u003C/tr>\u003Ctr data-start=\"2681\" data-end=\"2832\">\u003Ctd data-start=\"2681\" data-end=\"2712\" data-col-size=\"sm\">\u003Cstrong data-start=\"2683\" data-end=\"2695\">StarryAI\u003C/strong>\u003C/td>\u003Ctd data-col-size=\"sm\" data-start=\"2712\" data-end=\"2731\">Web\u003C/td>\u003Ctd data-col-size=\"sm\" data-start=\"2731\" data-end=\"2753\">Free tier\u003C/td>\u003Ctd data-col-size=\"md\" data-start=\"2753\" data-end=\"2832\">Creative AI generator for backgrounds\u003Cspan class=\"\" data-state=\"closed\">\u003Cspan class=\"ms-1 inline-flex max-w-full items-center relative top-[-0.094rem] animate-[show_150ms_ease-in]\" data-testid=\"webpage-citation-pill\">\u003C/span>\u003C/span>\u003C/td>\u003C/tr>\u003C/tbody>\u003C/table>\u003C/div>\u003C/div>\r\n\u003Ch2 data-start=\"2839\" data-end=\"2872\" id=\"NtoYeC\">\u003Cstrong data-start=\"2842\" data-end=\"2872\">Why PixelFox.ai Stands Out\u003C/strong>\u003C/h2>\r\n\u003Cp data-start=\"2874\" data-end=\"3003\">\u003Cstrong data-start=\"2874\" data-end=\"2960\">\u003Ca data-start=\"2876\" data-end=\"2958\" rel=\"noopener\" target=\"_new\" class=\"decorated-link\" href=\"https://pixelfox.ai/image/background-generator\">PixelFox.ai Background Generator\u003Cspan aria-hidden=\"true\" class=\"ms-0.5 inline-block align-middle leading-none\">\u003Csvg width=\"20\" height=\"20\" viewBox=\"0 0 20 20\" fill=\"currentColor\" xmlns=\"http://www.w3.org/2000/svg\" data-rtl-flip=\"\" class=\"block h-[0.75em] w-[0.75em] stroke-current stroke-[0.75]\">\u003Cpath d=\"M14.3349 13.3301V6.60645L5.47065 15.4707C5.21095 15.7304 4.78895 15.7304 4.52925 15.4707C4.26955 15.211 4.26955 14.789 4.52925 14.5293L13.3935 5.66504H6.66011C6.29284 5.66504 5.99507 5.36727 5.99507 5C5.99507 4.63273 6.29284 4.33496 6.66011 4.33496H14.9999L15.1337 4.34863C15.4369 4.41057 15.665 4.67857 15.665 5V13.3301C15.6649 13.6973 15.3672 13.9951 14.9999 13.9951C14.6327 13.9951 14.335 13.6973 14.3349 13.3301Z\">\u003C/path>\u003C/svg>\u003C/span>\u003C/a>\u003C/strong> offers a streamlined, powerful experience:\u003C/p>\r\n\u003Cul data-start=\"3005\" data-end=\"3386\">\r\n\u003Cli data-start=\"3005\" data-end=\"3123\">\r\n\u003Cp data-start=\"3007\" data-end=\"3123\">\u003Cstrong data-start=\"3007\" data-end=\"3033\">AI-Created Backgrounds\u003C/strong>: Just upload your photo and choose or describe a background; PixelFox handles the rest.\u003C/p>\r\n\u003C/li>\r\n\u003Cli data-start=\"3124\" data-end=\"3202\">\r\n\u003Cp data-start=\"3126\" data-end=\"3202\">\u003Cstrong data-start=\"3126\" data-end=\"3146\">Seamless Editing\u003C/strong>: No installs required—works directly in your browser.\u003C/p>\r\n\u003C/li>\r\n\u003Cli data-start=\"3203\" data-end=\"3282\">\r\n\u003Cp data-start=\"3205\" data-end=\"3282\">\u003Cstrong data-start=\"3205\" data-end=\"3229\">High-Quality Results\u003C/strong>: Clean compositing and visually appealing outputs.\u003C/p>\r\n\u003C/li>\r\n\u003Cli data-start=\"3283\" data-end=\"3386\">\r\n\u003Cp data-start=\"3285\" data-end=\"3386\">\u003Cstrong data-start=\"3285\" data-end=\"3312\">Versatile Customization\u003C/strong>: From product demos to branding visuals—adaptable to any creative need.\u003C/p>\r\n\u003C/li>\r\n\u003C/ul>\r\n\u003Cp data-start=\"3388\" data-end=\"3575\">While tools like Adobe Express and Canva provide extensive stock libraries and user-friendly UI, PixelFox.ai excels in \u003Cspan data-start=\"3507\" data-end=\"3574\">generating custom scenes AI-only — fast and free tier available\u003C/span>.\u003C/p>\r\n\u003Ch2 data-start=\"3582\" data-end=\"3646\" id=\"eTofrC\">\u003Cstrong data-start=\"3585\" data-end=\"3646\">Step-by-Step: How to Use PixelFox.ai Background Generator\u003C/strong>\u003C/h2>\r\n\u003Col data-start=\"3648\" data-end=\"4009\">\r\n\u003Cli data-start=\"3648\" data-end=\"3752\">\r\n\u003Cp data-start=\"3651\" data-end=\"3752\">Navigate to \u003Cstrong data-start=\"3663\" data-end=\"3749\">\u003Ca data-start=\"3665\" data-end=\"3747\" rel=\"noopener\" target=\"_new\" class=\"decorated-link\" href=\"https://pixelfox.ai/image/background-generator\">PixelFox.ai Background Generator\u003Cspan aria-hidden=\"true\" class=\"ms-0.5 inline-block align-middle leading-none\">\u003Csvg width=\"20\" height=\"20\" viewBox=\"0 0 20 20\" fill=\"currentColor\" xmlns=\"http://www.w3.org/2000/svg\" data-rtl-flip=\"\" class=\"block h-[0.75em] w-[0.75em] stroke-current stroke-[0.75]\">\u003Cpath d=\"M14.3349 13.3301V6.60645L5.47065 15.4707C5.21095 15.7304 4.78895 15.7304 4.52925 15.4707C4.26955 15.211 4.26955 14.789 4.52925 14.5293L13.3935 5.66504H6.66011C6.29284 5.66504 5.99507 5.36727 5.99507 5C5.99507 4.63273 6.29284 4.33496 6.66011 4.33496H14.9999L15.1337 4.34863C15.4369 4.41057 15.665 4.67857 15.665 5V13.3301C15.6649 13.6973 15.3672 13.9951 14.9999 13.9951C14.6327 13.9951 14.335 13.6973 14.3349 13.3301Z\">\u003C/path>\u003C/svg>\u003C/span>\u003C/a>\u003C/strong>.\u003C/p>\r\n\u003C/li>\r\n\u003Cli data-start=\"3753\" data-end=\"3808\">\r\n\u003Cp data-start=\"3756\" data-end=\"3808\">Upload your photo with a clear foreground subject.\u003C/p>\r\n\u003C/li>\r\n\u003Cli data-start=\"3809\" data-end=\"3899\">\r\n\u003Cp data-start=\"3812\" data-end=\"3899\">Select a background style or type a prompt (e.g., “sunset beach” or “modern office”).\u003C/p>\r\n\u003C/li>\r\n\u003Cli data-start=\"3900\" data-end=\"3953\">\r\n\u003Cp data-start=\"3903\" data-end=\"3953\">Let the AI process the image—usually in seconds.\u003C/p>\r\n\u003C/li>\r\n\u003Cli data-start=\"3954\" data-end=\"4009\">\r\n\u003Cp data-start=\"3957\" data-end=\"4009\">Download your updated photo with its new background.\u003C/p>\r\n\u003C/li>\r\n\u003C/ol>\r\n\u003Cp data-start=\"4011\" data-end=\"4056\">No editing skills or manual masking required!\u003C/p>\r\n\u003Ch2 data-start=\"4063\" data-end=\"4106\" id=\"iv5PFn\">\u003Cstrong data-start=\"4066\" data-end=\"4106\">Use Cases: When to Choose Which Tool\u003C/strong>\u003C/h2>\r\n\u003Cul data-start=\"4108\" data-end=\"4580\">\r\n\u003Cli data-start=\"4108\" data-end=\"4225\">\r\n\u003Cp data-start=\"4110\" data-end=\"4225\">\u003Cstrong data-start=\"4110\" data-end=\"4146\">Product Photos for Online Stores\u003C/strong> → Canva or Fotor for quick presets; PixelFox.ai for unique branding visuals.\u003C/p>\r\n\u003C/li>\r\n\u003Cli data-start=\"4226\" data-end=\"4337\">\r\n\u003Cp data-start=\"4228\" data-end=\"4337\">\u003Cstrong data-start=\"4228\" data-end=\"4261\">Social Media Avatars or Reels\u003C/strong> → PixelFox.ai for AI-styled backgrounds, or Picsart’s prompt replacement.\u003C/p>\r\n\u003C/li>\r\n\u003Cli data-start=\"4338\" data-end=\"4423\">\r\n\u003Cp data-start=\"4340\" data-end=\"4423\">\u003Cstrong data-start=\"4340\" data-end=\"4361\">Pro-level Editing\u003C/strong> → Photoshop with Adobe Firefly tools for precision control.\u003C/p>\r\n\u003C/li>\r\n\u003Cli data-start=\"4424\" data-end=\"4521\">\r\n\u003Cp data-start=\"4426\" data-end=\"4521\">\u003Cstrong data-start=\"4426\" data-end=\"4454\">Marketing Banners or Ads\u003C/strong> → Photoroom for realistic settings; Canva for templated designs.\u003C/p>\r\n\u003C/li>\r\n\u003Cli data-start=\"4522\" data-end=\"4580\">\r\n\u003Cp data-start=\"4524\" data-end=\"4580\">\u003Cstrong data-start=\"4524\" data-end=\"4543\">One-Click Swaps\u003C/strong> → Phot.AI or Fotor for fast results.\u003C/p>\r\n\u003C/li>\r\n\u003C/ul>\r\n\u003Ch2 data-start=\"4587\" data-end=\"4605\" id=\"cuo4Lk\">\u003Cstrong data-start=\"4590\" data-end=\"4605\">Expert Note\u003C/strong>\u003C/h2>\r\n\u003Cp data-start=\"4607\" data-end=\"4665\">While many AI tools claim ease, users on Reddit point out:\u003C/p>\r\n\u003Cblockquote data-start=\"4667\" data-end=\"4817\">\r\n\u003Cp data-start=\"4669\" data-end=\"4817\">“Good and/or free with that level of AI doesn't exist. Photoshop is your best bet for a one-click solution.” \u003Cspan class=\"\" data-state=\"closed\">\u003Cspan class=\"ms-1 inline-flex max-w-full items-center relative top-[-0.094rem] animate-[show_150ms_ease-in]\" data-testid=\"webpage-citation-pill\">\u003C/span>\u003C/span>\u003C/p>\r\n\u003C/blockquote>\r\n\u003Cp data-start=\"4819\" data-end=\"4935\">However, that's shifting fast—modern tools like PixelFox.ai are bridging gaps between ease and professional quality.\u003C/p>\r\n\u003Ch2 data-start=\"4942\" data-end=\"4953\" id=\"DOBrv4\">\u003Cstrong data-start=\"4945\" data-end=\"4953\">FAQs\u003C/strong>\u003C/h2>\r\n\u003Cp data-start=\"4955\" data-end=\"5067\">\u003Cstrong data-start=\"4955\" data-end=\"5007\">Q1: Are these AI background changers truly free?\u003C/strong>\u003Cbr data-start=\"5007\" data-end=\"5010\">\r\nYes—many offer free usage with optional premium features.\u003C/p>\r\n\u003Cp data-start=\"5069\" data-end=\"5218\">\u003Cstrong data-start=\"5069\" data-end=\"5126\">Q2: Can I use AI backgrounds for commercial projects?\u003C/strong>\u003Cbr data-start=\"5126\" data-end=\"5129\">\r\nYes, but check each tool’s licensing terms—some require paid plans for commercial rights.\u003C/p>\r\n\u003Cp data-start=\"5220\" data-end=\"5329\">\u003Cstrong data-start=\"5220\" data-end=\"5256\">Q3: Do I need design experience?\u003C/strong>\u003Cbr data-start=\"5256\" data-end=\"5259\">\r\nNot at all. Tools like PixelFox.ai and Canva are built for simplicity.\u003C/p>\r\n\u003Cp data-start=\"5331\" data-end=\"5464\">\u003Cstrong data-start=\"5331\" data-end=\"5372\">Q4: Do AI backgrounds look realistic?\u003C/strong>\u003Cbr data-start=\"5372\" data-end=\"5375\">\r\nTools like PixelFox.ai, Photoroom, and Photoshop Firefly offer highly realistic outcomes.\u003C/p>\r\n\u003Cp data-start=\"5466\" data-end=\"5648\">\u003Cstrong data-start=\"5466\" data-end=\"5527\">Q5: Can I replace background for a large batch of images?\u003C/strong>\u003Cbr data-start=\"5527\" data-end=\"5530\">\r\nBatch tools vary—Fotor and Canva may support some automation, whereas PixelFox.ai focuses on single-image enhancement.\u003C/p>\r\n\u003Ch2 data-start=\"5655\" data-end=\"5672\" id=\"pYFnK9\">\u003Cstrong data-start=\"5658\" data-end=\"5672\">Conclusion\u003C/strong>\u003C/h2>\r\n\u003Cp data-start=\"5674\" data-end=\"5749\">The best AI background changers of 2025 make once-complex editing a breeze:\u003C/p>\r\n\u003Cul data-start=\"5750\" data-end=\"5973\">\r\n\u003Cli data-start=\"5750\" data-end=\"5802\">\r\n\u003Cp data-start=\"5752\" data-end=\"5802\">Professional-grade AI tailoring? → \u003Cstrong data-start=\"5787\" data-end=\"5802\">PixelFox.ai\u003C/strong>\u003C/p>\r\n\u003C/li>\r\n\u003Cli data-start=\"5803\" data-end=\"5866\">\r\n\u003Cp data-start=\"5805\" data-end=\"5866\">Rich templates & design tools? → \u003Cstrong data-start=\"5838\" data-end=\"5847\">Canva\u003C/strong>, \u003Cstrong data-start=\"5849\" data-end=\"5866\">Adobe Express\u003C/strong>\u003C/p>\r\n\u003C/li>\r\n\u003Cli data-start=\"5867\" data-end=\"5916\">\r\n\u003Cp data-start=\"5869\" data-end=\"5916\">Studio-product quality visuals? → \u003Cstrong data-start=\"5903\" data-end=\"5916\">Photoroom\u003C/strong>\u003C/p>\r\n\u003C/li>\r\n\u003Cli data-start=\"5917\" data-end=\"5973\">\r\n\u003Cp data-start=\"5919\" data-end=\"5973\">Full creative control? → \u003Cstrong data-start=\"5944\" data-end=\"5973\">Photoshop with Firefly AI\u003C/strong>\u003C/p>\r\n\u003C/li>\r\n\u003C/ul>\r\n\u003Cp data-start=\"5975\" data-end=\"6075\">\u003Cspan data-start=\"5975\" data-end=\"6075\">Don’t settle for static filters—try AI background editing and revolutionize your workflow today.\u003C/span>\u003C/p>\r\n\u003C/div>\u003C/div>\u003C/div>\u003C/div>\u003Cdiv class=\"flex min-h-[46px] justify-start\">\u003C/div>\u003Cdiv class=\"mt-3 w-full empty:hidden\">\u003Cdiv class=\"text-center\">\u003C/div>\u003C/div>\u003C/div>\u003C/div>\u003C/article>","best-ai-background-changer-tools-of-2025-featuring-pixelfox-ai",102,1756254140,1756254239,{"id":122,"lang":11,"author_id":12,"image":123,"title":124,"keywords":125,"description":126,"content":127,"url":128,"views":129,"publishtime":130,"updatetime":91,"status":22,"publishtime_text":92,"status_text":25},127,"https://api.pixelfox.ai/uploads/20250714/7de0869e314ef3c1bcb00552c22dfbc2.png","Free Online Object Remover – Remove Objects & People from Photos Instantly","remove object from image, remove object from photo, object remover from photo, object remover, remove object from picture","Easily remove objects, people, or clutter from your photos online with PixelFox. No downloads, no design skills needed, just quick, clean edits using AI. Try it free in your browser!","\u003Cp style=\"line-height: 1.38;\">\u003Cspan style=\"color: rgb(0, 0, 0);\">To take a nice picture, there is usually an element of surprise intrusion, an intrusive figure in the background, a photobomber, a trash can, or other aspects of clutter interfering with the attractive look. Fortunately, you do not require sophisticated software and a high level of editing skills to correct it. Everyone can edit and \u003C/span>\u003Cspan style=\"color: rgb(0, 0, 0);\">remove objects from photo \u003C/span>\u003Cspan style=\"color: rgb(0, 0, 0);\">through free tools that are easy to use. \u003C/span>\u003Cspan style=\"color: rgb(0, 0, 0);\">Object removers \u003C/span>\u003Cspan style=\"color: rgb(0, 0, 0);\">are your miracle workers, whether you are an amateur photographer or an avid user of social media, or want to clean up a family photograph, object removers are as good as your best friend.\u003C/span>\u003C/p>\u003Cp style=\"line-height: 1.38;\">\u003Cspan style=\"color: rgb(0, 0, 0);\">In this guide, let's learn how to \u003C/span>\u003Cspan style=\"color: rgb(0, 0, 0);\">remove objects from photos \u003C/span>\u003Cspan style=\"color: rgb(0, 0, 0);\">with free online applications. Mainly focus on knowing how these applications work, and learn some of the tips that will give us clean, professional results.\u003C/span>\u003C/p>\u003Cp style=\"line-height: 1.38;\">\u003Cspan style=\"color: rgb(0, 0, 0);\">\u003Cbr>\u003C/span>\u003C/p>\u003Ch2>\u003Cspan style=\"color: rgb(0, 0, 0);\">What is the Need to use an online object remover?\u003C/span>\u003C/h2>\u003Cimg loading=\"lazy\" alt=\"Free Online Object Remover – Remove Objects & People from Photos Instantly\" src=\"https://api.pixelfox.ai/uploads/20250714/7de0869e314ef3c1bcb00552c22dfbc2.png\" data-filename=\"filename\" style=\"font-family: "Source Sans Pro", "Helvetica Neue", Helvetica, Arial, sans-serif; font-size: 14px; width: 840px;\">\u003Cspan style=\"color: rgb(0, 0, 0);\">\u003Cbr>\u003Cbr>\u003Cp>\u003C/p>\u003Cp style=\"line-height: 1.38;\">\u003Cspan style=\"color: rgb(0, 0, 0);\">No more is needed to know how to use Photoshop to \u003C/span>\u003Cspan style=\"color: rgb(0, 0, 0);\">remove objects from an image\u003C/span>\u003Cspan style=\"color: rgb(0, 0, 0);\">. With the help of current technical advancements and AI-based technologies, a number of online platforms have made it possible to remove content from an image using a few clicks. These are:\u003C/span>\u003C/p>\u003Cul>\u003Cli>\u003Cp style=\"line-height: 1.38;\">These tools are free of cost\u003C/p>\u003C/li>\u003Cli>\u003Cp style=\"line-height: 1.38;\">It can be accessed by a browser ( requires no download )\u003C/p>\u003C/li>\u003Cli>\u003Cp style=\"line-height: 1.38;\">Easy and fast for learners\u003C/p>\u003C/li>\u003Cli>\u003Cp style=\"line-height: 1.38;\">Artificial intelligence-powered and smooth editing help\u003C/p>\u003C/li>\u003C/ul>\u003Cp style=\"line-height: 1.38;\">\u003Cspan style=\"color: rgb(0, 0, 0);\">An \u003C/span>\u003Cspan style=\"color: rgb(0, 0, 0);\">object remover from a photo\u003C/span>\u003Cspan style=\"color: rgb(0, 0, 0);\"> editor will make removing a tourist out of a beautiful shot and a logo from the picture of a product much easier.\u003C/span>\u003C/p>\u003Ch2>\u003Cspan style=\"color: rgb(0, 0, 0);\">Which tool is perfect for removing objects from an Image?\u003C/span>\u003C/h2>\u003Cp style=\"line-height: 1.38;\">\u003Cspan style=\"color: rgb(0, 0, 0);\">PixelFox \u003C/span>\u003Cspan style=\"color: rgb(0, 0, 0);\">is a sensible, intuitive online tool that allows users to remove unnecessary elements of photos (including people), best of all. Be it any tourist behind or a power line, or a distracting object in your composition, this tool gives you a clean yet painless method of fixing it out. By using this\u003C/span>\u003Cspan style=\"color: rgb(0, 0, 0);\"> object remover, \u003C/span>\u003Cspan style=\"color: rgb(0, 0, 0);\">you do not need design experience.\u003C/span>\u003C/p>\u003Cp style=\"line-height: 1.38;\">\u003Cspan style=\"color: rgb(0, 0, 0);\">The service is browser-based and allows quick changes without the installation of massive third-party software. Intuitive brush tools and AI-driven clean-up, PixelFox enables an easy way to emphasize what is important and get rid of what is not.\u003C/span>\u003C/p>\u003Ch3>\u003Cspan style=\"color: rgb(67, 67, 67);\">Top Features\u003C/span>\u003C/h3>\u003Cul>\u003Cli>\u003Cp style=\"line-height: 1.38;\">Browser-based tool with no app download required\u003C/p>\u003C/li>\u003Cli>\u003Cp style=\"line-height: 1.38;\">AI-driven background and object removal\u003C/p>\u003C/li>\u003Cli>\u003Cp style=\"line-height: 1.38;\">Simple brush selection for precise edits\u003C/p>\u003C/li>\u003Cli>\u003Cp style=\"line-height: 1.38;\">Fast export with high-quality results\u003C/p>\u003C/li>\u003Cli>\u003Cp style=\"line-height: 1.38;\">Free to use for personal or creative projects\u003C/p>\u003C/li>\u003C/ul>\u003Ch2>\u003Cspan style=\"color: rgb(0, 0, 0);\">Edit Images Without the Clutter\u003C/span>\u003C/h2>\u003Ch2>\u003Cimg loading=\"lazy\" alt=\"Free Online Object Remover – Remove Objects & People from Photos Instantly\" src=\"https://api.pixelfox.ai/uploads/20250714/e0ec107c2010461f0dabea521ade1d9f.png\" data-filename=\"filename\" style=\"width: 753px;\">\u003Cspan style=\"color: rgb(0, 0, 0);\">\u003Cbr>\u003C/span>\u003C/h2>\u003Cp style=\"line-height: 1.38;\">\u003Cspan style=\"color: rgb(0, 0, 0);\">Photo distractions may capture a viewer's attention from the subject. The PixelFox \u003C/span>\u003Cspan style=\"color: rgb(0, 0, 0);\">object remover\u003C/span>\u003Cspan style=\"color: rgb(0, 0, 0);\"> is a nice GUI, and the user can easily point to the piece they wish to delete. The tool mixes the background and replaces what would have been seen without the object in a few seconds.\u003C/span>\u003Cbr>\u003C/p>\u003Cp style=\"line-height: 1.38;\">\u003Cspan style=\"color: rgb(0, 0, 0);\">It allows a variety of formats and resolutions of images. Whether you're editing landscape photos, portraits, or product shots, the output remains natural and detailed.\u003C/span>\u003C/p>\u003Ch3>\u003Cspan style=\"color: rgb(67, 67, 67);\">Highlights\u003C/span>\u003C/h3>\u003Cul>\u003Cli>\u003Cp style=\"line-height: 1.38;\">Removes people, objects, text, and blemishes\u003C/p>\u003C/li>\u003Cli>\u003Cp style=\"line-height: 1.38;\">Maintains photo integrity without blurring\u003C/p>\u003C/li>\u003Cli>\u003Cp style=\"line-height: 1.38;\">Works for product, travel, or social media photos\u003C/p>\u003C/li>\u003Cli>\u003Cp style=\"line-height: 1.38;\">Smart background fill with minimal user input.\u003C/p>\u003C/li>\u003C/ul>\u003Ch2>\u003Cspan style=\"color: rgb(0, 0, 0);\">Simple Workflow for Fast Results\u003C/span>\u003C/h2>\u003Cp style=\"line-height: 1.38;\">\u003Cspan style=\"color: rgb(0, 0, 0);\">The process is direct. Click to upload the photo, choose the part you need to edit, and then \u003C/span>\u003Cspan style=\"color: rgb(0, 0, 0);\">PixelFox \u003C/span>\u003Cspan style=\"color: rgb(0, 0, 0);\">will do the cleaning. You can see what you will get before you download, and there is no registration also to start with.\u003C/span>\u003C/p>\u003Cp style=\"line-height: 1.38;\">\u003Cspan style=\"color: rgb(0, 0, 0);\">Its ease of use means that it is something that can be used by idiots and also by properly skilled workers who want to make some quick changes to output without resorting to messy software.\u003C/span>\u003C/p>\u003Ch2>\u003Cspan style=\"color: rgb(0, 0, 0);\">Highlights\u003C/span>\u003C/h2>\u003Cul>\u003Cli>\u003Cp style=\"line-height: 1.38;\">No account required\u003C/p>\u003C/li>\u003Cli>\u003Cp style=\"line-height: 1.38;\">Fast rendering time\u003C/p>\u003C/li>\u003Cli>\u003Cp style=\"line-height: 1.38;\">Undo and re-edit options are built in.\u003C/p>\u003C/li>\u003Cli>\u003Cp style=\"line-height: 1.38;\">Clear layout for distraction-free editing\u003C/p>\u003C/li>\u003C/ul>\u003Ch2>\u003Cspan style=\"color: rgb(0, 0, 0);\">Why PixelFox Works Better Than Manual Editing\u003C/span>\u003C/h2>\u003Cp style=\"line-height: 1.38;\">\u003Cspan style=\"color: rgb(0, 0, 0);\">The common traditional editing software usually takes several processes to tidy up an image, such as application of layers, cloning, and blending. That will be easier because the \u003C/span>\u003Cspan style=\"color: rgb(0, 0, 0);\">object remover from photo \u003C/span>\u003Cspan style=\"color: rgb(0, 0, 0);\">tool automates most of the process with the help of AI.\u003C/span>\u003C/p>\u003Cp style=\"line-height: 1.38;\">\u003Cspan style=\"color: rgb(0, 0, 0);\">This saves some time, as well as minimizing the possibility of excessive editing or conspicuous errors. The gadget is made in such a way that it does not delete shadows, lights, and the texture of the image; it replaces the deleted area with something that complements the rest of the image.\u003C/span>\u003C/p>\u003Ch3>\u003Cspan style=\"color: rgb(67, 67, 67);\">Highlights\u003C/span>\u003C/h3>\u003Cul>\u003Cli>\u003Cp style=\"line-height: 1.38;\">Built-in AI model for intelligent clean-up\u003C/p>\u003C/li>\u003Cli>\u003Cp style=\"line-height: 1.38;\">No risk of background mismatch\u003C/p>\u003C/li>\u003Cli>\u003Cp style=\"line-height: 1.38;\">Adjusts to lighting and tone for natural edits\u003C/p>\u003C/li>\u003Cli>\u003Cp style=\"line-height: 1.38;\">Better results than manual blur or clone tools\u003C/p>\u003C/li>\u003C/ul>\u003Ch2>\u003Cspan style=\"color: rgb(0, 0, 0);\">Who Will Find It Useful\u003C/span>\u003C/h2>\u003Cul>\u003Cli>\u003Cp style=\"line-height: 1.38;\">People on social media are editing their vacation or trip shots.\u003C/p>\u003C/li>\u003Cli>\u003Cp style=\"line-height: 1.38;\">The marked image of the product is being eliminated by the sellers.\u003C/p>\u003C/li>\u003Cli>\u003Cp style=\"line-height: 1.38;\">Bloggers and content creators are polishing visual content.\u003C/p>\u003C/li>\u003Cli>\u003Cp style=\"line-height: 1.38;\">Anyone with casual or professional photo editing needs\u003C/p>\u003C/li>\u003C/ul>\u003Ch2>\u003Cspan style=\"color: rgb(0, 0, 0);\">Why This Is a Go-To Tool for Object Remover\u003C/span>\u003C/h2>\u003Cp style=\"line-height: 1.38;\">\u003Cimg loading=\"lazy\" alt=\"Free Online Object Remover – Remove Objects & People from Photos Instantly\" src=\"https://api.pixelfox.ai/uploads/20250714/1f3496bf8caa3e4c84665189921bad3f.png\" data-filename=\"filename\" style=\"width: 1600px;\">\u003Cbr>\u003C/p>\u003Cp style=\"line-height: 1.38;\">\u003Cspan style=\"color: rgb(0, 0, 0);\">PixelFox focuses on making smart editing accessible to everyone. The platform is optimized to reduce the removal process and concentrate on the essential tools to get the results within a few seconds.\u003C/span>\u003C/p>\u003Cp style=\"line-height: 1.38;\">\u003Cspan style=\"color: rgb(0, 0, 0);\">It eliminates the necessity to download programs and to spend hours in order to master tools. Its AI technology and user-friendly interface make it the perfect option to consider in case one is looking to have a quick fix that appears to be professional.\u003C/span>\u003C/p>\u003Cp style=\"line-height: 1.38;\">\u003Cspan style=\"color: rgb(0, 0, 0);\">Key reasons to use it:\u003C/span>\u003C/p>\u003Cul>\u003Cli>\u003Cp style=\"line-height: 1.38;\">Quick edits with clean, natural finishes\u003C/p>\u003C/li>\u003Cli>\u003Cp style=\"line-height: 1.38;\">Works directly in your browser\u003C/p>\u003C/li>\u003Cli>\u003Cp style=\"line-height: 1.38;\">Handles both objects and people with ease\u003C/p>\u003C/li>\u003Cli>\u003Cp style=\"line-height: 1.38;\">Free access with no design background required\u003C/p>\u003C/li>\u003C/ul>\u003Ch2>\u003Cspan style=\"color: rgb(0, 0, 0);\">Final Thoughts\u003C/span>\u003C/h2>\u003Cp style=\"line-height: 1.38;\">\u003Cspan style=\"color: rgb(0, 0, 0);\">The PixelFox \u003C/span>\u003Cspan style=\"color: rgb(0, 0, 0);\">object remover\u003C/span>\u003Cspan style=\"color: rgb(0, 0, 0);\"> is an application that is utilized in organizing the improvement of quality output by \u003C/span>\u003Cspan style=\"color: rgb(0, 0, 0);\">removing objects from image\u003C/span>\u003Cspan style=\"color: rgb(0, 0, 0);\"> in a matter of minutes. Being free and available through any browser, the tool provides a good balance of performance and ease. It also offers strong AI support.\u003C/span>\u003C/p>\u003Cp style=\"line-height: 1.38;\">\u003Cspan style=\"color: rgb(0, 0, 0);\">To any person who requires eliminating the objects from images effectively, this tool provides an actual output without the e.g. learning. Whether you're refining a personal photo or preparing visuals for a professional project, PixelFox makes it easy to remove objects from a picture and focus attention where it belongs.\u003C/span>\u003C/p>\u003Cdiv>\u003Cspan style=\"color: rgb(0, 0, 0);\">\u003Cbr>\u003Cbr>\u003C/span>\u003C/div>\u003C/span>","free-online-object-remover",194,1752251295,{"id":132,"lang":11,"author_id":5,"image":133,"title":134,"keywords":135,"description":136,"content":137,"url":138,"views":139,"publishtime":140,"updatetime":141,"status":22,"publishtime_text":142,"status_text":25},857,"https://api.pixelfox.ai/template/facemakeup/feature_3.webp","The Best Editor Maker of 2025: Create Videos & Photos","editor maker, best editing sites, best editing websites, create video from website,","Discover the best AI **editor maker** of 2025! Create stunning photos & videos easily online. Find top editing sites & revolutionize your content.","\u003Cp>In today's world, great images and videos are everything. Everyone from small business owners to social media fans needs to create content that looks amazing. Years ago, this meant using expensive and hard-to-learn software. But now, things are different. The rise of the online \u003Cstrong>editor maker\u003C/strong> has changed the game. These tools let you edit photos and videos right in your web browser. You don't need to download anything, and many of them are free.\u003C/p>\r\n\u003Cp>Finding the right tool can be tough. There are so many options out there. This guide will show you the \u003Cstrong>best editing sites\u003C/strong> and what to look for. We will explore the features that matter most. We will also introduce you to Pixelfox AI, a powerful and easy-to-use \u003Cstrong>editor maker\u003C/strong> that uses artificial intelligence to make your content shine. Whether you want to touch up a photo or \u003Cstrong>create video from a website\u003C/strong>, this guide has the answers.\u003C/p>\r\n\u003Ch2 id=\"6Xjwv8\">What Makes a Great Online Editor Maker?\u003C/h2>\r\n\u003Cp>When you search for the \u003Cstrong>best editing websites\u003C/strong>, you will find many choices. They all promise to be easy and powerful. But what features really make a difference? A top-tier \u003Cstrong>editor maker\u003C/strong> should be simple for beginners but also have strong tools for pros.\u003C/p>\r\n\u003Cp>Here are the key things to look for:\u003C/p>\r\n\u003Cul>\r\n\u003Cli>\u003Cstrong>Ease of Use:\u003C/strong> A good editor should have a clean, simple layout. You shouldn't have to watch hours of tutorials to figure out basic tasks. Tools like Pixelfox AI are designed with this in mind. You can upload a photo and start editing in seconds. Drag-and-drop timelines and clear icons make the process smooth.\u003C/li>\r\n\u003Cli>\u003Cstrong>AI-Powered Tools:\u003C/strong> Artificial intelligence is the biggest change in photo and video editing. AI can do complex tasks in one click. Look for an \u003Cstrong>editor maker\u003C/strong> with features like AI photo enhancement, which automatically improves colors and sharpness. AI background removal is another must-have. It saves you from the slow process of manually cutting out a subject. Pixelfox AI excels here, offering tools that automatically fix lighting, remove unwanted objects, and even colorize old photos.\u003C/li>\r\n\u003Cli>\u003Cstrong>Photo and Video Support:\u003C/strong> Some sites are only for photos, while others are only for videos. The \u003Cstrong>best editing sites\u003C/strong> handle both. This saves you from switching between different websites. An all-in-one platform lets you create a consistent look for all your content. You can edit a photo for a thumbnail and then use the same tool to create the full video.\u003C/li>\r\n\u003Cli>\u003Cstrong>Templates and Assets:\u003C/strong> Sometimes you need a little help to get started. A good \u003Cstrong>editor maker\u003C/strong> offers a library of templates for things like social media posts, video intros, and slideshows. Access to stock photos, videos, and music is also a huge plus. This helps you make professional-looking content without having to create everything from scratch.\u003C/li>\r\n\u003Cli>\u003Cstrong>Flexible Export Options:\u003C/strong> Once you're done editing, you need to save your work. A great editor lets you export in different formats (like JPG, PNG, MP4) and resolutions (like HD or 4K). This ensures your content looks great on any platform, from Instagram to YouTube.\u003C/li>\r\n\u003C/ul>\r\n\u003Ch2 id=\"mHiWeC\">The Top Editor Maker Tools for 2025\u003C/h2>\r\n\u003Cp>The market for online editors is crowded. Big names and new tools are all competing for your attention. To help you choose, we've reviewed some of the \u003Cstrong>best editing websites\u003C/strong> available today. We compared them based on features, ease of use, and overall value.\u003C/p>\r\n\u003Ch3>1. Pixelfox AI (Top Recommendation)\u003C/h3>\r\n\u003Cp>Pixelfox AI stands out as the best all-around \u003Cstrong>editor maker\u003C/strong> for most people. It combines powerful AI features with a very user-friendly interface. It's built for both photos and videos, making it a true one-stop shop.\u003C/p>\r\n\u003Cp>\u003Cstrong>What we love:\u003C/strong>\u003C/p>\r\n\u003Cul>\r\n\u003Cli>\u003Cstrong>Powerful AI Suite:\u003C/strong> Pixelfox AI is not just an editor; it's an intelligent creative partner. The \u003Cstrong>\u003Ca href=\"https://pixelfox.ai/image/enhancer\">AI Photo Enhancer\u003C/a>\u003C/strong> can take a blurry, dark photo and make it sharp and vibrant with one click. Its background remover is fast and accurate. It also has unique AI tools like an \u003Cstrong>\u003Ca href=\"https://pixelfox.ai/image/face-reshape\">AI Face Reshape - Edit facial features\u003C/a>\u003C/strong> tool and an AI makeup filter, which are perfect for perfecting portraits and selfies.\u003C/li>\r\n\u003Cli>\u003Cstrong>Simplicity:\u003C/strong> You don't need any experience to use Pixelfox AI. The website is clean, and the tools are easy to find. Everything is designed to be intuitive.\u003C/li>\r\n\u003Cli>\u003Cstrong>All-in-One Platform:\u003C/strong> You can edit your photos, \u003Cstrong>create video from a website\u003C/strong>-based platform, and design graphics without leaving the site. This seamless workflow is a huge time-saver.\u003C/li>\r\n\u003Cli>\u003Cstrong>Free and Accessible:\u003C/strong> Pixelfox AI offers a very generous free plan. This makes it accessible to everyone, from students to small business owners. You can get professional results without spending any money.\u003C/li>\r\n\u003C/ul>\r\n\u003Cp>\u003Cimg loading=\"lazy\" src=\"https://api.pixelfox.ai/template/facemakeup/feature_3.webp\" alt=\"An image showing a virtual makeup filter being applied to a face using an AI editor maker.\">\u003C/p>\r\n\u003Ch3>2. Canva\u003C/h3>\r\n\u003Cp>Canva is incredibly popular, especially for beginners and those focused on graphic design. It's known for its huge library of templates.\u003C/p>\r\n\u003Cp>\u003Cstrong>What we love:\u003C/strong>\u003C/p>\r\n\u003Cul>\r\n\u003Cli>\u003Cstrong>Templates:\u003C/strong> Canva has a template for almost anything you can imagine, from Instagram stories to business presentations.\u003C/li>\r\n\u003Cli>\u003Cstrong>Ease of Use:\u003C/strong> Its drag-and-drop interface is famous for being simple and fun to use.\u003C/li>\r\n\u003C/ul>\r\n\u003Cp>\u003Cstrong>Where it could improve:\u003C/strong>\u003C/p>\r\n\u003Cul>\r\n\u003Cli>\u003Cstrong>Advanced Photo Editing:\u003C/strong> While Canva has basic photo editing tools, it lacks the advanced AI capabilities of Pixelfox AI. Tasks like detailed photo restoration or complex object removal are easier on other platforms.\u003C/li>\r\n\u003Cli>\u003Cstrong>Video Editing:\u003C/strong> Canva's video editor is good for simple projects like slideshows or social media clips. But it's not as powerful as dedicated video tools when it comes to timeline control and effects.\u003C/li>\r\n\u003C/ul>\r\n\u003Ch3>3. Adobe Express\u003C/h3>\r\n\u003Cp>Adobe is the king of creative software, and Adobe Express is their answer to easy online editing. It's a solid tool with the power of Adobe behind it.\u003C/p>\r\n\u003Cp>\u003Cstrong>What we love:\u003C/strong>\u003C/p>\r\n\u003Cul>\r\n\u003Cli>\u003Cstrong>Integration:\u003C/strong> If you already use other Adobe products like Photoshop or Lightroom, Express works well with them.\u003C/li>\r\n\u003Cli>\u003Cstrong>Quality Assets:\u003C/strong> It gives you access to Adobe's high-quality stock photo and font library.\u003C/li>\r\n\u003C/ul>\r\n\u003Cp>\u003Cstrong>Where it could improve:\u003C/strong>\u003C/p>\r\n\u003Cul>\r\n\u003Cli>\u003Cstrong>Complexity and Cost:\u003C/strong> While simpler than Photoshop, it can still feel a bit complicated for new users. The best features are locked behind a Creative Cloud subscription, which can be expensive.\u003C/li>\r\n\u003C/ul>\r\n\u003Ch3>4. CapCut\u003C/h3>\r\n\u003Cp>Owned by the same company as TikTok, CapCut is a mobile-first video editor that has become extremely popular for creating short-form content. It also has a web version.\u003C/p>\r\n\u003Cp>\u003Cstrong>What we love:\u003C/strong>\u003C/p>\r\n\u003Cul>\r\n\u003Cli>\u003Cstrong>Trendy Effects and Sounds:\u003C/strong> CapCut is always up-to-date with the latest trends, effects, and popular audio clips for social media.\u003C/li>\r\n\u003Cli>\u003Cstrong>Auto-Captions:\u003C/strong> Its automatic captioning tool is fast and surprisingly accurate, which is a huge help for making accessible content.\u003C/li>\r\n\u003C/ul>\r\n\u003Cp>\u003Cstrong>Where it could improve:\u003C/strong>\u003C/p>\r\n\u003Cul>\r\n\u003Cli>\u003Cstrong>Focus on Mobile:\u003C/strong> The web version is good, but the app's real power is on mobile. It's not as suited for long-form video or detailed photo editing on a desktop.\u003C/li>\r\n\u003Cli>\u003Cstrong>Photo Editing:\u003C/strong> CapCut is a video-first tool. Its photo editing features are very basic compared to a dedicated \u003Cstrong>editor maker\u003C/strong> like Pixelfox AI.\u003C/li>\r\n\u003C/ul>\r\n\u003Ch2 id=\"Yt2J0p\">How to Create Video From a Website-Based Editor\u003C/h2>\r\n\u003Cp>The idea to \u003Cstrong>create video from a website\u003C/strong> might sound complicated, but modern online editors make it simple. You can create a professional-looking video in just a few steps, right from your browser. Here’s a general guide that applies to tools like Pixelfox AI.\u003C/p>\r\n\u003Ch3>Step 1: Upload Your Content or Start with AI\u003C/h3>\r\n\u003Cp>First, gather your files. This can include video clips, photos, and music. Most online editors let you drag and drop files directly onto the webpage. If you don't have your own content, you can use the editor's stock library or even start with an AI tool. For example, some tools can generate a video from a simple text description.\u003C/p>\r\n\u003Ch3>Step 2: Assemble Your Story on the Timeline\u003C/h3>\r\n\u003Cp>Once your files are uploaded, drag them onto the timeline at the bottom of the screen. The timeline is where you build your video. You can arrange clips in the order you want them to appear. You can trim the beginning or end of a clip to remove unwanted parts. You can also split a clip in the middle to insert another photo or video. This is the stage where you shape the basic story of your video.\u003C/p>\r\n\u003Ch3>Step 3: Enhance with Effects, Music, and Text\u003C/h3>\r\n\u003Cp>Now for the fun part. This is where you add polish to your video.\u003C/p>\r\n\u003Cul>\r\n\u003Cli>\u003Cstrong>Transitions:\u003C/strong> Add transitions between clips to make the video flow smoothly. A simple fade or a fun slide can make a big difference.\u003C/li>\r\n\u003Cli>\u003Cstrong>Music and Sound:\u003C/strong> Add a background music track to set the mood. You can upload your own song or choose one from the editor's library.\u003C/li>\r\n\u003Cli>\u003Cstrong>Text and Titles:\u003C/strong> Add an opening title, end credits, or text overlays to highlight important information. The \u003Cstrong>best editing websites\u003C/strong> let you customize the font, color, and size of your text.\u003C/li>\r\n\u003Cli>\u003Cstrong>Filters and Effects:\u003C/strong> Apply a color filter to give your video a consistent look. You can also add special effects to make it more dynamic.\u003C/li>\r\n\u003C/ul>\r\n\u003Ch3>Step 4: Export and Share Your Video\u003C/h3>\r\n\u003Cp>After you are happy with your creation, it's time to export. Choose your desired resolution, like 1080p HD, and file format, usually MP4. The \u003Cstrong>editor maker\u003C/strong> will process your video and provide a download link. Once downloaded, your video is ready to be shared on YouTube, Instagram, or anywhere else you want.\u003C/p>\r\n\u003Ch2 id=\"9wTuWH\">The Future is AI: How AI is Changing Editing\u003C/h2>\r\n\u003Cp>We can't talk about a modern \u003Cstrong>editor maker\u003C/strong> without focusing on Artificial Intelligence. AI is not just a buzzword; it's a set of tools that automates difficult tasks and opens up new creative possibilities. For years, tasks like removing a person from the background of a photo required skill and patience in software like Photoshop. Now, AI can do it in seconds.\u003C/p>\r\n\u003Cp>Here are a few ways AI is transforming online editors:\u003C/p>\r\n\u003Cul>\r\n\u003Cli>\u003Cstrong>Smart Enhancement:\u003C/strong> AI can analyze a photo and automatically adjust brightness, contrast, and color balance to make it look its best. This is perfect for quick touch-ups.\u003C/li>\r\n\u003Cli>\u003Cstrong>Object and Background Removal:\u003C/strong> This is one of the most useful AI features. You can remove a distracting object, an ex-partner, or the entire background of an image with a single click. This is great for creating product photos with clean backgrounds.\u003C/li>\r\n\u003Cli>\u003Cstrong>Photo Restoration:\u003C/strong> Old, faded, and scratched photos can be brought back to life. AI tools can \u003Cstrong>\u003Ca href=\"https://pixelfox.ai/image/colorizer\">Colorize old Photos\u003C/a>\u003C/strong>, fix damage, and even sharpen blurry faces in old family pictures.\u003C/li>\r\n\u003Cli>\u003Cstrong>Generative AI:\u003C/strong> This is the most exciting development. You can now use text to create or change images. For example, you can select a person's shirt in a photo and type \"change to a red shirt,\" and the AI will do it. Or you can \u003Cstrong>\u003Ca href=\"https://pixelfox.ai/image/image-blender\">Combine Images\u003C/a>\u003C/strong> from different sources to create entirely new scenes.\u003C/li>\r\n\u003C/ul>\r\n\u003Cp>Pixelfox AI is at the forefront of this revolution. It has built its platform around these smart AI tools, making them easy for anyone to use.\u003C/p>\r\n\u003Cp>\u003Cimg loading=\"lazy\" src=\"https://api.pixelfox.ai/template/facetidyup/feature_2.webp\" alt=\"An image demonstrating an AI face reshape tool, showing adjustments to facial features.\">\u003C/p>\r\n\u003Ch2 id=\"mzd65T\">Conclusion: Your Perfect Editor Maker is Here\u003C/h2>\r\n\u003Cp>The world of digital content creation is moving fast. To keep up, you need tools that are powerful, easy, and affordable. The online \u003Cstrong>editor maker\u003C/strong> is the answer. It gives you the ability to create stunning photos and videos from any device with an internet connection.\u003C/p>\r\n\u003Cp>When looking for the \u003Cstrong>best editing sites\u003C/strong>, remember to focus on ease of use, a strong set of AI features, and the flexibility to handle both photos and videos. While tools like Canva and Adobe Express have their strengths, \u003Cstrong>Pixelfox AI\u003C/strong> offers the most complete and future-forward package. Its powerful AI tools, simple interface, and generous free plan make it the top choice for creators in 2025 and beyond.\u003C/p>\r\n\u003Cp>Don't let complicated software hold you back. Explore the world of online editing and see how easy it can be to bring your creative ideas to life. Try Pixelfox AI today and start creating content that gets noticed.\u003C/p>","the-best-editor-maker-of-2025-create-videos-photos",128,1755134365,1755154370,"2 months ago",["Reactive",144],{"$si18n:cached-locale-configs":145,"$si18n:resolved-locale":15},{"en":146,"zh":149,"tw":151,"vi":153,"id":155,"pt":157,"es":159,"fr":161,"de":163,"it":165,"nl":167,"th":169,"tr":171,"ru":173,"ko":175,"ja":177,"ar":179,"pl":181},{"fallbacks":147,"cacheable":148},[],true,{"fallbacks":150,"cacheable":148},[],{"fallbacks":152,"cacheable":148},[],{"fallbacks":154,"cacheable":148},[],{"fallbacks":156,"cacheable":148},[],{"fallbacks":158,"cacheable":148},[],{"fallbacks":160,"cacheable":148},[],{"fallbacks":162,"cacheable":148},[],{"fallbacks":164,"cacheable":148},[],{"fallbacks":166,"cacheable":148},[],{"fallbacks":168,"cacheable":148},[],{"fallbacks":170,"cacheable":148},[],{"fallbacks":172,"cacheable":148},[],{"fallbacks":174,"cacheable":148},[],{"fallbacks":176,"cacheable":148},[],{"fallbacks":178,"cacheable":148},[],{"fallbacks":180,"cacheable":148},[],{"fallbacks":182,"cacheable":148},[],["Set"],["ShallowReactive",185],{"article-detail-ai-suit-photo-pro-free-business-photo-ai-for-professional-headshots-online":-1},"/blog/ai-suit-photo-pro-free-business-photo-ai-for-professional-headshots-online",{"userStore":188},{"showLoginModal":189,"showLoginClose":148,"loading":190,"inviteCode":15,"bidIdentification":15,"token":15,"userInfo":192,"showPriceDialog":189,"paidBefore":91,"showTrailEndDialog":189},false,{"show":189,"message":191},"加载中...",{"avatar":193,"nickname":193,"email":193},null]