 Credit

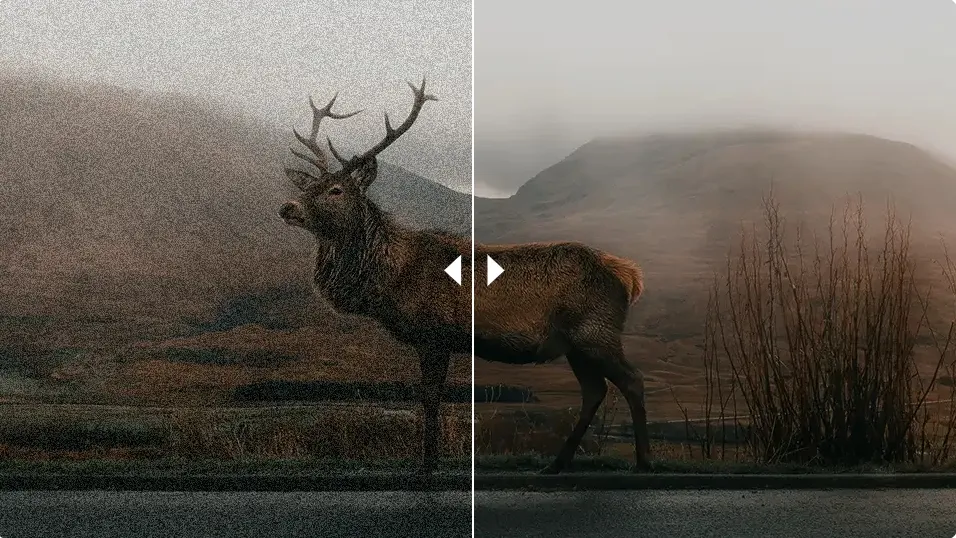
Grainy photos. Fuzzy night videos. Watercolor faces after “AI magic.” You’ve seen it. And it stings when the moment was perfect and the pixels look like popcorn. If you’re hunting for a noise reduction program that actually fixes the mess without nuking detail, you’re in the right place. This guide cuts through hype and shows what works in 2025. We’ll compare the best noise reduction software, share real workflows, and give you practical tips. We’ll also show you how to handle noisy video with Pixelfox AI, which is my go-to when I need clean results fast. Yes, I’m opinionated. Yes, I test things. And yes, we’ll talk about trade-offs like artifacts, detail loss, and real-world speed. ⚡
By the way, the core phrase we care about is “noise reduction program.” Expect it to show up where it matters. And if you want a short version of this whole piece: pick a tool that preserves detail first, then reduce noise. Not the other way around.
What Creates Noise, And Why You Should Care
Noise is the random pixel junk in your images or video. It shows up as specks in shadows, colored dots in mid-tones, and mush where eyes and hair should be. It comes from high ISO, low light, small sensors, overheated sensors, and aggressive compression. That’s the short version.
- Luminance noise looks like grain.
- Chromatic noise looks like color speckles.
- Compression noise looks like blocks, smudges, and banding.
If you shoot wildlife at ISO 6400, you know noise ruins fur texture. If you shoot astro, noise drowns faint stars. If you shoot a wedding dance on your phone, the video turns into mud. A good noise reduction program removes noise while keeping edges, textures, and skin natural. That last part is hard.
Analysts like Gartner and Forrester have said for years that AI-assisted creative tools are now a default in pro workflows. It tracks with what we see in the field. AI denoise got sharper, faster, and less “plastic.” The tools are not perfect. Some hallucinate false detail. Some smear. Your job is to pick software that fits your camera, your style, and your deadline.
Noise Reduction Program: What Actually Works In 2025
You want three things from any modern tool:
- Strong noise removal that adapts to scene and camera type.
- Detail protection that doesn’t over-smooth or invent fake texture.
- Speed you can trust for big batches and tight turnarounds.
This is why I lean on Pixelfox AI for video. It’s trained to separate real content from noise and compression junk. It runs frame-by-frame and across time, so it reduces noise without motion smear. It also recovers detail instead of turning faces into wax. If you shoot phone clips, drone footage, security video, or dim event reels, it saves you a ton of pain.
Here’s what a modern system should do:
- Detect multiple noise types: low-light grain, high-ISO sensor noise, compression artifacts.
- Adapt per frame and across frames: low risk of motion blur or ghosting.
- Recover real details: edges, fabric textures, facial features.
- Scale: handle 4K/8K, batch jobs, and random formats without choking.
Tip: Denoise before you sharpen or add contrast. If you sharpen first, you lock the noise in and make it harder to remove without artifacts.
A Quick, Real-World Workflow For Video With Pixelfox AI
- Upload your clip. You can drag and drop. Most common formats just work.
- Let the AI analyze the footage. It looks at each frame and also tracks noise over time.
- Adjust strength if needed. If the scene is very dark, bump it a bit. If faces look too smooth, back it off.
- Export. Keep bitrate reasonable so you don’t re-add compression junk.
- If the footage also needs more pop, run a final pass with the AI Video Enhancer for color and sharpness.
When do I use it? Night street reels. Wedding dance floors. Gym clips with slow shutter. Security footage. Old family videos with low bitrate. For those, the Pixelfox AI Video Denoiser is a lifesaver.
Tip: If a shot has lighting changes, avoid extreme denoise strength. It can “chase” the flicker and smear micro-contrast. Go moderate. Then fix micro-contrast with a light clarity or local contrast tweak after.
The Best Noise Reduction Software In 2025 (Photo + Video)
You want blunt honesty? No single tool wins every scene. Some tools crush high-ISO RAW files. Some are better for speed. Some keep color superb. And some are tiny price heroes. Below is the short, tested summary.
1) DxO PureRAW 5 / PhotoLab 9 — Best For RAW Purists
- What it does best: DeepPrime XD is still a beast. It cleans noise while guarding micro-contrast and fine edges. It also corrects lenses.
- Pros: Stellar detail retention. Great for wildlife and astro. Color stays clean.
- Cons: Adds a DNG step to your workflow. Not cheap. Best for RAW files, less ideal for already-compressed JPEGs.
- Price: Mid-to-high. Check current plans.
- Use if: You shoot RAW and care about max detail.
2) Topaz Photo AI v6 / DeNoise AI — Versatile With a Caveat
- What it does best: Strong AI denoise options. Batch-friendly. One-click presets can be solid.
- Pros: Flexible. Good on diverse subjects. Solid updates.
- Cons: Can hallucinate detail on fur, feathers, and stars. Watch for halos near edges.
- Price: Mid.
- Use if: You want an all-in-one AI suite with manual control.
3) ON1 NoNoise AI 2024.5 — Best Value AI
- What it does best: Good noise removal for the price. Plays nice with ON1 Photo RAW workflows.
- Pros: Budget-friendly. Integrates well with ON1 tools. Decent on high ISO.
- Cons: Detail can get softer than DxO. Color can shift slightly in odd cases.
- Price: Low-to-mid.
- Use if: You want a budget AI denoise that still looks pro.
4) Lightroom Classic AI Denoise — Easiest For Adobe Users
- What it does best: Seamless for LR users. One click. Writes out DNG and keeps your catalog clean.
- Pros: Fast setup. No need to round-trip to other apps.
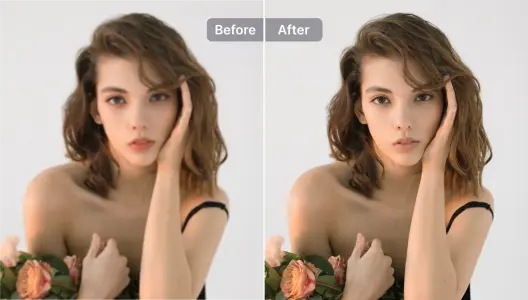
- Cons: Can make skin waxy. Can smudge fine texture if you push it.
- Price: Comes with Adobe plan.
- Use if: You live in Lightroom and want speed over absolute best quality.
5) Photoshop (Camera Raw) — Selective Control
- What it does best: You can mask, blend, and target. It’s the manual surgeon.
- Pros: Total control. Layer blending. Luminosity masks.
- Cons: Slower. More work. Easy to overdo it.
- Price: Adobe plan.
- Use if: You need selective denoise and pro-level control.
6) Capture One Pro — Great Color, Good Control
- What it does best: Color fidelity. Tethered workflows. Solid detail handling.
- Pros: Excellent color. Precise control with layers and masks.
- Cons: AI denoise is less “wow” than DxO or Topaz. Pricey.
- Price: Mid-to-high.
- Use if: You’re already in the Capture One ecosystem.
7) Luminar Neo (Noiseless AI) — One-Click Simplicity
- What it does best: Simple sliders. Gentle look. Good for quick edits.
- Pros: Easy to learn. Nice results on lifestyle and portraits.
- Cons: Not the sharpest in extreme ISO. Can soften hair and fabric too much.
- Price: Low-to-mid.
- Use if: You want fast results with minimal fuss.
8) Neat Image — The Classic Technician
- What it does best: Profile-based noise removal. Great for consistent studio work.
- Pros: Mature. Predictable. Good for pattern noise.
- Cons: Old-school UI. Learning curve. Less “AI smart.”
- Price: Low.
- Use if: You like profiles and repeatable studio workflows.
9) Pixelfox AI Video Denoiser — Best For Video (Phone, Drone, CCTV, Events)
- What it does best: Cleans video noise without smearing motion. Recovers detail that phones usually lose. Handles 4K/8K and odd formats without drama.
- Pros: Multi-noise detection. Temporal analysis. Detail recovery. Works fast and scales. Reliable on unstable networks and large files.
- Cons: It’s for video, not photo RAW files.
- Price: Try it free. Check the site for plans.
- Use if: You need clean, professional video with minimal setup. Start here: AI Video Denoiser.
If you also want smoother slow-mo or more fluid motion for your cleaned clips, test AI Frame Interpolation. It won’t remove noise by itself, but smoother motion can make subtle noise less noticeable at normal playback.
Head-to-Head: Quick Picks By Use Case
- Wildlife and birds (RAW): DxO for max detail. Topaz if you need batch speed and more control.
- Astro (RAW): DxO for clean stars. Use mild settings to keep star shapes.
- Lifestyle and portraits: Lightroom AI for speed; watch skin smoothing. Luminar if you want simple one-click.
- Budget: ON1 NoNoise AI gives great value. Neat Image if you like old-school profiles.
- Video (phone, drone, CCTV): Pixelfox AI for clean motion and real detail. Pair with AI Video Enhancer if color and sharpness also need help.
How To Choose The Right Software To Reduce Noise In Photos
You don’t want to try ten apps and lose a weekend. Here’s a simple flow.
- Do you shoot RAW and care about top detail? Go DxO. If you prefer Adobe-only, use Lightroom AI carefully.
- Is your budget under $100? Try ON1 or Neat Image. Good enough for most casual and even semi-pro work.
- Are you a control freak? Photoshop with masks wins. Slow but precise.
- Are you batch-processing hundreds of frames under a deadline? Topaz is quick and flexible, and the quality is strong when tuned right.
- Do you shoot mostly video or short-form content? Start with Pixelfox AI Video Denoiser. It hits a better balance of motion and detail than photo-first tools in video timelines.
Tip: Run small test crops first. Don’t judge a tool on a downscaled preview. Check 100% crops around eyes, hair, fine fabrics, and high-contrast edges.
Advanced Tips And Pro Workflows
- Blend denoise with masks. Create two versions: one denoised hard for shadows, one very light for faces and mid-tones. Mask and blend so you protect skin texture and hair. This beats a single heavy pass.
- For astro, stack before denoise. Align several frames in a stacker (e.g., Sequator, DeepSkyStacker), then run light denoise. You preserve star shapes and faint dust lanes.
- For wildlife, denoise in the linear stage. Do it before heavy contrast, clarity, or texture adjustments. If you denoise after, you fight against baked-in noise.
- Keep a low sharpening radius. Too much radius with heavy denoise creates halos. Use a small radius and moderate amount.
- In video, avoid pushing exposure too far in post. Lift exposure a stop or two before denoise if needed, then denoise, then color grade. If you denoise first and then push exposure, noise and banding can come back.
Real-World Case Studies
Case 1: Wedding Dance, Phone Video, ISO Through The Roof
The problem: A dim ballroom, DJ lights, lots of movement, and a phone that auto-pushed ISO. The clip looked like it was shot through sand.
What we did:
- Ran the footage through the Pixelfox AI Video Denoiser at a moderate setting.
- Left motion analysis on so it could track noise across frames.
- Ran a second pass through the AI Video Enhancer to lift color and sharpness by a notch.
Result: The grain dropped, faces looked like faces again, and the DJ lights kept their punch. Motion stayed clean. No ghosting. Export time fit the deadline. The family cried happy tears. We call that a win.
Case 2: Wildlife, ISO 6400, Late Evening, Nikon RAW
The problem: Fast shutter, high ISO. The hawk’s feathers looked rough and the background was noisy.
We tested:
- DxO DeepPrime XD: Gave the cleanest feather detail with a natural look. Background smoothed without plastic vibes.
- Topaz Photo AI: Good cleanup, but slight edge halo around fine feathers in backlight. Tuned sliders helped, but it took time.
- Lightroom AI Denoise: One click was fast, but it softened micro-feather texture. Usable with added texture and clarity tweaks.
Result: DxO looked most natural for a big print. Topaz got close but needed manual tuning. Lightroom was fine for social posts and speed.
Case 3: Old Family Clip, 720p, Heavy Compression
The problem: Years-old footage with blocky compression. Faces looked smeared.
We used:
- Pixelfox AI Video Denoiser to handle block artifacts and noise at once.
- Light color and sharpness pass in AI Video Enhancer.
Result: Blocks toned down, skin tones came back, and the clip felt watchable again. Not a miracle. But a big life upgrade for the family archive.
Common Mistakes And How To Fix Them
- Mistake: Pushing luminance denoise to the moon. Fix: Stop early. Then use local adjustments on the worst areas.
- Mistake: Sharpening first. Fix: Denoise first. Then sharpen with a smaller radius.
- Mistake: Treating all scenes the same. Fix: Night city > lower strength, more color noise control. Wildlife > protect edges and texture.
- Mistake: Using default color noise settings. Fix: Check skin and saturated fabrics. Tweak color noise separately.
- Mistake: Ignoring motion in video. Fix: Use a tool that reads across time. That’s how you avoid smearing action.
- Mistake: Cranking clarity after heavy denoise. Fix: Use gentle micro-contrast. Or dodge/burn to add depth without noise.
- Mistake: Over-exporting with too-low bitrate. Fix: Keep a sane bitrate so compression doesn’t reintroduce artifacts.
How to avoid photo noise reduction software causing over-smoothing: keep your luminance denoise below the point where pores vanish. If you can’t see hair strands anymore, you went too far. Roll back. Use a mask and bring back texture in faces.
Best practices from pros for the best noise reduction software: test three tools on your worst shot. Use 100% crops near edges. Pick the one that gives you detail without halos. Lock that into your workflow and create presets so you don’t repeat the pain.
Compared With Traditional Methods
Versus Photoshop And Other Manual Workflows
- Control: Photoshop gives surgical control. You can target just the shadows or a subject’s coat. It’s slower but precise.
- Risk: Manual methods can create halos or banding if you overdo curves or clarity after denoise.
- Win: AI denoise gets you 80–90% there fast. Then Photoshop finishes the last 10% with selective masks. Use both. That’s the pro play.
Versus Other Online Tools
- Many online tools cap file size or wreck your footage with heavy compression. Some slap watermarks on your result. Hard pass.
- Pixelfox AI scales to big files, weird formats, and long clips. It also runs fast and stays stable if your network blips. For real, reliability matters when deadlines do not care about your Wi‑Fi.
- If you also need cleanup on photos after denoise, you can remove objects from photos to fix random passersby or trash in the background. Clean shot. Happy client.
Extra Things Most Lists Skip
- GPU and speed: AI denoise loves a decent GPU. If you process big batches, 8–12GB VRAM helps a lot. Laptop iGPUs will struggle.
- Camera profiles: RAW-based tools (like DxO) use camera-specific magic. If your camera is supported, you get better results. Check support lists before buying.
- Color fidelity: Some tools shift deep reds or blues under heavy denoise. Always check saturated fabrics and neon signs.
- File formats: Video gets weird. MOV, MP4, MXF, MKV. Pick a tool that handles formats without drama. Pixelfox AI eats these formats for breakfast.
- Stability: Tools that crash mid-batch are not “pro,” no matter how cute their UI is. Reliability is a feature.
Industry note: Research groups like Nielsen Norman Group often show that clean, legible visuals increase trust and engagement in digital experiences. It’s not just “pretty.” It affects how people perceive your brand and your content. Clean images and video lift perceived quality.
Mini Workflow Recipes You Can Steal
- Clean YouTube B-roll fast: Denoise on import with Pixelfox AI, light color grade, add a bit of clarity, then export in a mid-to-high bitrate. Looks clean on phones and TVs.
- Smooth noisy slow-mo: Denoise first. Then use AI Frame Interpolation to make the motion fluid. It hides subtle residual noise and makes the clip feel more premium.
- E-commerce product photos: Light denoise, then selective sharpening just on edges of the product. If a background is cluttered, use the object removal tool to tidy it up before you export for web.
FAQs
-
How do I keep detail while using a noise reduction program? Use moderate luminance noise reduction and keep sharpening radius small. If texture fades, blend a masked layer that keeps detail in faces and edges.
-
Why do some AI tools create fake details? The model guesses what should be there. On fur, feathers, and stars, it can over-invent. Lower the “recover detail” or “enhance” sliders. Compare with a RAW-first tool like DxO to guard against artifacts.
-
Can I denoise video and keep motion natural? Yes. Use a temporal-aware tool like Pixelfox AI. It reads frame-by-frame and across time, so it cleans noise without smearing motion.
-
What’s the difference between photo noise reduction software and video denoisers? Photo tools focus on single frames and RAW detail. Video denoisers also track motion across frames to avoid blur and flicker. Different jobs, different tricks.
-
How do I pick the best noise reduction software for my setup? Test on your worst shot. If you shoot RAW and print big, try DxO. If you need fast batch work, try Topaz. If you want easy Adobe integration, use Lightroom AI. If you clean video often, start with Pixelfox AI.
The Bottom Line
You don’t need a magic wand. You need a noise reduction program that respects detail, understands motion, and doesn’t waste your time. For photo RAW files, DxO still sets the bar for natural detail. For all-around AI, Topaz is strong with the right settings. For tight budgets, ON1 and Neat Image carry weight. For Lightroom folks, the built-in AI is fast if you watch the smoothing. And for video? Pixelfox AI does what you want: it removes noise, protects detail, and keeps motion clean. Try the AI Video Denoiser, then finish with a light pass in the AI Video Enhancer. You’ll see the difference on your very first clip. ✨
If you want more guides like this, send me your worst noisy shot. I’ll break it down and share the exact steps. Your work deserves to look as good as it felt in the moment. And yes, we just said “noise reduction program” again because SEO is a thing. 😉
—
Author: A content strategist and shooter who has spent way too many nights fighting ISO 12800 and compression mush so you don’t have to.
Publisher note: editors can use a URL slug like /noise-reduction-program for best SEO alignment.