 Credit

You zoom in on a photo, and boom — your friend’s face turns into a Minecraft character.
Happens to everyone. It still hurts. 😅
If you’re searching how to fix pixelated image files, you’re probably staring at:
- A blurry family photo that looks fine on your phone but awful on a big screen
- A product photo that turns into mush on your Shopify or Amazon listing
- An old, tiny JPG someone sent you 10 years ago
- A meme or screenshot that dies the moment you crop or resize it
This guide will show you exactly how to unpixelate an image, step by step.
We’ll cover:
- Why images get pixelated in the first place
- When you can actually depixelate image files (and when you can’t)
- How to use free AI tools online like Pixelfox AI to turn a pixelated image to clear
- How to fix pixelated photos in Photoshop and on your phone
- Pro tricks, real case studies, and the dumb mistakes that wreck images even more
We’ll lean a lot on Pixelfox AI because it’s built for this kind of rescue work and still stays simple and free to start. And yes, we’ll also talk about Photoshop and other tools in a fair way, not “AI solves everything, praise the robots”.
Why your images turn into pixels in the first place
You can’t fix what you don’t understand. So let’s break down why photos get ugly.
1. Tiny resolution, huge expectations
Every digital image has a fixed number of pixels.
You take a 500 × 500 image and drag it to fill a 4K screen. Those 500 pixels now have to cover way more space. So each pixel becomes a big chunky block. That’s pixelation.
In simple terms:
- Small image + big display or print = pixelated
- Big image + small display = usually fine
Most people try to fix pixelated pictures after they’ve already scaled a tiny image way too large. AI can help, but it can’t break physics. It can only guess missing detail.
2. Aggressive compression (JPG “kill my quality” mode)
When you save a photo as a low-quality JPG, the file throws away data to get smaller.
Do it once, okay. Do it 10 times, your image turns into a blocky mess with weird colors and halos.
Social media sites, chat apps, and some website builders also compress your images behind your back. Which is fun. 🥲
3. Screenshots of screenshots of screenshots
You grab an image from someone’s IG story. They took it from a WhatsApp screenshot. That came from an old Facebook upload.
Every step adds compression and scaling.
By the time you try to improve pixelated image quality, it’s like working from a 10th‑gen photocopy.
4. Zooming in too far
Sometimes the image is not “bad”. You’re just zooming in beyond what it was made for.
If a file is 1000 × 1000 pixels, it won’t stay sharp when you zoom 400%. You’re looking at each pixel up close. That’s why faces look like Lego.
5. Low-res scans and old gear
Old phone cameras, cheap webcams, or bad flatbed scanners can create images that are low-res right from the start. That’s why old photos often look pixelated or noisy when you bring them into modern screens.
UX research groups like Nielsen Norman Group have pointed out for years that low-quality visuals hurt trust and perceived professionalism. So this isn’t just about looks. Bad images can literally cost you clicks and sales.
Can you actually unpixelate a picture?
Short answer: yes, sometimes.
Long answer: it depends how much detail is missing.
What AI can do
Modern AI tools like Pixelfox AI don’t “enhance” the pixels in some magic CSI way.
They predict what detail should be there based on patterns:
- See a face → add pores, eyelashes, clean edges
- See a product → sharpen edges, fix textures
- See a landscape → add natural‑looking detail like leaves and grass
So when you depixelate photo files with AI, you’re not restoring original data. You’re generating new, realistic detail that looks right.
This is why tools like Pixelfox AI Face Beauty can take a low-res portrait and make it look like it was shot on a better camera.
When it’s probably not fixable
You’ll hit a wall if:
- The image is tiny (like 100 × 100) and you want a poster
- The face or object is completely broken and blocky
- You only have a heavily compressed meme that’s been resaved 20 times
AI can still smooth it and make it less bad. It just can’t pull 4K detail out of 16×16 pixels. No tool can. If someone says they can, be careful.
So the goal often is this:
Not “perfect restore”, but “good enough for social, web, or small prints”.
That’s a win in real life.
Best tools to depixelate an image in 2025 (quick comparison)
Here’s a fast overview before we dive into step‑by‑step methods.
We’ll look at both AI depixelate image free tools and pro software.
| Tool | Type | Free Tier? | Best For | Limitations | Our Take (5★) |
|---|---|---|---|---|---|
| Pixelfox AI (Face Beauty + Reimagine) | Online AI | Yes | Portraits, product shots, batch edits | Needs internet; not a full editor | ★★★★★ |
| Adobe Photoshop | Desktop software | Trial | Detailed manual control, pros | Paid subscription, steep learning curve | ★★★★☆ |
| Canva AI Upscaler | Online design + AI | Limited | Quick social/media posts | Less control, watermarks on free in some cases | ★★★★☆ |
| Fotor / similar AI tools | Online / mobile | Limited | Simple “one-click” fixes | Quality varies, upsell heavy | ★★★☆☆ |
| GIMP | Desktop (free) | Yes | Budget users, manual sharpening | No AI, slower, more complex workflow | ★★★☆☆ |
The nice thing with Pixelfox is that you get depixelate image AI online plus extra goodies: batch processing, skin smoothing, color fixes, and even copyright‑safe image recreations.
Method 1: Fix pixelated image with free AI tools online (fast and easy)
If you just want to unpixelate image files without installing anything, this is where you start.
Why Pixelfox AI is the first tool you should try
Pixelfox is built for “I don’t have time for Photoshop” moments:
- AI Facial Recovery & Skin Perfection for portraits
- AI Image Reimagine to rebuild messy images into clean, copyright‑safe versions
- Batch processing when you have many photos
- Works in the browser on desktop, tablet, or phone
- Free to use, with no hidden paywalls or forced watermarks
And for privacy:
Pixelfox ensures all uploaded images and processed results are kept strictly confidential and secure. Your content stays private at every step.
So you can upload your face, your client’s product, or that weird childhood photo without stress.
Step‑by‑step: depixelate image AI online with Pixelfox
Let’s walk through a simple workflow.
A. For portraits and people shots
Use the AI Face Beauty / Photo Retoucher style tools to clean up faces, skin, and low-res details.
-
Upload your pixelated photo
Go to the Pixelfox AI Photo Retoucher page:
Pixelfox AI Photo Retoucher – Auto Retouch Photos Online -
Let the AI analyze the face
Pixelfox looks for faces, skin texture, and blurred areas.
It then:- Smooths skin while keeping pores and texture
- Removes light blemishes and rough noise
- Sharpens eyes, mouth, and important features
-
Check the before / after
You’ll see your original vs enhanced.
Look at eyes and edges of the face. They usually jump out first. -
Download in high quality
Save the final version.
You now have a much cleaner depixelate photo result ready for social or even small prints.
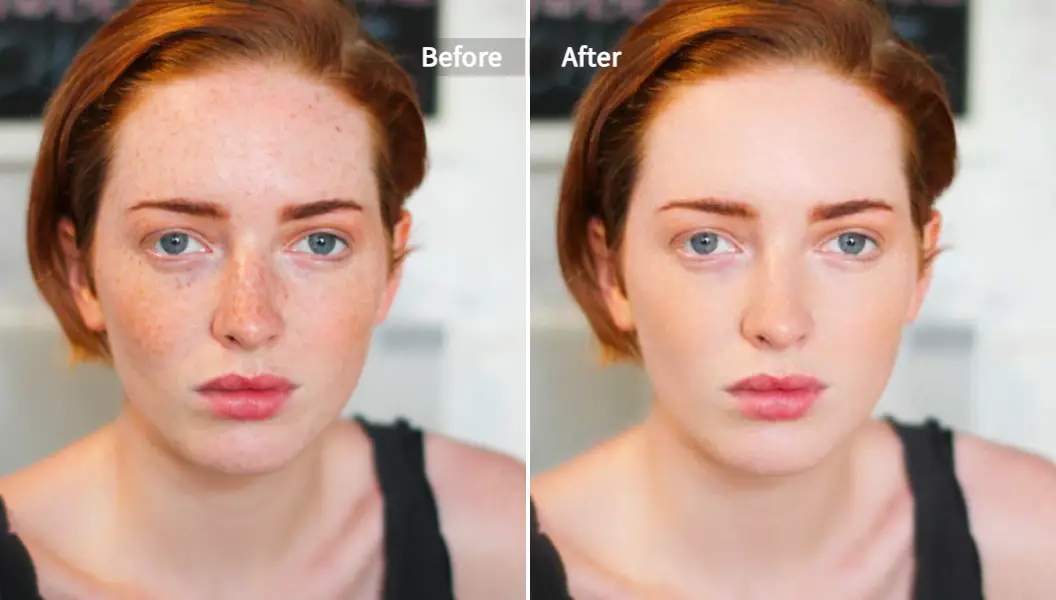
Tip: Always upload the highest‑quality version you have.
Don’t send a screenshot of the photo. Upload the original file if possible. Every extra step adds more damage.
B. For products, landscapes, and “non‑face” images
When your problem is a pixelated product shot or graphic, the AI Reimagine tool is a beast. It can actually rebuild the image while keeping the main layout.
-
Upload your image to Pixelfox AI Reimagine
Go here:
Pixelfox AI Reimagine – Create Unique Image Variations -
Let the AI generate variations
The tool:- Keeps the main subject and layout
- Changes textures, colors, and edges
- Removes copyright‑risky elements like logos or signatures
So you don’t just fix pixelated image problems.
You get several new clean versions that are copyright‑safe and sharper. -
Pick the best version
Choose the variation that looks most natural.
You can then run it again if you want a different style. -
Download in HD
The exported file keeps resolution and is ready for web or design tools.
Tip: If your image is very tiny, run it through Reimagine once, pick the cleanest result, then resize that new version for your project. It often looks way better than pushing the old pixelated source.
Pixelfox vs other online depixelate tools
Other tools can help too. But they usually fall into two camps:
- One-click “enhance” buttons with very little control
- Paid credits after a few free runs
Here’s where Pixelfox stands out:
- No surprise watermarks on your downloads
- Batch processing for big sets of product photos
- Semantic-preserving edits that keep your subject, not turn it into a weird AI stranger
- Built‑in copyright risk scanner in Reimagine to avoid hidden legal headaches
If you want ai depixelate image free without drama, this is a solid starting point.
Method 2: How to unpixelate a picture in Photoshop (for power users)
If you already pay for Photoshop, or you like precise control, you can fix pixelated photos there too. It just takes more steps.
Here’s a simple workflow that works well:
Step 1: Upscale the image the smart way
- Open your image in Photoshop.
- Go to Image → Image Size.
- Turn on Resample and choose Preserve Details 2.0 (if available).
- Increase the size slowly, like 150% or 200%, not 500% at once.
This gives you more pixels to work with, with less ugly stair‑step edges.
Step 2: Add controlled sharpening
-
Duplicate your layer (Ctrl/⌘ + J).
-
Go to Filter → Sharpen → Smart Sharpen.
-
Use:
- Small Radius (0.5–1.5)
- Moderate Amount (80–150%)
-
Check the preview for halos or crunchy edges.
You want sharper lines, not glowing outlines.
Step 3: Soften the worst blocky areas
This sounds strange, but a tiny bit of blur can make things look smoother.
- On the sharpened layer, go to Filter → Blur → Gaussian Blur.
- Use a very small radius (0.3–0.7).
- Mask out areas you want sharper, like eyes or text.
This “softens the Lego” without destroying clarity.
Tip: Work with layers and masks. Keep your original at the bottom and apply changes on copies. This way you can always back off when things get too fake.
Photoshop vs Pixelfox AI
- Photoshop = maximum control, great for pros, but slow and manual
- Pixelfox = fast, AI-driven, great for non‑designers or quick jobs
If you have a lot of files, or you just want to depixelate image AI online without learning every filter, Pixelfox is simply faster.
Method 3: Fix pixelated photos on your phone (iOS & Android)
You don’t always have a laptop nearby. Sometimes you just want to unpixelate a picture before posting a story.
Here are your main options:
Snapseed
- Free app by Google
- Use Details → Structure & Sharpening to add clarity
- Use Tune Image to fix brightness and contrast
Good for light fixes, not full rescue operations.
Lightroom Mobile
- Great if you already use Adobe
- Helps with noise, contrast, and sharpening
- Better for noise and color, not hardcore blocky pixelation
Mobile AI enhancers
There are many apps that promise to depixelate photo files with AI. Some work fine, some turn your face into a wax statue.
Watch for:
- Weirdly smooth “plastic” skin
- Over‑sharpened edges
- Data privacy (where are your face images going?)
This is why I still prefer browser tools like Pixelfox AI on mobile. You can open them in your phone browser and enjoy the same AI engine without installing sketchy apps.
Advanced tricks to turn a pixelated image to clear
You know the basics. Let’s add some higher‑level moves that even many “pros” skip.
1. Combine AI + light manual tweaks
One of the best workflows:
- Run your image through Pixelfox AI to clean the big problems.
-
Then do small manual fixes in Photoshop, GIMP, or another editor:
- Heal tiny artifacts
- Adjust colors and contrast
- Fix any weird spots from AI
You let the AI do the heavy lifting. You keep artistic control.
2. Rebuild hopeless images with AI Reimagine
Sometimes the source is just bad.
In that case, Reimagine is your friend.
Example:
You have a pixelated photo of a product on a messy table. You want a clean image with a white background.
You can:
- Upload to Pixelfox AI Reimagine.
- Let it create variations with cleaner edges and nicer lighting.
- Pick the version where the product looks sharp and the background is simple.
Now you basically have a “new” image that still looks like your product, but without the junk.
This is also great if you want to A/B test different visuals. You keep the subject, but you change the style or background.
3. Make pixelated old photos usable for modern projects
If you work with old black‑and‑white or faded photos:
-
Use AI to restore and colorize them.
Try the Pixelfox Photo Colorizer to add natural color to old B&W shots:
Pixelfox Photo Colorizer – Colorize Old Photos -
Use an AI enhancer (Face Beauty / Reimagine) to clean pixelation and noise.
-
Then resize for print or web.
This combo often gives you results that feel brand new but still keep the soul of the original.
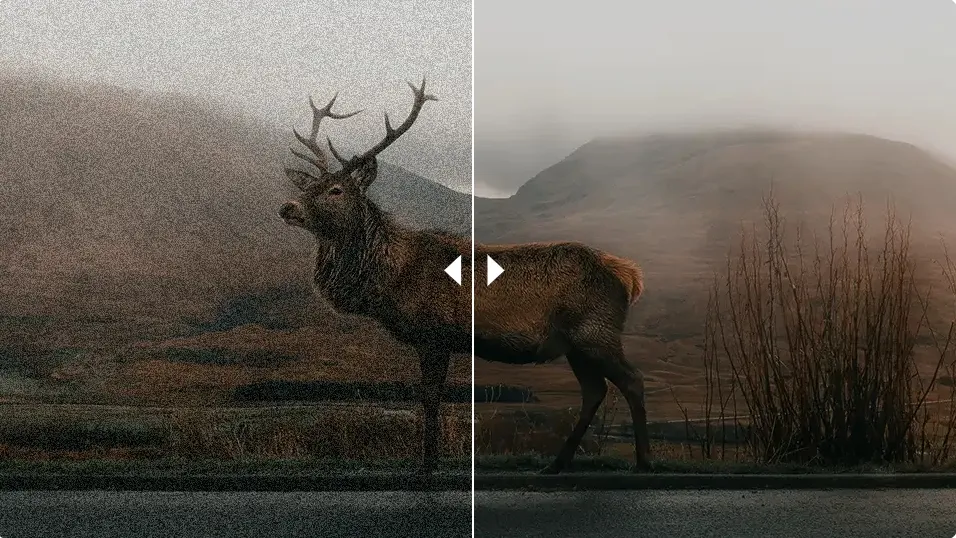
4. Pro move: fix pixelated video frames
Pixelation isn’t just a photo problem. Old or low‑bitrate videos also look grainy and blocky.
You can:
- Run the video through Pixelfox AI Video Denoiser to clean grain and block noise:
Pixelfox AI Video Denoiser – Eliminate Grain From Video - Export a frame from the cleaned video.
- Use that frame as a sharper thumbnail or social image.
This is clutch for YouTube covers, TikTok thumbnails, and social ads where the frame must look crisp even if the original video was shot on a potato.
Real‑world case studies: from pixelated chaos to clean images
Let’s make this concrete.
Case 1: Restoring a pixelated family photo for print
Scenario:
You find a 15‑year‑old digital photo of your grandparents. It’s small, a bit pixelated, and you want to print it as a framed gift.
Workflow:
-
Start with AI enhancement
Upload the photo to Pixelfox AI (Face Beauty + general enhancement).
The tool cleans skin, sharpens facial features, and reduces digital noise. -
Color and tone fix
If it’s faded or B&W, run it through Photo Colorizer to bring life back. -
Check the resolution
After enhancement, check the size. If you want a small print (like 5×7"), AI upscaling plus cleaning is usually enough. -
Minor touch‑ups
Use a simple editor to remove dust marks or random spots.
Result:
Is it as perfect as a modern DSLR shot? No.
Is it good enough for a framed print that doesn’t look like it came from an ancient phone? Usually, yes. And that’s what matters.
Case 2: Saving pixelated product images before launch
Scenario:
A small e‑commerce owner gets product photos from a supplier. They are:
- Low resolution
- Pixelated when placed on their site
- Inconsistent backgrounds
They need clean images fast and don’t have a designer on staff.
Workflow:
-
AI Reimagine for product clarity
They upload each product photo to Pixelfox AI Reimagine.
The tool creates several versions with sharper edges, better lighting, and simpler backgrounds. -
Batch processing for speed
They use batch processing to handle a whole collection at once.
This saves hours compared to manual retouching. -
Export and upload
They export the best versions and upload them to their shop.
Result:
The store now has clean, non‑pixelated product photos that look consistent.
That alone can help conversion, because according to many marketing studies (like those from HubSpot), sharp visuals increase trust and click‑through rates.
Common mistakes when people try to fix pixelated pictures
You can make a bad image even worse if you’re not careful. Let’s avoid that.
1. Upscaling way too much in one jump
You take a 400 × 400 image and blow it up to 4000 × 4000 in one shot.
The result looks like a mosaic.
Better:
Use AI upscaling or increase in smaller steps, and let tools like Pixelfox handle the detail.
2. Over‑sharpening everything
Sharpening feels good at first. Edges pop.
Then suddenly:
- Hair looks crunchy
- Skin looks like sandpaper
- Text has weird halos
Use sharpening like spice. Not like sauce. Small amounts.
3. Blurring the whole image to hide pixelation
Some people go the opposite way. They blur the entire photo to hide blocks.
Now it’s not pixelated. It’s just soft and muddy.
Better:
Use AI that can smooth and add detail, or blur only parts that really need it.
4. Saving and re‑saving in low‑quality JPG
Every time you save a JPG at low quality, you lose more data.
If you edit, save, re‑edit, save again, you slowly kill the image.
Work in PNG, TIFF, or high‑quality JPG during editing. Save web versions at the end.
5. Trusting any random app with your face
This one is less about visuals and more about privacy.
Many “magic face enhancer” apps upload your photo to who‑knows‑where.
If you care about privacy, stick with tools that clearly say they don’t store or share your images.
Pixelfox, for example, states that original and processed images are kept confidential and not shared with commercial third parties.
Tip: If an app is free, aggressive with ads, and vague about data, assume your images are the product.
How to avoid pixelated images in the future
Fixing damage is nice. Not causing it is better.
Here’s a simple checklist.
1. Start with the highest resolution you can
- Use the best camera you have access to
- For important photos, avoid sending screenshots. Send the actual file
- For logos or icons, use vector formats (.SVG, .AI) when possible
2. Use the right size for each platform
If you upload a 500px wide image as a full‑width hero on a website, it will look bad.
Check common guidelines:
- Website hero banners: often 1920px wide or more
- Social media posts: usually 1080px on the short side
- Print: aim for 300 DPI at the final size
3. Don’t rely on social media as your backup
WhatsApp, Instagram, Messenger — all compress your images.
Save important files on a drive or cloud in their original quality.
4. Export smartly from design tools
When exporting from Canva, Figma, or similar:
- Use PNG for graphics and logos
- Use high‑quality JPG for photos
- Avoid exporting at very small sizes then scaling up later
5. Use AI early, not only as last resort
If you know you’ll need bigger or cleaner versions, run images through an AI enhancer like Pixelfox AI early in your workflow.
That way your source is already in better shape.
FAQ: how to fix pixelated photos and use AI safely
How can I quickly fix a pixelated image for free?
Use an online AI tool.
Upload the image to Pixelfox AI, run it through the Photo Retoucher or Reimagine tool, and download the improved version.
This is one of the fastest ways to fix pixelated image files without installing software.
Why do my photos look sharp on my phone but pixelated on my computer?
Phones often show images in small sizes and use built‑in smoothing.
On a bigger monitor, the same image is stretched more, so the pixels become visible.
If the original resolution is low, it will look worse on larger screens.
Can AI really unpixelate a picture?
AI can’t magically recover lost data, but it can rebuild convincing detail.
Tools like Pixelfox analyze patterns and add new pixels that look right for faces, products, and scenes.
So AI can unpixelate a picture in a practical sense, even if it’s not restoring the exact original.
How is depixelating an image in Photoshop different from using AI online?
Photoshop gives you fine manual control. You tweak sharpness, blur, noise, and more by hand.
An AI depixelate image free tool like Pixelfox does most of that for you in one step.
Photoshop is better for experts and special cases. AI is faster for most people.
Why do social media uploads make my images pixelated?
Platforms compress images to save space and speed up loading.
If your uploaded image is already small, compression makes it worse.
Try uploading larger, higher‑quality files and avoid re‑uploading downloaded versions of your own posts.
Bring your images back from the pixel graveyard
Pixelation isn’t the end of the world. It just means you’re pushing an image past what it was built for.
Now you know:
- Why photos get blocky and rough
- How to fix pixelated photos with smart AI tools like Pixelfox
- When Photoshop and manual tweaks still matter
- How to avoid the classic mistakes that make things worse
- How to keep future images clean, sharp, and ready for any screen
If you want a simple path from pixelated image to clear, start with AI.
Try this:
- Use Pixelfox AI Photo Retoucher for faces and portraits
- Use Pixelfox AI Reimagine when you need cleaner, sharper, even copyright‑safe versions of rough images
- Use Pixelfox AI Video Denoiser when you need clean frames for YouTube covers and social clips
You can test everything online, fast, and free to start.
No heavy installs. No “learn Photoshop for 6 months” requirement.
Ready to fix pixelated image files and actually like how your photos look again?
Fire up Pixelfox AI, drop in your worst offender, and watch it glow up. ✨