 Credit

Why slow motion is important in the playback of videos
Ever watch a video and want to slow it down just so you can catch every detail? It doesn’t matter if you’re studying a sports move, watching cinematic footage, or looking at a tutorial, having a slow motion video viewer can change everything. Through a trustworthy video player with slo-mo capabilities, you don’t just watch – you learn and you experience. Now there’s a smart tool for that: Pixelfox. ai, be more relaxed when receiving frame-by-frame playback operation.
The Power of a Slo-Mo Vid-Viewer
A slow motion video viewer is more than just a fancy feature—it changes the game. It enables you to slow down your video while maintaining sharpness. Don't miss anything Important moments won¡¯t fly by when every detail remains so vivid ¨C sometimes all you need is a single image to capture your imagination.
For athletes, it is catching minor technique flaws. For creators, it’s a key to cinematic potential. And for the average customer, it makes tutorials and lessons much easier to follow.
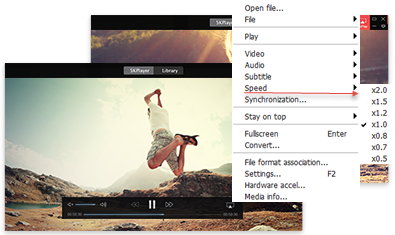
Why You Should Choose a Video Player with Slow Motion Feature
Unlike standard video playback, a slow motion video player not only plays—it does so at your own pace. With Pixelfox. ai, you can:
Adjust playback speeds seamlessly.
Take a closer look at the selected frames by zooming in.
Preserve high video quality even at a lower speed.
Make sections to bookmark for repeat playing.
AI optimization enables silky-smooth slow motion.
How is Pixelfox? ai Makes It Easy To Watch In Slow Motion
Pixelfox stands above the rest when it comes to slow motion video playback. Instead of pixelated, jerky frames, it uses AI-powered frame interpolation for perfectly sharp quality. That means slowing down a video while maintaining smoothness and detail.
It would be as if you were watching your video in ultra-HD slow motion — every frame optimized, every move fluid.
Best Applications of Slow Motion Video Players
You might be thinking to yourself, Who the hell wants a bit of slow-mo action? The answer: more than you might suspect.
Students and Learners – Review tutorials step-by-step without missing a thing.
Medical & Training Pros- Review recordings in detail.
Casual Viewers - Watch movies, music videos, and replay new ways.
Features You’ll Love in Pixelfox. ai Slow Motion Video Viewer
When you use Pixelfox. ai, you’re not just watching — you’re exploring. Its features include:
Smooth frame-by-frame playback
AI-powered detail enhancement
Customizable playback speeds
User-friendly interface
Support for multiple video formats
How to Use Pixelfox. ai for Slow Motion Playback
Using Pixelfox. ai is as simple as it gets. Here’s how you can start:
Upload your video to the Pixelfox. ai platform.
Select your slow motion playback speeds.
Improve clarity with AI smoothing preferences.
Play, pause, or rewind it as much as you want.
If you want to save the slow motion version copy you created, then: a.
No complex configuration, no costly software—just quick, powerful results.
Pros of a Slow Motion Video Viewer
Still on the fence? Here’s a rundown of the primary strengths:
Better Learning: Stop being frustrated and never be lost in a difficult class.
Faster Reading: Great for athletes and specialists.
Creative Editing: Incorporate cinematic slow-mo effects to your videos.
Accessibility: Perfect for older viewers, or people who can absorb information only at a slower pace.
Ease of Use: It functions online so no downloads or bloated apps, simple enough even for an infant to use.
Slow Motion Video Viewer vs Ordinary Video Players
Sure, a typical video player may allow you to swap speeds, but it frequently comes with the sacrifice of video quality. Pixelfox. ai changes that. AI boosted, your playback stays razor-sharp and smooth with no pixelation and no jerkiness.
In brief: average players will slow motion show you, but Pixelfox. ai lets you experience it.
Best Video Player With Slow Motion Feature
When you mix such an ease of use with modern AI, you get more than a video viewer — you get a video analysis and creation tool. Pixelfox. ai won’t only slow down your videos; it will make them look great doing it.
When clarity, detail and control matter (so much so you’re considering this software), this is really where you should be.
How to Get the Best Results
For a better slow playback experience, you can:
Feed it high-res source videos if you want sharper output.
Gradually ease the playback speed down, rather than cutting it in half immediately.
Take advantage of Pixelfox. ai AI smoothing for the utmost clarity.
Play the parts over and over again and you will see how it is done.
Save clips for later editing.
Why Slow Motion Improves Learning
Do you know how much easier complex movements are to understand when they’re slowed down? That’s because the science of visual learning is at work. A slow motion video viewer can also help:
Deconstruct rapid responses into manageable steps.
Promote the retention through giving the viewers more time to reflect on them.
And practise at hard stuff until you can play the stuff without snags.
Make the learning process of the language easy by listening to each word by slowing down the language speech.
With Pixelfox.ai, you don’t merely watch a video — you actually learn from it.
Mistakes When Using Slow Motion Tools
Slow motion can be useful, but some users haven’t had the best of luck with it. Here’s how not to step into common traps:
Uploading low resolution videos : AI can improve but the better the source the better the results.
No frame interpolation: Slowed down videos often look jumpy without AI smoothing.
Playing too slowly: If you play too slow without the correct settings, you can warp your footage.
Using incompatible browsers: Make sure to use an up-to-date browser for Pixelfox to work smoothly. ai.
Who Benefits Most from Pixelfox. ai Slow Motion Viewer
This tool is not just for professionals. Here’s who can gain the most:
Students who require to a substantial extent playback of tutorials.
Athletes & Coaches breaking down the pure form.
Businesses adding engaging video demonstrations.
Casual You, the everyday person who simply wants to do things differently.
What is the Future of Slow Motion Video Playback?
With the advances in technology, AI will enable slow motion viewing to be driven even further. Pixelfox. There’s already a precedent being set as ai takes the lead with AI-generated clarity as well as adaptive frame rendering. Soon, expect features like:
Real-time slow motion streaming.
AI-generated commentary for tutorials.
Customized practice starts from learning habits.
The future isn’t just slowing down video — it’s making playback an immersive, smart experience.
FAQs:
Q1:How can I use a slow motion video viewer online for free?
You can use Pixelfox. ai the AI to upload your video now with the possibility to change the speed of the video and get high quality and free slow motion right away.
Q2:Pixelfox decreases video quality when slowing down videos?
No, it uses AI to improve frames, so everything looks smooth without losing clarity.
Q3:Can I use Pixelfox? for sports video analysis?
Absolutely! Coaches and athletes rely on it to analyze movements and identify improvements in technique.
Q4: Is Pixelfox. Is it the video editor or just the player?
It’s both. Not only are you able to watch video in slow motion, but also you can save the edited slow video to your device for repeating.
Q5:Is there any software I need to download to launch Pixelfox?
No. Pixelfox works right in your browser — no downloads necessary.
Conclusion: Elevate Every Viewing Experience
A slow motion video viewer is not just a tool: It’s a better way to watch, to consume and analyze video. With Pixelfox. ai, you get a video player with slow motion that includes convenience, precision and AI-powered smoothness. Whether you are in training, in conversation, or in your spectacle routine, this gadget changes the way you listen and watch.
It’s not just about slowing video down — it’s about gaining access to a richer, more detailed view on every frame.