 Credit

If you want to know how to unblur an image, you are not alone. Blurry photos happen to everyone. The good news is there are clear ways to fix fuzzy pictures, make an image clearer, and sharpen picture details with the right workflow. In this expert guide, I will show you how to fix blurry photos step by step, when sharpening works, when it doesn’t, and which tools and settings produce the most natural results. I will also explain the science behind blur and sharpening, cite reliable sources, and give you simple checklists you can follow today.
What you will learn here covers both quick AI unblur methods and classic editing, so you can choose what works best. I’ll cover how to unblur a photo on desktop and mobile, how to make a picture less blurry for print or social, and how to sharpen image online free without harming the file. You will see how to make a photo clearer, how to make a photo more clear, and even how do I make a blurry picture clear if the file looks far gone. I’ll show real limits as well, so you can trust every step.
Before we start, a quick note on ethics: do not use “nudify free no blur” tools. They are invasive and often illegal. This guide focuses on lawful, respectful, and professional sharpening workflows only.
Why photos look blurry and what can be fixed
Not all blur is equal. Understanding the cause helps you pick the right fix.
- Out‑of‑focus blur: the lens focused behind or in front of your subject. Mild cases can look better with an image sharpener. Heavy defocus rarely becomes tack sharp again.
- Motion blur: the camera or subject moved. Short streaks can improve with directional sharpening or deconvolution. Long streaks have hard limits.
- Lens softness or low‑quality glass: edges are soft. Global sharpening helps a lot here.
- Compression blur: low‑bitrate or over‑compressed JPEG. Careful denoise plus sharpening can recover perceived detail.
- Noise and poor light: grain hides detail. Reduce noise first, then sharpen image in a subtle way.
Authoritative note: reversing blur is a classic problem called deconvolution. In simple words, blur is a spread function applied to the image; “unblurring” tries to estimate and reverse that spread. The mathematics is real and well studied. You can read the overview on Wikipedia (search: Deconvolution) for the high‑level idea. In practice, noise and unknown motion paths set limits, which is why no tool can “enhance!” a completely smeared frame into perfect detail.
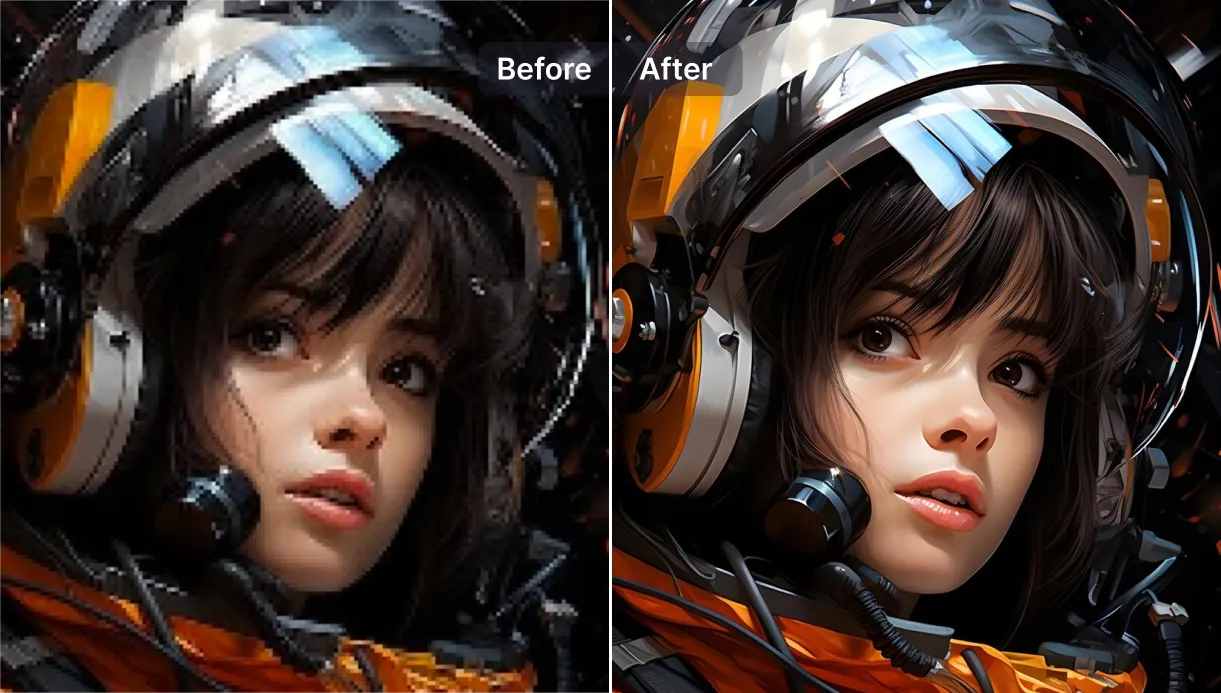
Quick start: the fastest way to unblur an image (AI + one click)
If you need a clean result fast, AI sharpen image tools do a strong job. They detect edges, reduce noise, and restore texture in one pass. Here is a simple workflow you can copy:
- Upload your photo to an AI image sharpener.
- Choose the “Enhance/Sharpen” or “Clarity/Detail” model.
- Preview the output at 100% zoom. If halos appear around edges, lower the intensity.
- Export a high‑quality image.
You can try an AI image sharpener that supports sharpen image online free previews. If you work with many pictures, batch options save time. Keep intensity low to medium. Let the tool make the image clearer, not crispy and fake.
Pro method for natural results: denoise first, then sharpen
When you sharpen a noisy image, the noise also gets sharper. So the order matters.
- Step 1: Reduce noise. Use a luminance noise reduction slider first. Keep faces clean and surfaces smooth. Do not wipe away real detail.
- Step 2: Sharpen. Add a small radius, moderate amount. Use masking to protect smooth areas like skies or skin.
- Step 3: Add clarity only if needed. Clarity boosts midtone contrast. It can make textures pop but can overdo pores.
- Step 4: Check at print size and at 100%. If it looks good at both, you did it right.
How to unblur a photo with AI (web)
This path is best for speed and for images that need both noise cleanup and edge sharpening.
- Upload your file to an AI unblur tool.
- Select a model like “Standard/Enhance” for general photos, or “Face” for portraits.
- Use “ai unblur” or “ai image sharpening free” options if the site provides free previews.
- Compare side by side. If hair or text looks oversharpened, reduce strength.
- Export in PNG if you want fewer compression marks.
Tip: If you want to give your image more resolution as you sharpen, an upscaler with built‑in sharpening keeps edges stable. You can try the AI Image Upscaler workflow for larger outputs and better print quality. It helps when you need to make an image clearer while enlarging it.
Internal link: Try Pixelfox AI Image Upscaler for 2x–4x output with smart sharpening: AI Image Upscaler
How to unblur a picture on mobile (iPhone and Android)
Modern phone editors include capable tools. The steps are almost the same across apps.
- Open your photo in your editor.
- Use a “Sharpen” or “Detail” slider first. Add a small amount to sharpen picture edges.
- Add “Clarity” to boost mid‑tones. Keep it light on faces.
- Reduce “Noise” if your shot is in low light.
- If the app offers “AI Enhance,” try it. Many apps provide “ai sharpen image” modes that unify the above steps.
These steps answer how to make photos less blurry on the go. When friends ask how to fix a blurry pic, you can suggest this order: a touch of denoise, then sharpen, then clarity.
Sharpen on desktop: Lightroom, Photoshop, GIMP
If you edit on a computer, you get more control and better masking. Here is a reliable workflow.
Lightroom or similar raw editors
- Detail panel: Increase “Sharpening Amount” slowly, set “Radius” around 0.8–1.2, raise “Detail,” then hold Alt/Option while moving “Masking” to protect skies and skin.
- Noise reduction: Set “Luminance” until grain is reduced but edges stay real. Small increases in “Contrast” can help texture.
- Texture and Clarity: Add small values to bring micro‑contrast back.
Photoshop
- Camera Raw Filter → Detail: follow the Lightroom steps.
- Smart Sharpen: Choose “Remove: Lens Blur” for defocus or “Remove: Motion Blur” for short blur. Keep Amount moderate. Use “Reduce Noise” in the same dialog.
- High‑Pass Sharpening (local control): Duplicate layer → Filter → Other → High Pass (1–2 px) → blend with Overlay/Soft Light. Add a mask and paint only where you need detail.
- Shake Reduction: works on some mild motion blur. Do not overuse.
GIMP
- Unsharp Mask: set small radius, moderate amount. Mask smooth areas.
- Wavelet sharpen plugins: useful for fine texture with less halo risk.
These options help when users ask how to make a picture clearer or how to make a photo unblurry without AI. They also help answer how can you fix a blurry picture or how do you fix a blurry picture when you can afford a bit more time.
Make small text readable: screenshots and documents
If you need to unblur a screenshot or make type more legible:
- Upscale first. Doubling size gives more room for sharpening to work.
- Apply a small radius, higher amount sharpening.
- Add clarity/contrast to midtones so letters stand out.
- If text edges show color fringing, reduce saturation slightly.
This solves how to make a fuzzy photo clear when the “photo” is really a compressed screenshot. It also works for “how to fix a fuzzy photo” used in manuals or infographics.
Portraits require a different touch
Human faces look odd when oversharpened. Use a face‑aware tool or use masks.
- Denoise skin first.
- Sharpen hair, lashes, and eyes more than cheeks or forehead.
- Keep teeth and eye whites natural. Avoid halos.
- Add very small clarity for texture. Or add Texture at +5 to +10.
If you need a one‑step approach, use a face model in an AI image sharpener. Face‑specific sharpening is trained to avoid waxy skin or crunchy pores.
Ethics and hard limits
A tool can sharpen image edges and make an image clearer. But it cannot invent real information that the camera never captured. You will see better acutance and better separation of edges. You will not see license plates become crystal clear from a streak. Be wary of claims that promise perfect fixes.
About that keyword again: do not use “nudify free no blur” services. These tools harm people and break laws in many places. They also install malware. Stay away from them. This guide does not endorse or link to them.
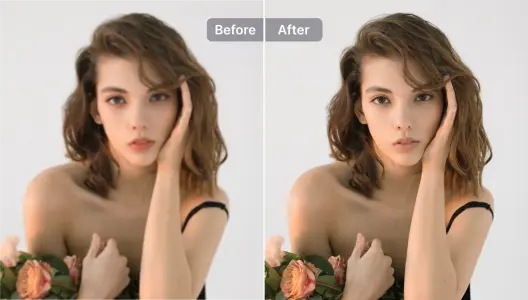
How to unblur a photo with Pixelfox AI (step by step)
Pixelfox AI focuses on clean, fast results and a simple flow. Here is a practical recipe you can reuse when users need how to unblur a picture quickly:
- Upload your image. Large JPEG, PNG, or HEIC are fine.
- Click AI Enhance. The model removes noise, improves edges, and recovers texture.
- Preview at 100% and at fit‑to‑screen. Lower intensity if you see halos.
- Export in high quality.
- If you plan to print or crop, upscale by 2x or 4x while maintaining sharp edges to keep fine lines clean.
If distractions make the photo feel “soft,” remove them so the subject looks sharper by comparison. Clean backgrounds do wonders for perceived sharpness.
Internal link: Remove small distractions easily with Pixelfox Object Remover
How to make a picture less blurry for print
Print hides and reveals different things than screens do.
- View at print size. If you print at 300 dpi, zoom so one screen inch equals one print inch.
- Upscale to the target size with an upscaler that includes anti‑alias sharpening. That keeps diagonals clean.
- Apply gentle, global sharpening. Then add a little local high‑pass sharpening to key textures like clothing seams or hair.
- Export as high‑quality JPEG or TIFF. Avoid re‑compressing again and again.
This is the best route when clients ask how to make a picture less blurry for a poster or how to make a photo more clear for magazine layouts.
How to fix blurry photos from phones: capture tips that matter
Fixing blur starts before you press the button. These simple habits prevent pain later and reduce how often you ask how to make a photo clearer after the fact.
- Use more light. It cuts noise and shrink blur.
- Raise shutter speed. For people, 1/125s or faster helps. For kids and pets, 1/250s or faster is safer.
- Use burst mode. Pick the sharpest frame later.
- Tap to focus. Wait for the focus box to go green.
- Brace the phone. Use two hands, or lean on a wall.
- Clean the lens. Smudges add haze that no editor removes fully.
- Shoot RAW or HEIC if your app allows. You get better data to sharpen later.
With these, you will ask how to fix a blurry pic much less often.
How to unblur an image with deconvolution (for advanced users)
If you are comfortable with technical tools, blind deconvolution can help in some cases.
- It tries to estimate the blur kernel (point spread function) and reverse it.
- It works best on small, uniform blur with low noise.
- It struggles with large motion, depth changes, or compression artifacts.
This is a known field studied for decades. If you want a primer, read a trusted overview on deconvolution. You will see why gains are real but bounded. This context will help you make fair calls and keep client expectations in line.
Common questions answered simply
- How to unblur an image without AI? Use Unsharp Mask or Smart Sharpen with small radius and moderate amount; mask smooth areas.
- How to unblur a photo on a phone? Denoise first, then sharpen, then clarity; save a copy.
- How do I make a blurry picture clear? Start with noise control, then edge sharpening, then midtone contrast; do not overdo.
- How can you fix a blurry picture? You can make it better if blur is mild to moderate; you cannot recover detail that never existed.
- How do you fix a blurry picture fast? Use an AI enhancer with a face‑aware or standard model; keep strength modest.
- How to make a photo unblurry for social? Sharpen at phone resolution; export at the platform’s recommended size.
- How to make a fuzzy photo clear for printing? Upscale first, then sharpen at print size; test a small proof.
Professional QA checklist for natural sharpening
Use this list before you export. It prevents the most common mistakes.
- View at 100% and at fit‑to‑screen. If halos show at 100% but not at fit‑to‑screen, reduce a little more.
- Zoom into faces. If pores look crunchy, lower clarity or mask skin.
- Check fine repeating lines (fabrics, fences). If they shimmer, lower sharpening or change the radius.
- Compare before/after for color shifts. If color changed, add a tiny contrast curve instead of more clarity.
- If you upscaled, inspect diagonal edges. If they stair‑step, try a different upscale factor or enable anti‑alias sharpening.
Best tools to try (balanced and trustworthy)
- Pixelfox AI: fast “AI Enhance,” face‑aware sharpening, upscale + sharpen in one flow. A great answer to how to make a picture clearer with low effort. Try the AI Image Enhancer and export at high quality.
- Adobe Express: a simple online sharpen. See Adobe’s “Unblur your image” page for a clear baseline workflow, and note their guidance about setting “Sharpen” numerically for consistent edits.
- Classic editors (Lightroom, Photoshop, GIMP): give precise control and masks for advanced needs.
- Caution: Avoid untrusted sites that promise magic fixes. Many bundle malware or misuse your images. Use known names and read their privacy statements.
Troubleshooting: what if the result looks fake?
- Reduce sharpening amount by 10–20%.
- Lower clarity a little and raise micro‑contrast with a curve instead.
- Add a small bit of fine film grain after heavy noise reduction to restore a natural look.
- Mask smooth areas and keep sharpening focused on edges.
- If false detail appears, try a different AI model or a smaller upscale factor.
Security and trust
Always work on a copy. Keep your original safe. When you upload files to any site, prefer tools that delete images quickly and encrypt traffic. If the service offers on‑device processing for sensitive work, use it. Choose vendors with clear policies and no dark patterns.
External reading and sources
- Adobe Express “Unblur your image” shows the standard “Sharpen” flow and a balanced stance on what is realistic. It is a good baseline to cross‑check your steps.
- Search “Deconvolution” on Wikipedia for the core idea behind reversing blur and why noise makes perfect reversal impossible. It is short and fair.
- Look for reputable photography education sites that explain Unsharp Mask, Smart Sharpen, and High‑Pass with masking. The best guides focus on small radius, modest amount, and controlled masks.
Use cases and mini‑recipes
Product shot (soft edges)
- Denoise lightly, add small‑radius sharpen, add micro‑contrast (texture + clarity), remove dust marks, and export high‑res.
Landscape (haze + softness)
- Dehaze a bit, sharpen with low radius, add clarity in midtones, mask skies to avoid noise.
Architecture (straight lines)
- Upscale to target print size, sharpen with small radius, mask flat walls, add a fine edge pass to windows and trims.
Old family photo (grain + blur)
- Denoise first, restore tones, sharpen with a face‑aware model, add gentle clarity, and leave fine grain for natural character.
Sports (motion blur)
- If blur is short, try Smart Sharpen “Motion Blur” removal in Photoshop with an angle that matches streaks; mask background.
How to write the right search queries for help
Use plain language. For example:
- “how to unblur an image in Photoshop small radius”
- “how to make a picture less blurry phone clarity noise order”
- “ai unblur faces reduce halos”
- “how to fix a blurry pic print size 300 dpi workflow”
This simple phrasing returns clear guides and fewer ads.
Put it all together: a simple 10‑minute plan
- Open your photo. Duplicate it.
- If noisy, reduce luminance noise a little first.
- Add sharpening with small radius. Keep amount moderate.
- Add clarity in small steps. Stop before halos.
- If needed, upscale by 2x and repeat a light sharpen.
- Check at 100% and at fit‑to‑screen.
- Mask smooth areas to protect skin and skies.
- Export as high‑quality JPEG or PNG.
- If you see artifacts on upload to social, export at the platform’s size and try again.
- Save your steps as a preset so your next “how to unblur a picture” run is even faster.
Internal link: If your image needs global enhancement before sharpening, try Pixelfox’s AI Image Enhancer to clean noise and boost detail with one click.
Conclusion: the honest way to sharpen picture quality
Now you know how to unblur an image the right way. You learned when AI helps and when manual control wins. You learned how to make a picture clearer with denoise‑then‑sharpen order, how to make a photo unblurry without halos, and how to make a fuzzy photo clear for both screens and prints. You also saw why deconvolution can help only so much, and why claims of perfect reversal are not true.
So start with small changes. Keep your edits natural. Use AI when speed matters. Use masks when precision matters. If you want a quick win today, upload a file and run a careful AI pass, then finish with a light manual touch. That balance is how to fix blurry photos with results you can trust.
Call to action: try a clean, one‑click pass to unblur image free with a preview. Then refine by hand if you want more control. And share this guide with a friend who keeps asking how do you fix a blurry picture or how do I make a blurry picture clear. It will save them time and help them get a sharper shot next time.
Internal link: Ready to enlarge and sharpen for print? Use the AI Image Upscaler to scale 2x–4x and keep edges crisp.