 Credit

Suggested URL: /tint-image
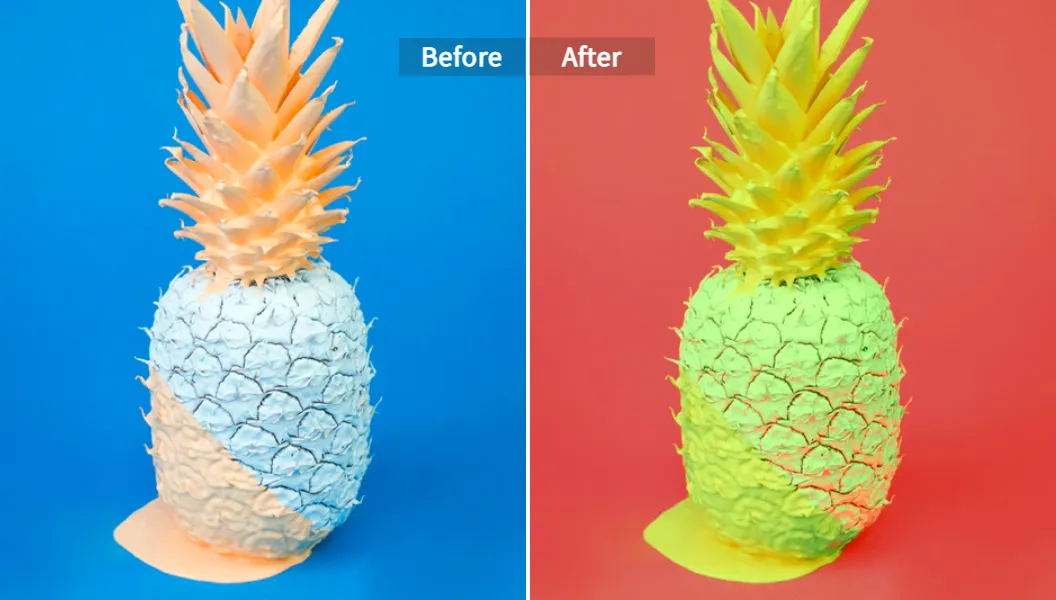
Ever stare at a photo and think, “This is fine… but it feels emotionally unemployed”? That’s exactly why people tint image files in 2025. A good photo tint can make a dull shot look warm, cinematic, vintage, or “my brand has its life together” in under a minute. This guide shows you how to add tint to image files using fast online tools (my go-to: Pixelfox AI), plus Photoshop-level methods when you need full control.
What “tint image” actually means (and what it’s NOT)
A tint is basically a color overlay (or a color shift) that nudges your image toward a chosen vibe. It can be subtle (10–20% warm glow) or loud (full neon wash that screams “album cover”). It’s used for:
- Mood: warm tint = cozy, cool tint = cinematic, green tint = eerie, sepia tint = nostalgia.
- Brand consistency: same color vibe across product photos, thumbnails, socials.
- Fixing: correcting weird color casts (like the “why is everything yellow?” problem).
Now the part people mess up:
Tint vs Hue vs Temperature (quick sanity check)
- Tint (creative overlay): you push color into the photo for style.
- Temperature (white balance): you correct warm/cool lighting so whites look white.
- Hue shift: you swap colors (blue becomes green, red becomes orange, etc.).
If your photo looks like it was taken under a cafeteria heat lamp, that’s often white balance. If you want “cinematic teal vibes,” that’s tint.
Authority note (EEAT): Nielsen Norman Group’s usability research keeps showing the same boring truth: people scan fast, decide fast, and visuals drive the first impression. Color grading and tinting are not “extra.” They’re part of how users judge quality in seconds.
Why tint pictures works so well (yes, psychology is doing the heavy lifting)
Color hits emotion before logic. That’s not woo-woo, it’s how brains work. A few common tint choices and what they “say”:
- Warm orange tint: friendly, cozy, food-friendly, lifestyle-friendly
- Cool blue tint: clean, modern, techy, “this product costs more and you will accept it”
- Pink tint: dreamy, fashion, beauty, soft romance
- Green tint: spooky, sickly, cyberpunk, dystopian vibes
- Sepia tint: memory lane, vintage, “this was shot on film” (even if it wasn’t)
According to Forrester-style CX thinking (and basically every brand team ever), consistency builds trust. Tinting is a cheat code for that consistency.
How to tint image online (fast, no downloads)
You can tint pictures with a bunch of tools. Many are fine. Some are… fine with ads stapled to your eyeballs.
If you want the short path with strong results and low hassle, use Pixelfox AI. It’s built for modern recolor workflows, and that includes tint-style looks (warm/cool overlays, palette-based grading, reference-based matching).
The best “one tool” workflow: Pixelfox AI (recommended)
Use Pixelfox AI Image Colour Changer when you want speed, clean output, and control without living inside layer panels.
Go here: AI Image Colour Changer - Change Image Colors | Pixelfox AI
Step-by-step: add tint to image with Pixelfox AI
- Upload your photo (drag/drop works).
- Pick a tint direction:
- Custom palette: choose warm/cool tones (great for brand kits).
- Reference image recolor: match the tint vibe from another photo (insanely useful).
- Automatic color expansion: let AI push the look while keeping it natural.
- Adjust until skin tones and whites look right (don’t bully the highlights).
- Export your tinted image.
Why I push Pixelfox AI as the default:
- Color harmony stays intact. That’s the real problem with cheap tint filters—they nuke balance.
- Reference-based matching is gold for campaigns (same tint across 20 photos).
- Privacy is clear: your uploads and results are kept private and automatically deleted after a short time (Pixelfox states deletion happens within a few hours, typically within 3 hours), and they don’t use your images for training or share them. That’s how it should be. 🔒
Tip #1: If your goal is “cinematic,” don’t slam a 100% blue overlay and call it art. Use a subtle cool tint and then boost contrast a little. The “movie look” is usually tint + contrast + controlled shadows, not Smurf Mode.
When your tint looks good but the photo still looks “meh”
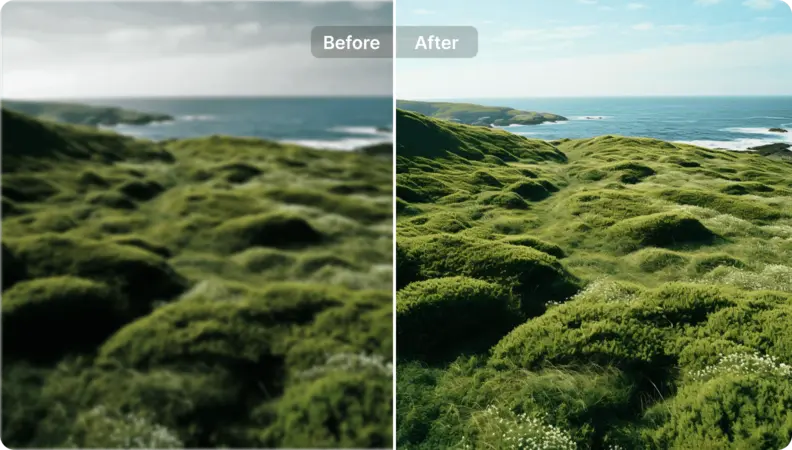
Tint doesn’t fix blur or low-res noise. Pair tinting with enhancement.
Use AI Image Enhancer – Enhance Image Quality Online | Pixelfox AI to sharpen and clean the image before (or after) tinting, depending on the photo.
Other ways to tint pictures online (quick comparisons)
Competitors often publish tool pages with the same three lines: “Upload. Pick color. Download.” Useful, but thin.
Here’s what actually matters when choosing a tint tool: control, quality, export options, ads/watermarks, and whether it wrecks skin tones.
Fast comparison table (real-world criteria)
| Tool | Best for | Control | Annoyances | Notes |
|---|---|---|---|---|
| Pixelfox AI | consistent, natural-looking tint + matching sets | High | Low | AI palette + reference matching, privacy posture |
| Fotor | quick presets | Medium | Medium | often pushes upgrades; still handy |
| LunaPic | old-school editing | Medium | High | UI feels like 2006 (retro, not in a cute way) |
| PineTools | basic “shift toward color” | Low–Med | Low | simple overlay feel |
| ImageOnline tint | presets + intensity | Medium | Low | clean and straightforward |
I’m not telling you to never use other tools. I’m telling you: if you’re tinting for brand work, ecommerce, or a serious content pipeline, the “free random tint slider” tools get old fast.
The “why does my photo tint look bad?” section (aka: the stuff tool pages skip)
Most tint disasters come from 5 issues:
1) You tinted the highlights and killed the whites
White areas should stay close to white unless you want a stylized wash.
Fix: lower intensity, protect highlights, or use a subtler palette.
2) Skin tones went alien
Over-tinting faces is the easiest way to make a photo look cheap.
Fix: tint background more than subject (selective tint), or keep warm tones near skin.
3) You used one tint on a whole batch with mixed lighting
One photo was shot in shade, one in warm indoor light, one in daylight. Same tint across all of them can look messy.
Fix: normalize lighting first (basic correction), then tint. Or use reference matching in Pixelfox AI so the “look” stays consistent while respecting each photo’s base.
4) You exported the wrong format
JPG is fine for photos. PNG is better for graphics and transparency.
Fix: if you need crisp edges or overlays, export PNG.
5) You confused “fixing color cast” with “adding a tint”
A yellow cast from bad lighting is not a “vintage tint.” It’s just bad lighting.
Fix: correct white balance (temperature/tint in editing apps), then add a creative tint.
Tip #2: If your tint looks harsh, try this simple rule: pull back intensity until it feels slightly too weak, then bump it up a tiny bit. Your eyes adapt fast, and people tend to overdo it. (Yes, I’m calling you out. I do it too. ¯\\(ツ)/¯)
Pro methods: how to tint an image in Photoshop (without ruining it)
Photoshop is powerful. It’s also the place where time goes to die if you don’t know what you’re doing.
Method A: Solid Color + Blend Mode (fast and flexible)
- Open the photo.
- Add Solid Color Fill adjustment layer.
- Pick your tint color (warm orange, cool teal, etc.).
- Set blend mode to Soft Light or Color.
- Lower opacity (start around 10–30%).
Why it works: you keep the photo’s detail and just push color mood.
Method B: Gradient Map (duotone-style tint)
- Add Gradient Map adjustment layer.
- Choose two colors (shadows + highlights).
- Set blend mode to Soft Light or lower opacity.
This is how a lot of “Spotify cover” looks are made. (And yes, half of them look the same. That’s kind of the point.)
Method C: Camera Raw Filter (best for “cinematic”)
- Filter → Camera Raw Filter
- Go to Color Grading
- Tint shadows/midtones/highlights separately
This gives real control, but it’s slower.
Free alternative: tint image in GIMP (no subscription drama)
GIMP can tint pictures well. The UI is… a journey.
A simple approach:
- Colors → Colorize
- Pick hue/saturation/lightness
- Adjust opacity with layer blending if needed
It works. It’s free. It also makes you work for it.
Mobile workflows: photo tint on iPhone/Android (fast creator style)
If you’re editing for TikTok or IG, speed matters more than perfect color science.
Good options:
- Snapseed: use Tune Image + Curves + Warmth
- VSCO: presets + adjust tint/temperature
- Many “Tint Photo Editor” apps: quick overlays (quality varies)
Phone editing is great for quick posts. It’s not great for batch consistency across campaigns. That’s where Pixelfox AI wins again because it’s web-based and built for repeatable looks.
Advanced plays (stuff that makes people go “wait, that’s smart”)
These are the tactics that separate “random filter” from “I did this on purpose” 😈
1) Selective tint: keep the subject natural, tint the background
This is the trick behind a lot of high-end lifestyle ads.
How to do it (conceptually):
- Isolate subject (mask / cutout)
- Apply tint to the background layer only
- Keep skin tones and key product colors true
This avoids the biggest beginner mistake: tinted faces that look seasick.
If you also need colorizing for old photos (not just tint), use Photo Colorizer - Colorize Old & B&W Photos | Pixelfox AI.
2) Brand kit tint: lock a palette and reuse it everywhere
Pick 3–5 brand colors and reuse them:
- one for shadows
- one for highlights
- one accent
In Pixelfox AI, this is where custom palette recolor and reference image recolor shine. It’s the difference between “my feed is chaotic” and “my feed looks expensive.”
3) Web/dev trick: tint images with CSS (for landing pages)
If you need tinted hero images without exporting 20 versions:
.hero {
  background-image: linear-gradient(rgba(10,120,255,.25), rgba(10,120,255,.25)),
                    url(hero.jpg);
  background-size: cover;
}
Fast. Clean. Easy to A/B test.
Real-world case studies (what this looks like outside a tutorial)
Case Study 1: Ecommerce product photos that don’t look like a flea market
Scenario: A small skincare brand sells 30 products. Photos came from different shoots. Lighting was inconsistent. The store looked messy.
Goal: Create one clean look for the whole catalog using a soft warm tint.
What worked:
- Normalize sharpness and clarity on the worst images
- Apply a consistent warm tint using a fixed palette
- Keep whites close to neutral so labels stayed readable
Result: The grid looked consistent. Add-to-cart rates usually track with trust, and trust tracks with “this store looks legit.” That’s not magic. That’s just humans.
Best tool fit: Pixelfox AI for palette consistency + quick batch-style workflow thinking (even if you’re not batching inside one click yet, the approach is built for sets).
Case Study 2: YouTube thumbnails that pop without looking cursed
Scenario: A creator’s thumbnails looked flat. They added heavy tints. Faces turned orange. CTR didn’t improve.
Goal: Add a cool/teal photo tint that keeps skin tones normal.
What worked:
- Use selective tint (background more than face)
- Add contrast and a tiny bit of saturation
- Export in high quality (thumbnails get compressed anyway, don’t start with junk)
Result: Thumbnails looked cleaner, not louder. That usually wins because viewers aren’t allergic to good design.
Pixelfox AI vs Photoshop vs “random free tint tools” (honest comparison)
Pixelfox AI vs Photoshop
- Speed: Pixelfox AI is faster for most people. Photoshop is slower but deeper.
- Consistency across sets: Pixelfox AI is built for palette + reference matching. Photoshop can do it, but you’ll build actions and still babysit results.
- Skill required: Pixelfox AI is simpler. Photoshop is a skill cliff.
- Control: Photoshop wins if you need pixel-level masking and complex blends.
My take: if you tint images every day for content, Pixelfox AI is the sane default. If you’re doing a hero image for a paid campaign and the art director breathes down your neck, Photoshop is still the final boss.
Pixelfox AI vs other online tint tools
- Many online tools do “overlay + slider.” That’s fine for one-offs.
- Pixelfox AI leans into harmonized recolor and reference matching, which is what you need when you tint pictures for brand systems, not just vibes.
If you want an all-in-one place to do more than tinting (recolor, enhance, generate), start from Pixelfox AI.
Beginner mistakes: the 7 most common tint image errors (and fixes)
-
Going full intensity
Fix: stay subtle. People like style, not punishment. -
Tinting skin the same as background
Fix: selective tint or softer warm tones near skin. -
Ignoring lighting differences across a batch
Fix: normalize, then tint. Or match with a reference. -
Using one “brand color” that destroys contrast
Fix: keep contrast readable. Your logo needs to survive. -
Forgetting to check on mobile
Fix: preview on phone. Most people will see it there. -
Overdoing saturation after tint
Fix: tint can make colors feel stronger already. Don’t stack chaos. -
Exporting tiny images and scaling up later
Fix: enhance/upscale first if needed, then tint.
FAQ (tint image, tint pictures, photo tint)
How do I tint only part of an image?
Use masking or subject separation. Keep the subject layer clean, tint the background layer. In AI workflows, pick tools that support controlled recolor so you don’t dye everything the same color.
Why does my photo tint look yellow or green?
That’s often a lighting/white balance issue, not a creative tint. Fix white balance (temperature) first, then add a tint on top.
Can I add tint to image files for free?
Yes. Many online tools offer free tinting. Watch for watermarks, export limits, and ads. For consistent results across many images, use a tool designed for palette control like Pixelfox AI.
What’s the difference between tint and colorize?
Tint pushes an existing photo toward a mood color. Colorize adds realistic colors to black-and-white photos (restoration). Different goals, different tools.
Does tinting reduce image quality?
Tinting itself shouldn’t, but repeated exports, heavy compression, and low-quality tools can. Export high quality, and enhance sharpness if the image is weak.
The no-fluff workflow I recommend (especially for busy people)
If you want a clean process that scales:
- Pick your mood (warm, cool, sepia, duotone).
- Improve clarity if needed (don’t tint a blurry mess and hope).
- Apply tint with a palette or a reference image so the look stays consistent.
- Check skin tones and whites.
- Export the right format.
That’s it. No “17 secret steps.” No mystical LUT rituals. Just control and taste.
Wrap-up: make your tint look intentional (and repeatable)
A great tint image workflow is not about slapping on a filter and praying. It’s about choosing a mood, keeping skin and whites sane, and applying the look in a way you can repeat across a whole set. If you want the fastest path to a consistent photo tint (and you don’t feel like wrestling Photoshop layers at 1 a.m.), use Pixelfox AI and start here: AI Image Colour Changer - Change Image Colors | Pixelfox AI.
You’ll get better results, faster, and you’ll actually want to do it again. Go tint image files the fun way. 😎✨
About the author / disclosure: I’m a content strategist and editor with 10+ years in SEO-led creative tooling content. I test workflows from “free online sliders” to pro pipelines. This article includes a recommended tool (Pixelfox AI) because it matches the use cases described. Always test on your own images, since lighting, skin tones, and compression can change results.