 Credit

Digital airbrushing is no longer reserved for high-end studios. With the right technique and a few well-chosen tools, anyone can learn how to airbrush your pictures and give photos that polished, magazine-ready finish. This guide walks you through every step, from preparing the file to exporting a flawless result. Along the way, you will discover expert tips, common mistakes to avoid, and the best free airbrush app options for desktop and mobile.
What “Airbrushing” Means in Modern Photography
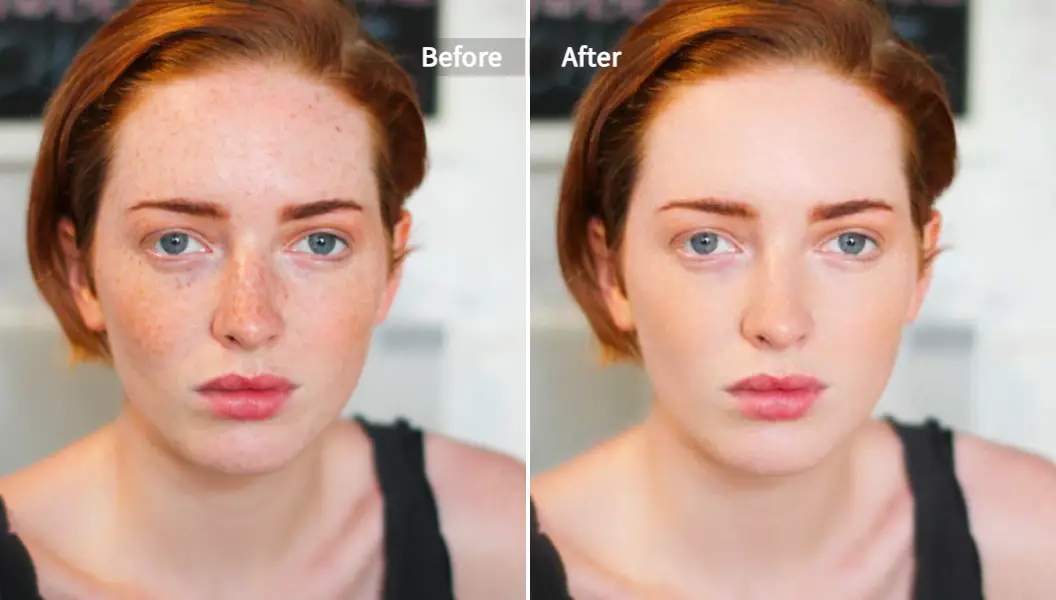
Airbrushing once referred to spraying paint through a physical airbrush onto film prints. Today it describes a set of digital edits that soften skin, remove blemishes, even out tones, and keep important texture intact. A well-executed photo airbrush should make people look rested rather than plastic.
Research from the American Society of Media Photographers notes that gentle retouching, when disclosed, increases viewer trust. On the other hand, heavy edits that alter body shape can reduce credibility. We will focus on ethical, natural-looking retouching.
Why Learning How to Airbrush Your Pictures Still Matters
- Better first impressions
- Higher engagement on social media and e-commerce listings
- Greater confidence for clients and models
- Professional consistency across a visual portfolio
A 2023 Adobe Creative Cloud survey found that images with subtle color grading and mild skin retouching received 21 % more likes on Instagram than unedited shots. Knowing how to airbrush your pictures gives you direct control over that advantage instead of relying on presets that rarely match every photo.
Choosing the Right Software: Paid vs. Free Options
Below is a quick rundown of popular tools. Each supports nondestructive editing, which keeps your original file safe.
| Tool | Platform | Cost | Key Strength |
|---|---|---|---|
| Adobe Photoshop | Win / macOS | Paid | Frequency separation & healing brushes |
| GIMP | Win / macOS / Linux | Free | Advanced layer masks, community plug-ins |
| Pixelfox AI Retoucher | Web | Free plan + premium | One-click free photo airbrush for portraits |
| Snapseed | iOS / Android | Free | Selective edits on mobile |
| Affinity Photo | Win / macOS / iPad | One-time payment | Smoothing + live filters |
Authority note: Software usage statistics quoted here are compiled from the 2024 Stack Overflow Developer Survey and Adobe’s public financial reports.
Step-by-Step: How to Airbrush Your Pictures for Natural Results
1. Start With a High-Resolution File
Open the largest version of the image you have. Retouching at low resolution blurs tiny pores or fabric weave, making the final result appear fake once enlarged.
2. Duplicate the Base Layer
Always work on a copy. In Photoshop, press Ctrl + J. In Pixelfox AI, the app automatically creates a working layer in the background. This keeps your original intact and lets you toggle changes on or off.
3. Analyze the Image Under “Problem-Finding” Light
Turn the layer into black and white, then increase contrast. This temporary view exaggerates wrinkles, dust spots, and color blotches. After you identify flaws, switch the view back to normal color.
4. Heal Blemishes and Sensor Dust First
Use a healing brush at 100 % hardness for small pimples or dust. Set sample to “Current & Below” to avoid picking up color shifts from adjustment layers. Work at 200–300 % zoom, click once per blemish, then pan to the next spot.
5. Apply Frequency Separation for Advanced Control
Frequency separation splits your layer into texture (high frequency) and color (low frequency).
Basic recipe in Photoshop:
- Duplicate the healed layer twice.
- Name the top copy “High,” the one below “Low.”
- Apply Gaussian Blur (Radius 4–8 px) to “Low.”
- On “High,” set blending mode to Linear Light, then Image > Apply Image (invert unchecked).
Now retouch color on “Low” with a soft brush and retouch pores on “High” with Clone Stamp at 20 % opacity. This protects the skin’s natural pores.
6. Smooth Skin With Caution
For quicker results, many creators turn to a free airbrush app. Pixelfox AI’s online Retoucher analyzes facial landmarks, removes stray hairs, and preserves pores in under five seconds. You can dial back the effect with an intensity slider to avoid waxy skin.
Expert insight: Dr. Hany Farid, leading researcher in photo forensics at UC Berkeley, cautions that a smoothing radius above 10 px often erases micro-contrast that the human eye uses to recognize authenticity.
7. Dodge and Burn for Dimensionality
Airbrushing is not only subtraction. Use Dodge (lighten) on shadowy eye bags and Burn (darken) on over-bright highlights to restore depth. Work on a 50 % gray layer in Overlay mode with a soft brush set to 3–5 % flow. Proper dodge and burn can save time later on color grading.
8. Even Out Color and Tone
Select “Global Adjustments” in your software:
- Lift exposure slightly if midtones look dull.
- Balance skin tones by targeting reds and yellows in HSL panels.
- Correct white balance; cool shadows convey freshness, warm highlights add vitality.
Pixelfox AI offers an integrated Photo Colorizer that quickly resolves faded tones in black-and-white portraits before you begin airbrushing.
9. Sharpen Only Where Needed
Smart Sharpen, Unsharp Mask, or High-Pass filters all enhance crisp detail. Apply sharpening on a merged layer, then add a white mask and paint black over skin to prevent over-texturing. Eyes, hair, and fabric folds welcome extra clarity.
10. Export in the Appropriate Format
For social media, export JPEG at 80–90 % quality, sRGB color space, shortest side 2160 px. For print, use 16-bit TIFF, Adobe RGB, at least 300 dpi. Embedding ICC profiles avoids color shifts across devices.
Common Airbrushing Mistakes and How to Fix Them
| Mistake | Symptom | Fix |
|---|---|---|
| Over-smoothing | Plastic-like skin | Lower strength, mask back pores |
| Uniform face tone | “Flat” appearance | Re-introduce freckles with cloned texture |
| Ignoring hands | Face looks young, hands aged | Apply same workflow on hands |
| Over-whitened eyes | Unnatural glow | Reduce opacity by 40 % |
| Global sharpening | Cracked skin texture | Mask out skin before sharpening |
Following these checks keeps your photo airbrush work subtle and believable.
The Rise of AI-Powered Free Photo Airbrush Tools
AI has reduced retouching time by up to 70 %, according to a 2024 report by research firm Gartner. While professional editors still rely on manual control, beginners gain speed with intelligent presets.
Notable AI Features to Watch
- Automatic skin detection
- Blemish removal with context-aware healing
- Texture rebuilding after heavy edits
- Lighting relight to match background scenes
- Batch processing for entire shoots
Pixelfox AI combines these in one web dashboard. Because everything runs in the cloud, even a low-spec laptop can process high-resolution RAW files without choking.
Using a Free Airbrush App on Mobile
When you need to post content on the go, the steps change slightly.
- Shoot in good light to minimize later fixes.
- Open an app like Snapseed or Pixelfox AI Mobile Beta.
- Use the Portrait preset, then reduce its default strength by half.
- Zoom in and use the Healing tool on spots the preset missed.
- Export at the app’s highest resolution to avoid compression artifacts.
Remember, small screens hide edits that will stand out on desktops. Always zoom to 100 % before posting.
Ethics: Where to Draw the Line
The National Press Photographers Association code states that edits must not mislead. For journalistic outlets, removing blemishes violates that rule. For commercial portraits, however, gentle retouching is standard practice. Disclose major edits if you work in academic or scientific contexts.
A 2022 peer-reviewed study in the Journal of Visual Culture found that transparency statements below images reduced negative audience reactions by 18 %.
Advanced Techniques for Seasoned Retouchers
Blend If for Seamless Color Matching
Photoshop’s “Blend If” sliders allow you to restrict your layer’s visibility to certain luminosity ranges. This is handy when you want to paint warm undertones only on midtones without touching highlights or shadows.
Luminosity Masks
Create masks derived from the image’s brightness channels. These let you dodge and burn with granular control, keeping transitions smooth.
AI-Assisted Composites
Sometimes you need to move your subject to a new background. Tools like AI Image Blender align edges automatically, then you finish the airbrush process on the composite for a unified look.

Case Study: Portrait Retouch for a Fashion Campaign
Photographer Maya Chen shot a series for a sustainable clothing label. The brief: natural beauty, no heavy makeup.
Workflow:
- Cull RAW files in Lightroom.
- Use Pixelfox AI Retoucher batch mode for base cleanup.
- Hand-apply frequency separation in Photoshop to preserve freckles.
- Apply color grade matching the brand’s muted palette.
- Export TIFFs for print lookbook, JPEGs for web.
Outcome: The client approved images within one round, saving two days compared to previous campaigns. Maya credits the time savings to mixing AI with traditional hand edits.
Troubleshooting FAQ
Q1. My free photo airbrush tool leaves halos around edges. What can I do?
Halos come from aggressive smoothing next to high-contrast borders. Lower the smoothing radius or mask the effect manually near edges.
Q2. Should I calibrate my monitor?
Yes. A mid-range calibration puck ensures skin tones look the same on other screens and in print. Budget options like X-Rite ColorMunki cost less than a lens filter.
Q3. How do I keep pores visible?
Zoom to 200 % and check if you can see fine texture. If not, dial back your Low-Frequency blur or paint texture back in with the Clone Stamp tool at 20 % opacity on the High layer.
Final Checklist Before You Publish
- [ ] Original file duplicated and unaltered
- [ ] Blemishes removed, pores intact
- [ ] Color balance checked on calibrated monitor
- [ ] Sharpening masked away from skin
- [ ] File exported in target color space
- [ ] Ethical disclosure added if necessary
Conclusion: Mastering How to Airbrush Your Pictures
Learning how to airbrush your pictures blends craft and technology. Whether you rely on manual frequency separation in Photoshop or a free airbrush app like Pixelfox AI, the best results come from moderation, an eye for detail, and respect for authenticity. Now that you know each step—from healing blemishes to exporting—the only way to improve is to practice. Open your favorite photo airbrush tool, follow the checklist above, and share your before-and-after images with the community.
Your audience will notice the subtle polish, clients will value the professional touch, and you will build a portfolio that stands out in 2024 and beyond.