 Credit

Introduction
We all had a moment when we wanted to use that picture, but it was not large enough or simply too blurry. Be it that you are preparing a product image for your online store, editing a client’s photo, or working on something personal, getting the resolution right sets up everything. Poor visuals can make a site ineffective, destroy your brand, or stop them, making bad impressions. Instead, fortunately for us today, there are incredibly strong tools available in Photoshop that will not only help you to enlarge the resolution of your images but also maintain a high quality throughout.
What is image resolution, and why does it matter?
Let us first revise the basics before we jump into the details. Resolution:
This is regarding image clarity and detail in an image.
High resolution = visuals are sharp and detailed
Unfocused, fuzzy images due to poor resolution
Resolution matters whether it's a file printing, putting it online, or even zooming into the image. Higher resolution means better quality. Your images will look much more professional and clearer than lower resolutions, which is especially important for e-commerce or graphic design/photography.
The higher the resolution and quality it has, your images will look professional and clearer, as against lower resolutions, which is very crucial for e-commerce or graphic design/photography.
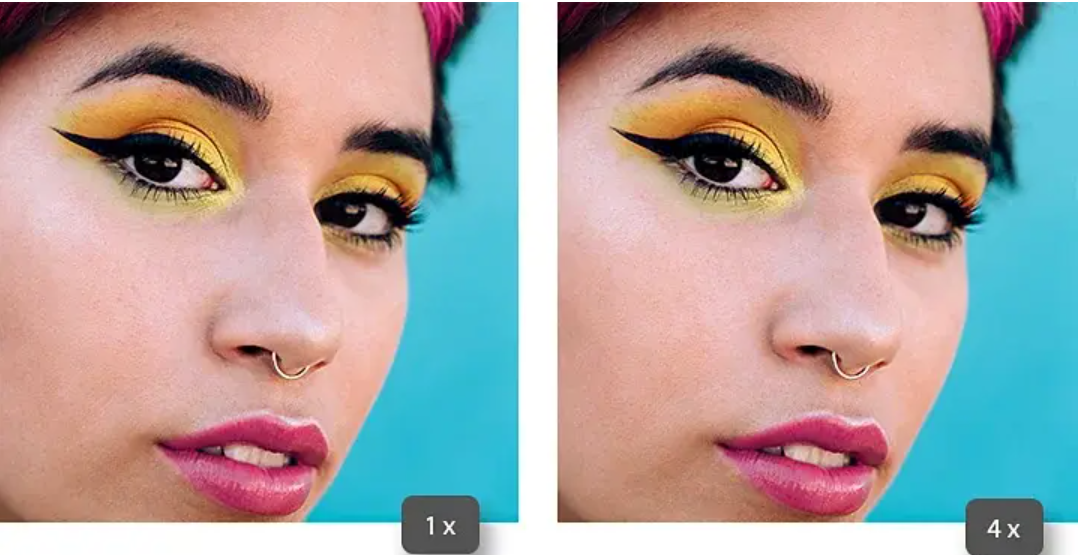
Using Super Resolution in Photoshop
Adobe introduced Super Resolution as part of its AI toolkit, and it’s a game-changer. It uses machine learning to intelligently quadruple the number of pixels in your photo while preserving clarity and texture.
Here's how to use it:
Open your image in Photoshop through Adobe Camera Raw (or Lightroom).
Right-click the image and choose “Enhance…”
Check the Super Resolution option.
Choose Enhance – Photoshop will generate a new high-resolution image
Now, an image that was 1500×1000 can be upscaled to a crisp-looking version of 3000×2000.. That’s perfect for printing or detailed product zooms. Super Resolution is perfect when you want speed, ease, and surprisingly clean results.
Want Full Control? Use Preserve Details 2.0 Instead
Alternatively, you can manually control the way Photoshop adds extra pixels during upscaling. [] You should perhaps even click OK and not worry too much about the rest. The best way to handle upscaling is likely Preserve Details 2.0, which smooths edges, reduces noise, but keeps the image looking natural!
Steps:
Go to Image > Image Size
Make sure Resample is checked.
Select Preserve Details 2.0 from the dropdown, then press OK.
Put in your new dimensions or increase the resolution (Ex, from 72PPI to 300PPI)
You can also adjust the Reduce Noise slider, if necessary.
Click OK to apply.
Real-Life Example: From Blurry to Brand-Ready
Let’s say you run an online store and receive a product image that’s only 800×600. You need it to look good at full width on your site and support a zoom function.
Here’s a typical workflow:
Upscale it using Super Resolution technology to bring the size up to 1600×1200 (from left)
So, scale it without fixed height/width resolution to 2400×1800 with Preserve Details 2.0
Just add a touch of Smart Sharpen for details to pop.
Choose Reduce Noise to remove unwanted noise.
The result? A clean, clear photo that has the appearance of a professional studio shot, though it originally was produced as a low-res image.
How to Get The Highest Resolution in Photoshop
Work with the highest quality image you have. AI tools work best with decent source quality. Do not upscale at all beyond 200–300% at once; any further has to be done in steps. Enlarger blade, but always sharpen and clean up after.
When you are editing, make sure to zoom in at 100% and see in what way it really affects. Whenever it is conceivable, save your configuration in PSD or TIFF format for greatest conclusion preservation.
Conclusion
Progressive JPEG Compression: Increasing resolution does not necessarily mean decreasing the quality. When armed with the right tools and a consistent workflow, you can take ordinary, or worse yet, low-quality images into sharp, high-res files.
The kick of the can, there are a couple here: you have a quick AI stomp with Super Resolution, or nitty gritty manual upscale using Preserve Details 2. So now that all 3 of those were incorporated into your workflow, you will have more than enough to create top-quality images.
Thing is, don't toss the next low-res photo you get stuck with. Refine it, elevate with Pixelfox.AI.
FAQs
1. In Photoshop, how do I get a picture to be more pixel?
The fastest is using Super Resolution through Adobe Camera Raw. It leverages AI to upscale images with improved quality of detail[].
2. How High Are We Talking When it Comes to Resolution and Photoshop?
Use some of those great features sparingly (most algorithms only support 20-60kb or are limited by the display size anyway).
3. And Does A Higher Resolution Correct Blurry Footage
Not always. Upscaling will not recover lost focus. When used in conjunction with sharpening and noise reduction, you can actually make a very soft image quite well.
4. Are these methods usable for an image with print quality?
Absolutely. But remember to enforce the resolution after it is set to 300 PPI and make some structure adjustments before printing with sharpening.