 Credit


People use video effects online to turn ordinary clips into scroll‑stopping stories. You can add color grades, light leaks, glitch, zooms, and even camera shake in your browser. You do not need a studio. You only need a plan, a clear workflow, and the right tools. This guide shows you how to design, edit, and publish a video effect video with confidence. It also explains how to add camera shake online the right way, so your footage looks dynamic but still easy to watch.
What “video effects online” really means
When we talk about video effects online, we mean visual changes you apply in a web editor. These include:
- Filters and color grading: change the mood with contrast, saturation, and curves.
- Overlays: add film grain, lens flares, bokeh, snow, and VHS textures.
- Transitions: cut on action, cross‑fade, whip pan, slide, and glitch.
- Keyed effects: remove green screen, replace skies, or stack graphics.
- Motion and camera effects: push‑in, zoom, shake, parallax, Ken Burns.
- Speed and time: slow motion, speed ramp, reverse.
An online editor runs in your browser. So you can edit on Mac, Windows, Chromebook, or even your phone. If you stay inside the browser, you also avoid driver issues and heavy installs.
Authoritative resources back this up. Adobe outlines browser‑based workflows and animated effects in its online editor overview (Adobe Express). You can explore a wide list of in‑browser effect categories on VEED, Kapwing, Flixier, FlexClip, and Clideo. These tools show that serious work can live on the web now, from filters and chroma key to motion graphics.
- Adobe Express online editor: https://www.adobe.com/express/feature/video/editor
- VEED effects: https://www.veed.io/tools/video-editor-effects
- Kapwing effects: https://www.kapwing.com/tools/add-effects
- Flixier effects: https://flixier.com/tools/video-effects-editor
- FlexClip overlays: https://www.flexclip.com/tools/video-effects/
- Clideo editor: https://clideo.com/video-editor
The core creative idea comes first
You should not start with a filter. Start with intent. Ask:
- What is the single message?
- Who will watch it and where?
- Which emotion should the viewer feel?
- What effect supports that emotion?
If you want energy, you use punchy colors, fast cuts, and a light camera shake. If you want calm, you use soft color, longer shots, and gentle movement. If you want nostalgia, you use grain, vignettes, and a warm tint. Tie every choice back to the story.
A simple framework for a standout video effect video
Use this four‑step plan:
1) Script the beats
Write a short outline: hook, body, and payoff. Decide where each effect lands.
2) Choose a visual language
Pick two or three effect families to keep. For example, “clean teal‑orange grade + subtle film grain + quick whip transitions.” Less is more.
3) Match the platform
Vertical 9:16 for TikTok and Reels. 1:1 or 4:5 for some Instagram feed posts. 16:9 for YouTube. Use safe margins for captions and graphics.
4) Lock the output early
Pick the frame rate and resolution now to avoid resampling later. For social, 24 or 30 fps is common. For gameplay, 60 fps can look better.
You can create this plan on paper. Then you open a web editor and build.
Where online tools shine (and how to pick wisely)
Online editors speed up the process because they combine effects, stock, captions, and exports in one place. Here is how to judge them:
- Effects library: look for ready overlays like glitch, VHS, snow, lens flares, and bokeh.
- Motion controls: check keyframes, camera zoom, and preset animations.
- Chroma key: make sure it has a color picker and tolerance controls.
- Audio tools: noise clean, auto‑level, music ducking.
- Performance: cloud rendering saves time on weak laptops.
- Collaboration: project links, comments, and versioning.
- Exports: 1080p and 4K, common presets, and clean audio.
Examples:
- VEED lets you layer real‑time effects like VHS, glitch, and filmic with one click.
- Kapwing offers chroma key, smart cut for silence, and easy animation presets.
- Flixier runs in the browser and uses cloud rendering to finish fast.
- Adobe Express includes animated text and Adobe Stock audio.
- FlexClip focuses on overlay packs like light leaks, glitch, and film grain.
- Clideo keeps it simple with cropping, speed, and filter controls.
When you should use AI to speed it up
AI is now part of online video effects. It helps you:
- Generate concepts from a prompt.
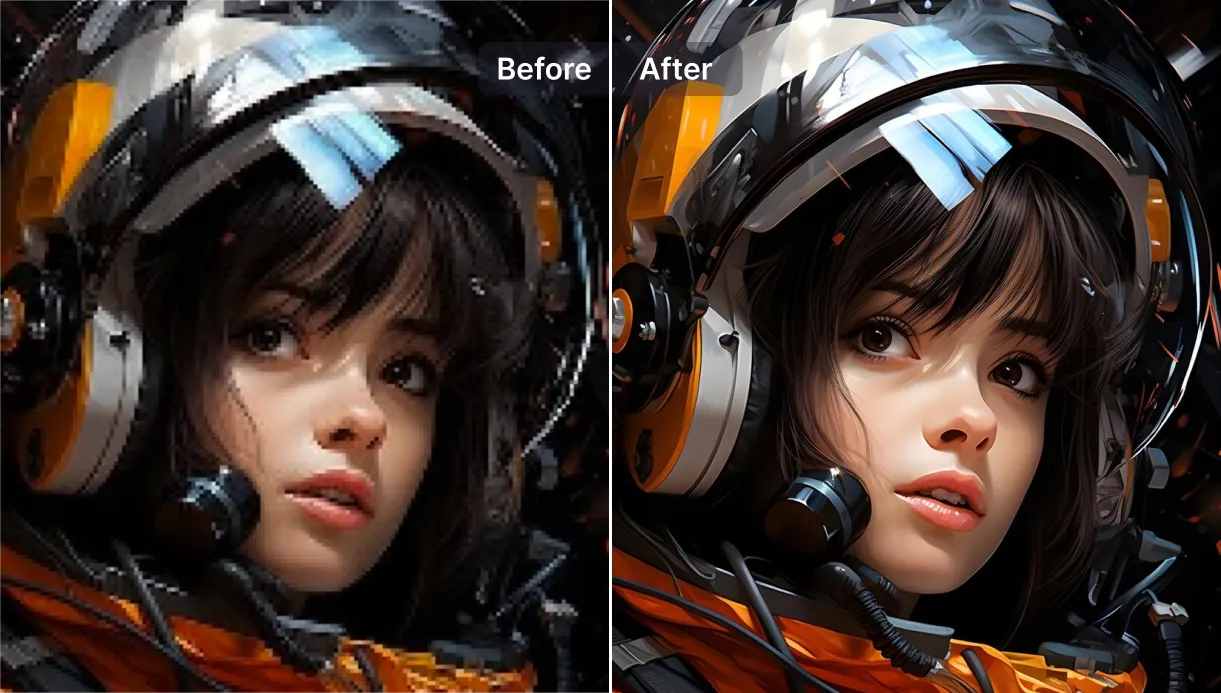
- Upscale or clean old footage.
- Enhance low light and color.
- Transfer the look of a style image onto your video.
Pixelfox AI focuses on these use cases. You can go from idea to draft fast, then refine with manual controls. For concepting and short content, this saves hours.
- Try the AI Video Generator to turn text or images into animated scenes: https://pixelfox.ai/video/generate
- Use the AI Video Enhancer to fix clarity, lighting, and color in seconds: https://pixelfox.ai/video/enhancer
- Apply an AI video style transfer to turn a clip into anime, sketch, or oil paint: https://pixelfox.ai/video/style-transfer
Quick wins: how to add camera shake online (without ruining your shot)
“Add camera shake online” is one of the most searched micro‑effects because it adds energy. Yet too much shake looks fake. Here is how to do it well.
Method 1: One‑click camera shake preset
- Pick a shake preset with small amplitude and short frequency.
- Keep intensity low on dialogue or product shots.
- Add more shake only on impacts, hits, or beats.
- Avoid heavy shake on text overlays (they become hard to read).
Method 2: Manual keyframe shake
- Add two keyframes on the clip position (at the start and end of the shake region).
- Between them, add small X/Y offsets every 2–3 frames.
- Alternate directions to avoid drift.
- Add a little rotation (0.3–0.8°) for realism.
- Ease out at the end so it stops clean.
Pro tip: a tiny motion blur helps. So does a brief bass hit or thump on the audio beat. The eye and ear work together.
Where camera shake makes sense
- Action moments and punchlines.
- Glitch cuts and abrupt transitions.
- Beats in music videos.
- VFX impacts after explosions, muzzle flashes, or heavy steps.
Where to avoid shake
- Screen recordings, UI demos, and tutorials.
- Close product shots and small text.
- Slow, emotional scenes.
The essential workflows for video effects online
Below are three no‑nonsense walkthroughs you can use today.
Workflow A: Clean grade + subtle film grain + soft vignettes
- Fix exposure. Set white balance.
- Add a base grade. Use a standard contrast curve.
- Push color toward your brand mood.
- Add film grain (low strength).
- Add a slight vignette. Keep the center bright.
- Finish with a soft glow or halation if you want a film look.
This look works for brand stories, personal videos, and calm reels.
Workflow B: Glitch and VHS for a retro punch
- Duplicate the clip. Offset one copy by a few frames.
- Add a horizontal RGB split on the top layer.
- Add scanlines and light noise.
- Use quick stutter cuts on beats.
- Insert glitch transitions between shots.
You can build most of this with online presets. Add only as much as the story needs.
Workflow C: Green screen replacement with chroma key
- Use the eyedropper on the green.
- Raise threshold until edges key out.
- Shrink/soften the matte a bit.
- Add the new background. Match color and contrast.
- Add a soft shadow or blur the background so the subject pops.
Kapwing and Flixier list chroma key tools in the effect panels. You only need a clean plate and steady lighting.
Asset overlays and how to use them right
You can boost your video effect video with ready overlays:
- Light leaks and lens flares (screen or add blend mode).
- Dust and scratches for vintage feel.
- Snow, rain, smoke, and fire for mood.
- HUD and glitch elements for tech vibes.
Use high‑quality files with alpha channels or clean black backgrounds. Make sure you have the rights to use them. FootageCrate offers effects and motion graphics in ProRes, MP4, and PNG sequences with alpha channels: https://www.footagecrate.com/vfx/visual-graphics
Keep overlays subtle. They should support the shot, not hide it.
Audio is half the effect
Good visuals fail with poor sound. Add whooshes on transitions, light hits under cuts, and ambient beds under quiet scenes. Use noise reduction on dialogue. Keep loudness near platform norms so people do not get a shock.
Most online editors include basic noise clean and level controls. You can also bring in a free limiter or EQ if the tool supports it.
Performance, formats, and exports you can trust
Online editors export to common presets. YouTube lists recommended upload settings on its Help pages. Follow those for bit rate, codec, and frame rate to avoid re‑encoding issues later.
- YouTube Help: Recommended upload encoding settings
https://support.google.com/youtube/answer/1722171?hl=en
Practical tips:
- Lock your frame rate at the start.
- Export at your native frame rate.
- Keep 1080p for social if your source is 1080p.
- Use 4K when you need reframes or a platform benefit.
- Use high bit rate if the scene has lots of motion or noise.
Cloud rendering, like in Flixier and some AI pipelines, can finish heavy exports faster than low‑end laptops. That saves time on big projects.
A realistic scoring rubric for your effect choices
Before you hit export, run a quick check:
- Clarity: can I read on‑screen text at phone size?
- Consistency: do effects match the same visual language?
- Timing: do effects land on beats or story turns?
- Restraint: did I remove one thing I do not need?
- Purpose: can I explain why each effect is there?
If you cannot answer “why,” cut it.
Try a fast AI‑assisted path to draft, then refine by hand
You can concept faster with AI, then take control:
- Use an AI tool to generate a first pass of shots and motion from text or reference images.
- Replace any weak shots with your own footage.
- Enhance clips with color and detail.
- Add manual effects where they matter most.
- Polish audio last.
Pixelfox AI is built around this workflow. You can ideate at speed, then finish with precision.
- Generate scenes from text or images with the AI Video Generator (great for ideation and social hooks): https://pixelfox.ai/video/generate
- Clean up low‑light or soft clips with the AI Video Enhancer (simple but powerful quality lift): https://pixelfox.ai/video/enhancer
- Re‑skin your clip into a fresh look with AI video style transfer (anime, sketch, oil paint, and more): https://pixelfox.ai/video/style-transfer
Mobile vs desktop vs cloud: what to expect
- Mobile browser editors are fine for quick posts, trims, captions, and basic effects.
- Desktop browsers can handle longer timelines, more layers, and heavier color work.
- Cloud rendering frees your computer and shortens exports.
- If you need deep compositing, you may still move a shot to desktop software. Yet you can still do 80% of social work online.
Security, privacy, and reliability
Always read the privacy policy of your online editor. Check how long projects stay on their servers. Some tools keep drafts for a set time. Some add watermarks on free plans. Check team roles and access, especially if you work with client files.
You should also keep local backups of key assets. Use a clean folder for exports with clear names: project name, date, version, and resolution.
Platform‑ready versions in one pass
You save time when you make all versions at once:
- Cut the master.
- Duplicate and reframe for 9:16, 1:1, and 4:5.
- Adjust captions and on‑screen text for safe zones.
- Export with platform presets.
- Keep a high‑quality master for future edits.
Many online editors include resizing templates. This helps you ship more without losing quality.
Common mistakes (and how to fix them fast)
-
Too many effects at once
Fix: pick two to three families and stay with them. -
Over‑sharpened video
Fix: keep sharpening low; use detail only where needed. -
Heavy camera shake everywhere
Fix: use shake on beats only; keep dialogue steady. -
Dirty chroma key edges
Fix: refine matte, add a small blur, match color and grain. -
Loud music under dialogue
Fix: duck music by 6–10 dB under speech; sidechain if the tool allows. -
Export stutter from mixed frame rates
Fix: set a project frame rate first; conform all clips to match.
Example build: from zero to polished in under an hour
Here is a straight path you can follow:
1) Import your clips.
2) Trim and set the story beats.
3) Add a base color grade.
4) Drop a light film grain overlay at low opacity.
5) Add one energy moment with a short camera shake.
6) Place simple animated text with clean fonts.
7) Use one transition style across the timeline.
8) Add a whoosh or hit on each key cut.
9) Export 16:9 and 9:16 versions.
10) Watch on your phone before you post.
Credible sources you can trust while you work
Use these to confirm best practices and specs:
- Adobe Express on adding animated effects in browser: https://www.adobe.com/express/feature/video/editor
- VEED on filters, VHS, glitch, and filmic looks: https://www.veed.io/tools/video-editor-effects
- Kapwing on chroma key and background removal: https://www.kapwing.com/tools/add-effects
- Flixier on keyframes, transitions, and cloud render: https://flixier.com/tools/video-effects-editor
- YouTube Help on upload encoding settings and bit rate: https://support.google.com/youtube/answer/1722171?hl=en
- FootageCrate on using transparent overlays and 4K assets: https://www.footagecrate.com/vfx/visual-graphics
Cross‑checking with these resources helps you stay accurate and consistent. It also helps you make choices that hold up across platforms.
Final checklist before you publish
- The first three seconds hold a clear visual hook.
- Colors match the brand or story mood.
- Text is readable on a small phone screen.
- Audio is clean and not too loud.
- Effects are purposeful and not overdone.
- Exports follow the right aspect ratios.
- File names are clear and versioned.
If this list passes, you are ready to post.
Conclusion: make more with less, and ship faster
Video effects online let you build strong visuals fast. You can design a simple plan, pick two or three effect families, and keep the story first. You can add camera shake online with care so the clip feels alive, not messy. You can lean on AI for speed, then refine by hand for control. And you can export for each platform without leaving your browser.
If you need a quick way to draft ideas, enhance quality, and try new looks, start with Pixelfox AI. Try the AI Video Generator for fast concepts, lift your footage with the AI Video Enhancer, and push a fresh look with AI video style transfer. Then finish with clear sound and smart timing. Publish with purpose. Measure the results. And keep improving your next video effect video.
Remember, the best use of video effects online is to support the story. Pick what helps the viewer feel something. Remove the rest.