 Credit

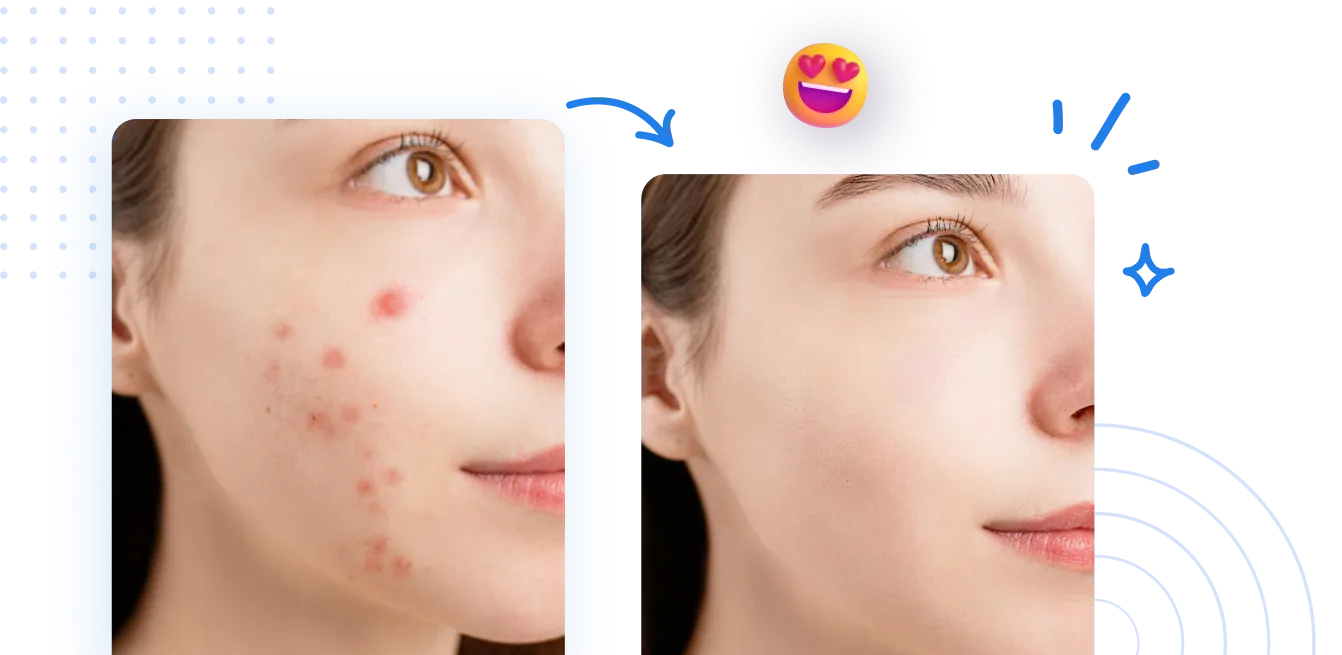
Let’s be real for a second. You just took what might be the best selfie of your life. The angle is perfect, your outfit is popping, but then you zoom in. Ugh. The lighting turned your forehead into a grease trap, or a massive stress pimple decided to make a guest appearance right on your chin. It happens to the best of us. You want to fix it, obviously. But you are also terrified of editing it so much that you end up looking like a plastic mannequin from a department store basement.
This is exactly why finding the right photo smooth skin editor is a big deal. You aren't looking to change who you are; you just want to look like you on a good skin day.
In this guide, we are going to ditch the technical jargon and cut through the noise. We will look at why AI tools are crushing old-school editing, which free face smoother photo editor options are actually worth your storage space, and how to use tools like Pixelfox AI to get that "I woke up like this" glow without looking fake.
The "Plastic Face" Epidemic: Why You Need a Smart Tool
We have all seen them. Photos where the skin is so smooth it looks blurry, while the eyes and hair are razor-sharp. It’s uncanny and, frankly, a bit embarrassing. According to recent user behavior studies in social media apps, engagement actually drops on photos that look heavily manufactured. People crave authenticity.
A high-quality face smoother tool or skin smoothing tool shouldn't just blur everything. It needs to be smart enough to distinguish between a blemish (which you want gone) and your skin texture (which you need to keep).
The Problem with Basic Blur
Most basic apps to smooth photos use a simple "Gaussian blur." It's like smearing Vaseline on the lens. It kills your pores, your freckles, and the dimension of your face.
- Old Tech: Blurs everything. Result = Wax Figure.
- New Tech (AI): Identifies skin, separates texture from color. Result = Natural Glow.
This is where Pixelfox AI changes the game. It uses advanced algorithms to target specific imperfections—like acne, scars, or uneven tones—while leaving your skin's natural texture intact. It’s the difference between painting over a wall and actually repairing the cracks.
Top Contenders: Finding the Best Free Airbrush App in 2025
The market is flooded. You type "smooth skin" into the app store and get hit with a thousand results. I've tested the big ones so you don't have to download and delete them five minutes later.
1. Pixelfox AI (The Smart Choice)
I might be biased, but the results speak for themselves. Pixelfox is designed as an all-in-one photo smooth editor. It doesn't just offer a slider; it analyzes the face.
- Pros: It’s incredibly fast. The retouch photo editor features are automated but customizable. It handles the dreaded "oily shine" better than most.
- Best Feature: The AI Photo Retoucher doesn't just smooth; it unifies skin tone, which is usually the real culprit behind a "bad skin" photo.
2. AirBrush
This used to be the gold standard. It’s still a solid free airbrush app, but they have locked a lot of the good stuff behind a paywall recently.
- Pros: Good manual control.
- Cons: Expensive subscription for advanced features. Ads can be annoying.
3. Peachy
Great for body editing, but also a decent skin retouch app. It’s colorful and fun, aiming at a younger demographic.
- Pros: Fun filters.
- Cons: Can easily accidentally warp the background if you aren't careful with the reshaping tools.
4. Snapseed
The OG picture smoother from Google. It’s powerful but not automated.
- Pros: Totally free.
- Cons: High learning curve. You have to manually select areas to smooth, which takes forever.
How to Smooth Skin Without Losing Texture (Step-by-Step)
Using a photo smooth skin editor is easy, but using it well is a skill. Here is how to get that professional magazine look using Pixelfox AI.
Step 1: The Clean Up
Before you smooth, you need to remove the big distractions. Use the blemish remover or acne tool first.
- Expert Tip: Don't remove permanent features like moles or scars unless you really want to. Those are part of you! Only remove temporary things like pimples or redness.
Step 2: Intelligent Smoothing
Open the face retouch panel. Instead of cranking the "Smooth" slider to 100%, start at 0% and slowly move up.
- Stop when the skin looks even but you can still see pores. Usually, around 30-50% is the sweet spot.
- If you use the AI Face Beauty tool, it often sets this balance automatically.
Step 3: Killing the Shine
This is a massive search intent: free app to remove shine from face. Flash photography or sweaty summer days can make you look oily.
- In Pixelfox, look for "Matte" or "De-shine" options. This specifically targets the white, blown-out highlights on the forehead and nose without darkening the rest of the face.
Step 4: The Eyes Have It
When you smooth skin, sometimes the eyes lose contrast. Use the "Sharpen" or "Brighten Eyes" tool to bring focus back to the center of the face. This creates a beautiful contrast between the soft skin and sharp eyes.
Tip: Never smooth the whole photo globally. Always use a tool that detects the face. If you smooth the whole image, your hair and clothes will look blurry, which is a dead giveaway that you edited the pic.
Comparison: Pixelfox AI vs. Photoshop
You might be thinking, "Shouldn't I just use Photoshop?"
If you are a professional retoucher getting paid $100 an hour, sure. But for the rest of us? Let's compare.
| Feature | Photoshop | Pixelfox AI |
|---|---|---|
| Learning Curve | High. You need to watch 5 hours of YouTube tutorials on "Frequency Separation." | Zero. Upload and click. |
| Time | 20-30 minutes per photo. | 10 seconds. |
| Cost | $20+/month subscription. | Free / Affordable. |
| Shin Removal | Manual painting required. | Automated facial retouching. |
| Result | Professional (if you are skilled). | Professional (automatic). |
For 99% of people looking for a smooth image for Instagram, LinkedIn, or a dating profile, the photo smoother in Pixelfox is faster, cheaper, and just as effective.
Advanced Strategies: Beyond Basic Smoothing
Okay, you know the basics. Let’s get into the stuff that power users do. These are the tricks that make people ask, "What camera do you use?" rather than "What app do you use?"
1. The "Texture Grafting" Technique
Sometimes, a smooth picture app works too well and removes too much texture.
- The Trick: After smoothing, add a tiny bit of "Grain" or "Noise" back into the photo. It sounds counterintuitive, right? But adding 5-10% grain makes the digital smoothing look like real film film texture. It tricks the eye into thinking the smoothness is natural.
2. High-Contrast Portraiture
If you have a really gritty, dramatic photo (think black and white), standard smoothing looks weird.
- The Trick: Use the skin smoothing tool but then crank up the "Structure" or "Clarity" on the beard, hair, and background. This juxtaposition makes the skin look soft but the photo look rugged.
3. Fixing Mismatched Skin Tones
One of the biggest fails with a free face smoother photo editor is when it fixes the face but leaves the neck or hands looking different.
- The Strategy: Pixelfox AI’s body retouching capabilities can detect exposed skin on the neck and arms. Ensure you apply the skin retouch app settings to all exposed skin, not just the face mask.
Real-World Case Studies
Case Study A: The Corporate Headshot
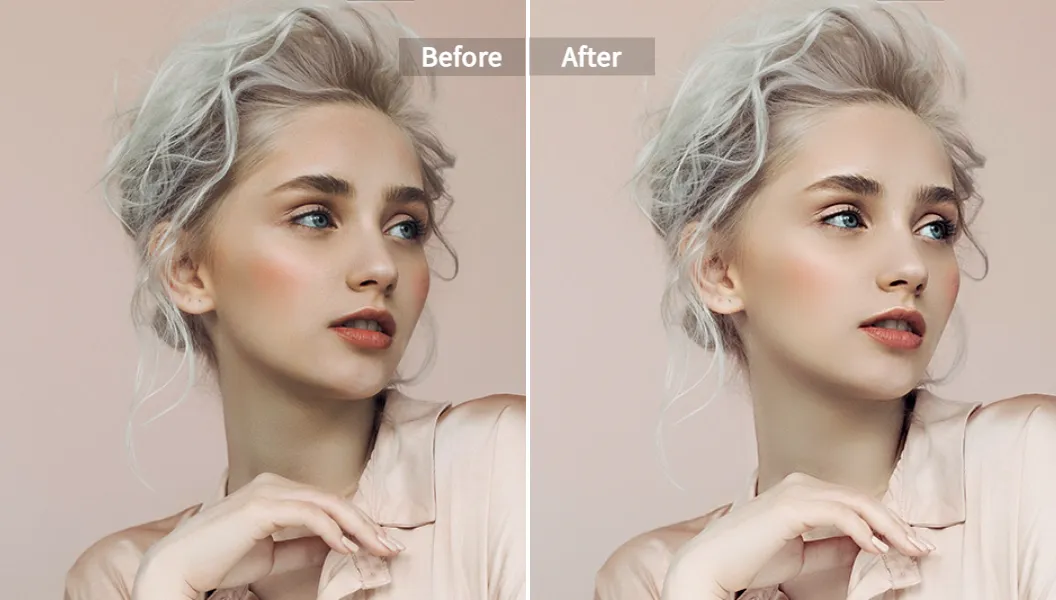
The Scenario: Sarah needed a LinkedIn photo. She had a great shot, but the office fluorescent lighting gave her uneven skin tone and a shiny forehead. The Fix: She used a photo smooth editor.
- She didn't use a heavy filter.
- She used the blemish remover for a stress spot.
- She used the "Matte" tool to kill the shine.
- She applied mild smoothing (35%). The Result: She looked professional and rested, not filtered. Recruiters trust photos that look like real people.
Case Study B: The E-Commerce Seller
The Scenario: Mike sells vintage jewelry. He models the necklaces himself. His hand skin looked dry and distracted from the gold. The Fix: He used Pixelfox as a smooth picture app but focused on his hands.
- He used the brush tool to apply smoothing only to his hands.
- He used the AI Image Editor to brighten the jewelry. The Result: Sales increased because the distraction was gone, and the focus remained on the product.
Common Mistakes to Avoid (Please Don't Do This)
Even with the best apps to smooth photos, you can mess it up.
- The "Voldemort" Nose: If you smooth too much, you lose the bridge of your nose. You need shadows to define your face shape. If you look 2D, dial it back.
- Glowing Teeth: Some apps whiten teeth so much they glow in the dark. It looks terrifying. Keep it subtle.
- Ignoring the Background: Did you use a reshape tool to slim your face and accidentally bend the doorframe behind you? We see it. Always check your background grid.
- Over-Smoothing Men: Men usually have rougher skin texture. If you use a face smoother tool on a guy at 100% intensity, he will look like a baby. Dial the intensity down to 20% for male portraits.
Tip: If you have been staring at the photo for 10 minutes, take a break. Your eyes get used to the edits. Walk away, get a coffee, and come back. You will likely realize you went too far and need to reduce the effect.
Professional Gameplay: Creative Edits
Want to really impress? Here are two "pro" moves using tools like Pixelfox.
1. Creating the "Etherial" Dream Look
Combine skin smoothing with a "Glow" or "Soft Focus" effect.
- Smooth the skin heavily (70%).
- Slightly lower the contrast.
- Add a warm color temperature. This creates that dreamy, wedding-photography vibe that is huge on Pinterest right now.
2. The YouTube Thumbnail Pop
YouTubers need faces to pop on small screens.
- Smooth the skin to remove noise.
- Over-sharpen the eyes and mouth.
- Saturate the background. This creates a "hyper-real" look that grabs attention in a crowded feed.
Frequently Asked Questions (FAQ)
Q: Is there a truly free app to remove shine from face? A: Yes. Many apps claim to be free but add watermarks. Pixelfox AI allows you to handle shine and oiliness without forcing a watermark on your face or demanding a credit card upfront for basic features.
Q: What is the difference between "Retouch" and "Smooth"? A: "Smooth" generally applies a blur to soften texture. "Retouch" is a broader term that includes removing blemishes, fixing red eyes, whitening teeth, and reshaping. A good retouch photo editor does both.
Q: Will smoothing my photo lower the quality? A: Poorly coded apps will compress your image and make it pixelated. High-quality tools like Pixelfox process the image at full resolution, so your smooth image remains crisp and HD.
Q: Can I smooth skin in videos? A: Video is harder than photos because the subject moves. While some apps offer this, it requires heavy processing power. For now, we recommend perfecting your photos first.
Q: How do I remove wrinkles without looking fake? A: Don't remove all wrinkles. Use the tool to reduce their depth or opacity. Leave the laugh lines around your eyes—they show personality. Completely erasing them makes you look unhuman.
Ready for Flawless, Natural Photos?
Stop settling for photos where you don't feel confident, and definitely stop ruining your pictures with cheap blur filters. You deserve to look your best, and modern AI makes it easier than ever.
Whether you are trying to save a wedding photo, polish up a selfie for the 'gram, or get a professional headshot without the studio price tag, the right tool matters.
Don't let bad lighting or a bad skin day hold you back. Try the Pixelfox AI photo smooth skin editor today. It’s the fastest way to get that professional, natural retouch that enhances you instead of hiding you.