 Credit

You know that feeling. You open an old shoebox (or a dusty digital folder), pull out a photo of your grandparents from the 70s, or maybe a snap from your college days, and… yikes. It’s blurry. It’s faded. It looks like it was taken with a potato, not a camera. We've all been there. The memories are precious, but the image quality? Absolute garbage.
Here’s the thing: you don’t have to let those memories rot in low resolution. Welcome to the world of remastering pictures. It’s not just for Hollywood movies anymore. Thanks to some serious leaps in tech, you can now take a grainy, scratched-up mess and turn it into a crisp, high-definition masterpiece in about the time it takes to sip your coffee.
In this guide, we aren't just talking about basic editing. We’re diving deep into how to transform remastered photos using AI, why manual editing is dead (mostly), and how tools like Pixelfox AI are changing the game for everyone from genealogy nerds to Instagram influencers.
Let’s fix those pixels. 📸
The Science of Remastering: It's Not Magic, It's Math
Okay, let's get one thing straight before we start clicking buttons. When we talk about remastering pictures, we aren't just "sharpening" them. Sharpening is what you did in 2010—it just added contrast to edges and made everything look gritty.
True remastering in 2025 is generative.
Think of it like this: If you have a puzzle with missing pieces, old software would just smudge the surrounding colors to fill the hole. It looked okay from a distance, but terrible up close. An ai remaster image tool, however, looks at the puzzle, realizes "Hey, that’s a human eye," and actually draws a new, high-res eye based on millions of examples it has learned from.
According to recent reports from industry watchers like Gartner, the adoption of generative AI in creative workflows has exploded, with efficiency jumping by over 40%. Why? Because AI understands context. It knows the difference between skin texture and the grain of a sweater.
Why Should You Even Bother?
- Preservation: Digital rot is real. Every time you save a JPG, it loses a tiny bit of quality. Remastering stops the bleeding.
- Printing: You can’t print a 500kb image on a canvas. It’ll look like a Minecraft screenshot. Remastering bumps that resolution up to 4K or 8K.
- Social Proof: Let’s be honest. High-quality, vibrant images get more likes.
The Old Way vs. The AI Way: A Reality Check
I spent years mastering Adobe Photoshop. I learned about clone stamps, high-pass filters, and frequency separation. It took me hundreds of hours to get good.
You don't have time for that.
Traditional Methods (The Hard Way)
- Time: 30 minutes to 2 hours per photo.
- Skill: Steep learning curve. You need to understand layers, masking, and curves.
- Cost: Expensive subscriptions ($20+/month).
- Result: Good, but depends entirely on your skill level.
The AI Revolution (The Smart Way)
- Time: 5 to 30 seconds.
- Skill: Can you click a mouse? You're qualified.
- Cost: Often free or very cheap (like Pixelfox AI).
- Result: Consistently high-quality, leveraging data from millions of images.
Tip: If you are a professional retoucher, AI doesn't replace you; it speeds you up. Use an ai remaster image tool to do 90% of the heavy lifting, then use Photoshop for the final artistic 10%.
Step-by-Step: How to Remaster Pictures with Pixelfox AI
Alright, enough theory. Let’s get your hands dirty. We’re going to use Pixelfox AI because, frankly, it combines multiple neural networks (upscaling, coloring, face enhancement) into a single workflow, which saves you from jumping between five different tabs.
Phase 1: The Cleanup (Restoration)
If your photo is physically damaged (scratches, tears), this is step one.
- Scan it right: Don't just take a photo of the photo with your phone (unless you have a steady hand and good lighting). A scanner is best. If you must use a phone, use an app like Google PhotoScan to reduce glare.
- Upload to Pixelfox: Drag your image into the AI Photo Retoucher.
- Auto-Heal: The AI detects "non-image" artifacts like dust and scratches and fills them in.
Phase 2: The Color Boost (Optional but Recommended)
Black and white is classy, but sometimes you want to see what that day actually looked like.
- Navigate to the Photo Colorizer.
- The AI analyzes the grayscale values. It knows trees are green and the sky is blue, but it also guesses skin tones surprisingly well based on lighting.
- Check the result. If it's a bit too saturated, you can adjust the intensity.
Phase 3: The Upscale (The Remastering Core)
This is where the magic happens. We need to add pixels that weren't there before.
- Go to the AI Image Upscaler.
- Select your scale: 2x is usually safe. 4x is great for printing.
- Process: The tool effectively rebuilds your image. It sharpens edges, removes JPEG artifacts (those ugly blocky squares), and adds texture.
Advanced Playbook: Tricks the Pros Use 🧠
Most people stop at "Auto Enhance." But you want remastered photos that look like they were shot on a DSLR yesterday. Here are two advanced strategies I use.
Strategy 1: The "Sandwich" Technique
Often, AI gets confused if an image is too small and has wrong colors.
- Upscale first: Use Pixelfox to blow the image up 2x. Don't go to 4x yet.
- Colorize second: Now that the AI has more pixels to read, run the colorizer. The color bleeding will be significantly reduced because the edges are sharper.
- Upscale again (optional): If you need a massive poster, upscale the colorized version one last time. This layering process usually yields cleaner results than doing it all at once.
Strategy 2: Background Swap for Product Remastering
If you are an eBay seller or run a Shopify store, you might have old product photos with messy backgrounds. Remastering isn't just for faces.
- Remaster the item: Upscale the grainy product shot so the label text is readable.
- Remove the clutter: Use the AI Image Blender or background remover to isolate the product.
- New Context: Place the crisp, remastered product on a clean white or studio background. Result: A professional listing created from a potato-quality photo.
Real-World Case Studies: Does It Actually Work?
Let's look at two scenarios where remastering pictures saved the day.
Case Study A: The Wedding Anniversary Surprise
The Problem: Sarah wanted to print a large canvas of her parents' wedding photo from 1985 for their 40th anniversary. The original was a small 4x6 inch print, slightly yellowed, and soft-focused. Scanning it at high DPI just made the blur bigger. The Fix: She used Pixelfox AI. First, she used the Photo Colorizer to correct the yellow tint (sepia) back to natural B&W tones. Then, she used the Upscaler at 400%. The Outcome: The AI reconstructed the lace details on the dress which were previously a blur. The printed canvas looked sharp, and her parents were in tears (the good kind).
Case Study B: The E-Commerce Archive
The Problem: A vintage sneaker reseller had an archive of low-res digital photos from the early 2000s. He wanted to post them on Instagram, but they looked pixelated on modern Retina screens. The Fix: He batch-processed 50 images through an ai remaster image workflow. The Outcome: The text on the shoe boxes became readable. The leather texture was restored. His engagement rate on the "Throwback Thursday" posts tripled because the images stopped looking like "low effort" content.
5 Common Mistakes That Ruin Remastered Photos
Even with AI, you can mess this up. Avoid these traps.
- The "Wax Figure" Effect: Some tools go too heavy on face smoothing. It removes all pores and wrinkles, making your grandpa look like a Madame Tussauds wax figure. Pixelfox AI is tuned to retain skin texture, but always check your settings.
- Ignoring the Source: Garbage in, garbage out. If your photo is behind glass in a frame, and you take a picture with a glare? AI can't fix a giant white reflection covering a face. Take the photo out of the frame first!
- Over-Colorizing: AI loves blue. Sometimes it makes gray suits bright blue. If the colors look radioactive, dial down the saturation or use a "Text Description" feature (if available) to guide the AI.
- Remastering Already Edited Photos: If you try to upscale an image that has already been heavily sharpened or filtered, the AI might amplify the artifacts. Always try to find the rawest, oldest file version you have.
- Expecting CSI Magic: "Enhance!" works in movies. In reality, if a face is literally 4 pixels wide (a tiny dot in the background), the AI will just invent a random face that looks nothing like your uncle Bob. AI needs at least some detail to work with.
Comparing Alternatives: Why Pixelfox vs. The Rest?
You've got options. Let's be real about them.
| Feature | Pixelfox AI | Photoshop | Phone Built-ins (e.g., Samsung Remaster) |
|---|---|---|---|
| Speed | Instant (Web/Mobile) | Slow (Desktop) | Fast |
| Learning Curve | None | High | Low |
| Restoration Quality | Generative (Creates detail) | Interpolation (Guesses detail) | Basic (Filters) |
| Features | All-in-one (Color, Upscale, Retouch) | Everything (if you know how) | Limited to basic fixes |
| Accessibility | Any device | Desktop focused | Phone only |
Samsung Remaster is cool if you have a Galaxy phone, but it's often too subtle. It creates a "nicer" version of the bad photo. Pixelfox, on the other hand, essentially rebuilds the photo for a professional result. It bridges the gap between a simple phone filter and a pro designer.
Tip: Are you a developer or running a business? You don't want to do this manually. Look for tools that offer an API. (Yes, Pixelfox does that too).
FAQ: Your Questions, Answered
Q: Is remastering pictures safe for my privacy? A: This is a huge concern. Reputable platforms like Pixelfox AI process images securely. Unlike some sketchy free apps that claim rights to your photos for training data, reliable tools ensure your uploads are private and deleted after processing.
Q: Can I remaster a photo that is completely blurry? A: It depends on the kind of blur. Motion blur (camera shake) is hard to fix perfectly. Out-of-focus blur is easier for AI to correct because it can predict what the edges should look like.
Q: What format should I save my remastered photos in? A: Don't save as JPG if you can help it! JPG compresses data. Save your new master file as PNG or TIFF. These are lossless formats that preserve that beautiful new detail you just generated.
Q: Why does the AI sometimes change the face slightly? A: Because the AI is hallucinating details based on statistical probability. If the original eye was just a black smudge, the AI guesses "most eyes look like this." Tools like Pixelfox's AI Photo Retoucher are optimized to keep identity consistency high, but for extremely low-res faces, slight variations can happen.
Stop Letting Your Memories Fade
We live in a visual age. The standard for image quality has never been higher—we have 4K screens in our pockets. Yet, our most cherished history is often trapped in fuzzy, low-resolution files.
Remastering pictures isn't just about vanity; it's about respect. It's about respecting the moment that was captured and bringing it up to the standard it deserves today. You don't need a degree in graphic design, and you don't need to spend hours painting out scratches.
You just need the right AI.
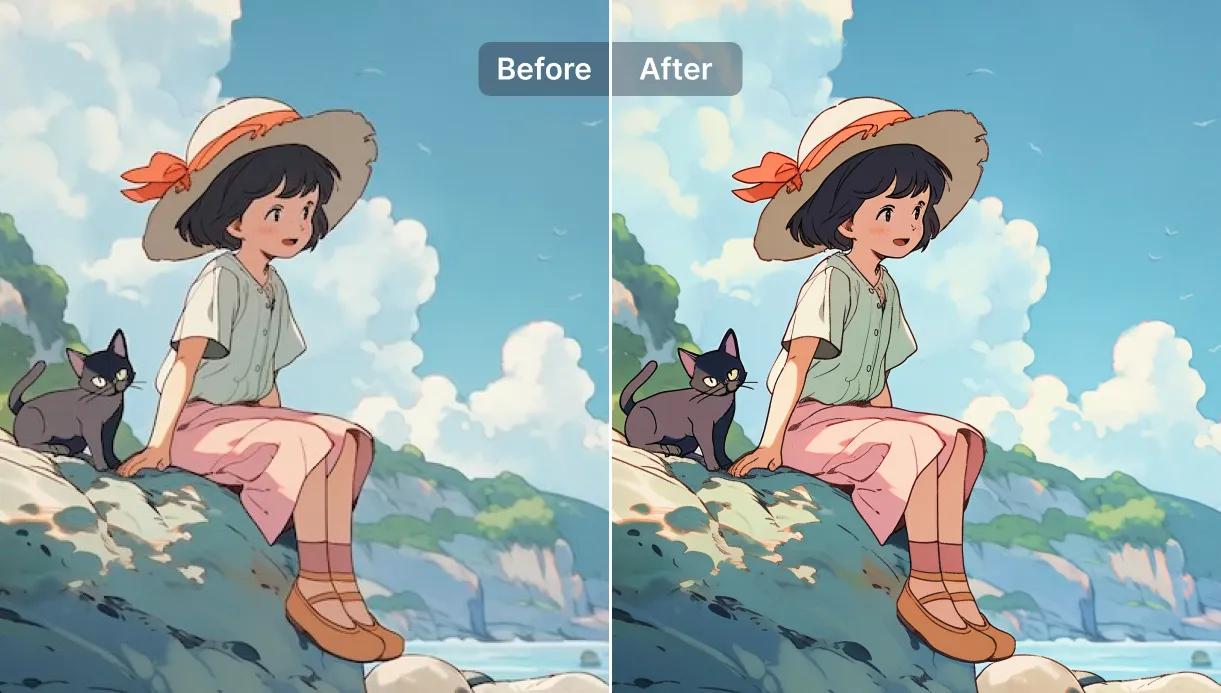
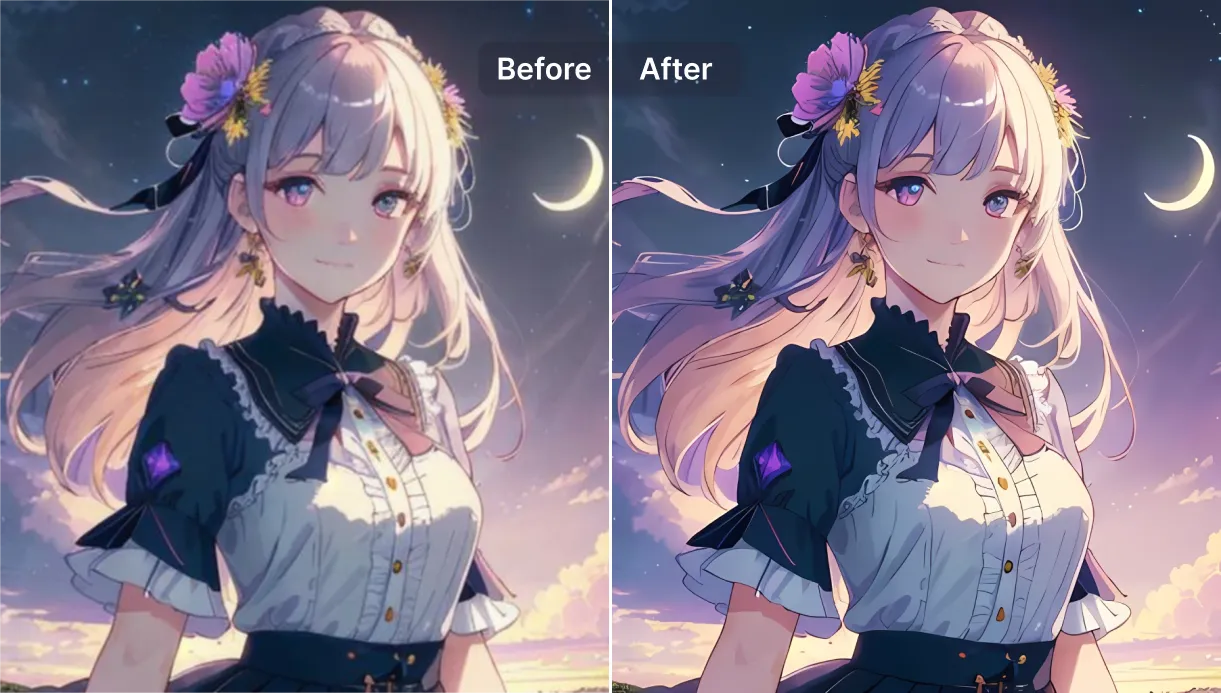
Ready to see what your parents really looked like in the 80s? Or maybe you just want that anime wallpaper to look crisp on your 27-inch monitor?
Don't settle for blur. Give Pixelfox AI a spin right now. It’s fast, it’s frighteningly good, and it might just make you the hero of your next family reunion.