 Credit

If your “HD” photo turns into a crunchy Minecraft mess the moment you zoom in, you’re not alone. Nielsen Norman Group has talked for years about how fast people form a first impression of what they see on a screen (we’re talking milliseconds), and yeah… blurry images don’t exactly scream “trust me with your money” 😅. This guide is here to fix that with a real-world, no-fluff look at the upscaler program landscape in 2025—what works, what’s hype, and how to get clean results without making faces look like wax dolls.
Suggested URL: /upscaler-program
The real problem: why your photos fall apart when you enlarge them
Most “bad upscale” pain comes from one boring fact: traditional resizing doesn’t invent detail. It just stretches pixels. So edges get soft, textures smear, and skin turns into a plastic smoothie.
AI upscaling (aka “super-resolution”) tries to do something smarter: it learns patterns from tons of images, then predicts what detail should be there. That’s why people also call it ai upres, smart upscaler, smart image upscaler, or (when marketing teams get involved) magic upscale.
And yes, AI can still mess up. It can add halos, fake texture, or over-sharpen eyebrows into angry caterpillars. The trick is picking the right tool and using it the right way.
What an upscaler program actually does (and what it can’t)
A good upscaler program usually does four jobs at once:
- Upscaling: increases pixel dimensions (like 1024px → 4096px)
- Denoising: removes grain/compression junk so new detail has room to exist
- Deblurring: rescues slight motion blur or soft focus
- Detail recovery: rebuilds edges and textures (hair, fabric, product labels)
What it cannot do (no matter what TikTok says):
- Recover text that is already unreadable
- Fix extreme motion blur like you shot it from a moving car in a hurricane
- Turn a 50×50 thumbnail into a billboard with perfect realism
It can help a lot, but it’s not time travel.
How AI upscaling works (resize vs AI upres vs “open ai image upscale”)
Resize (old-school)
This is math-based interpolation (bicubic, lanczos). It’s fast, and it’s also why your enlarged image looks like soup.
AI upres (modern)
Deep learning models (often CNN/GAN-style approaches) learn how high-res images tend to look, then rebuild missing structure.
What people mean by “open ai image upscale”
A lot of users search open ai image upscale thinking OpenAI offers a dedicated consumer upscaler tool. In practice, most people simply mean “AI-based upscaling online.” The key is not the brand name—it’s the model quality, artifact control, and whether the tool fits your workflow (web vs desktop vs batch).
How to choose an upscaler program in 2025 (the checklist I actually use)
When clients ask me for the best image upscaler (or the best ai upscaler) I don’t start with a listicle. I start with the job.
Here’s what matters:
- Output target: social post, product page, print, or 4K wallpaper
- Image type: portraits, anime/AI art, products, landscapes, text/logos
- Naturalness: do you want faithful detail or “creative enhancement”?
- Speed: one image or 300 images before lunch?
- Privacy: web upload vs local processing
- Price: truly free, free credits, or paid subscription
If you want something that’s easy, fast, and doesn’t demand a GPU and a prayer, you’re going to like Pixelfox.
Pixelfox AI: my go-to best ai image upscaler for clean results
If your goal is upscale photography without the “AI glow” and weird textures, Pixelfox AI is the first tool I’d reach for because it focuses on practical quality: sharp edges, controlled noise, and colors that don’t go nuclear.
Use it here: Pixelfox AI Image Upscaler
It’s built for the stuff people actually do every day:
- rescue low-res photos
- prep product images for e-commerce
- upscale digital assets for design
- refine AI art outputs so they print better
What Pixelfox does well (in human terms)
- AI-Powered 4x Image Upscaling: upscale up to 4× while keeping edges crisp
- Automatic Noise Reduction: stops grain from becoming bigger grain
- Smart Detail Preservation: keeps textures like hair and fabric believable
- Automatic Color Enhancement: revives washed-out images without overcooking them
- Image Deblurring: sharpens soft shots so they look usable again
And yeah, it’s also built like a modern tool should be: fast, format-friendly, and not a maze of settings.
Step-by-step: use Pixelfox as a 4k image converter ai (without pain)
If you’re here because you searched 4k image converter ai, you’re basically saying: “I want this image bigger and sharper, and I don’t want to learn Photoshop today.” Fair.
Here’s the clean workflow:
- Open Pixelfox and go straight to Try now
- Upload your image (PNG/JPG/JPEG/WEBP/HEIC are supported)
- Run the upscale and preview the result
- Download and use it for web, social, or print layouts
That’s it. No thirty sliders. No “enhance… enhance… ENHANCE!” movie nonsense.
Tip: If your image is noisy (old phone photo, screenshot, compressed download), don’t sharpen it first. Upscale first, then do light sharpening at the end. Sharpening before upscaling often locks in artifacts, so the AI “learns” the wrong stuff.
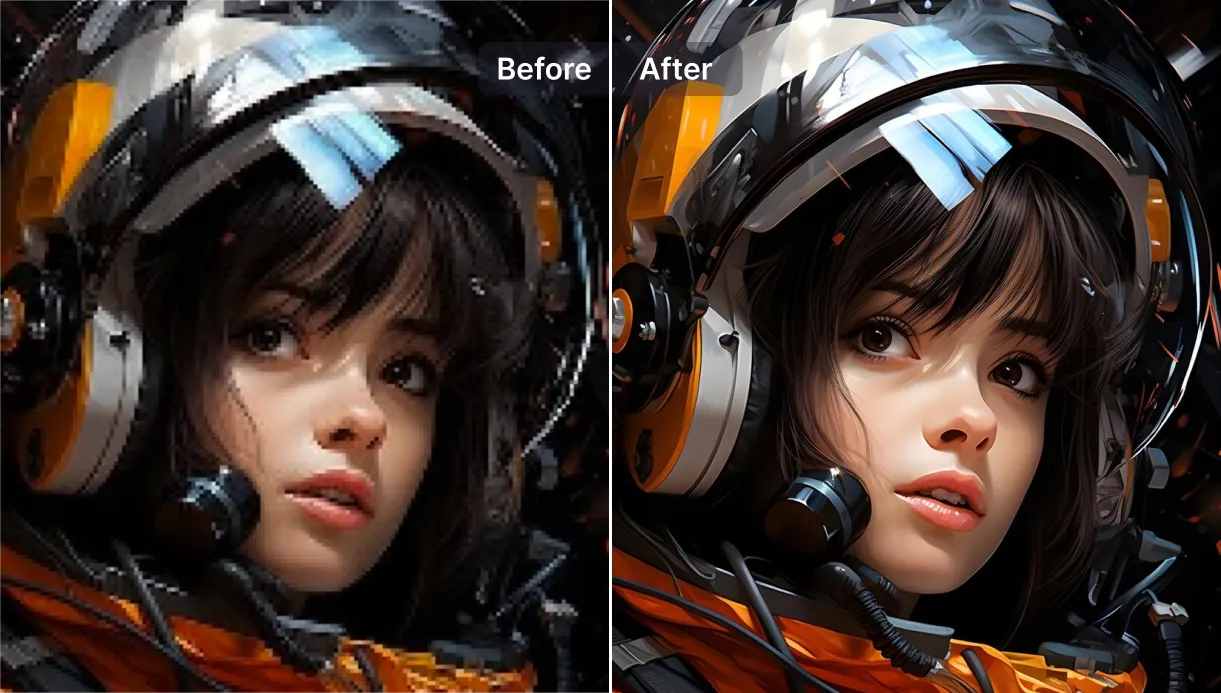
When you need an ai face upscaler (portraits that look human)
Faces are where bad upscaling goes to die. You’ve seen it: eyes too sharp, pores painted on, skin like plastic.
A solid ai face upscaler workflow is less about “more detail” and more about “the right detail.” Pixelfox’s combo of deblurring + detail preservation tends to keep portraits looking real, not airbrushed into a mannequin.
If your portrait is also dull or low-contrast, pair upscaling with a dedicated enhancer:
That combo is usually enough to fix:
- soft faces from phone focus misses
- low-res profile pics
- old family photos that need clarity for printing
Tip: For portraits, crop closer before you upscale (face + hair + shoulders). Upscale that crop, not the whole background. You get better face detail, smaller files, and fewer “AI invented wallpaper textures” in the background. Win-win ( ̄▽ ̄)
Comparison: Pixelfox vs Photoshop as image upscale software
Photoshop is powerful. It is also… Photoshop. That means cost, learning curve, and the classic “why are there 19 ways to do the same thing?” vibe.
Adobe’s own docs for Photoshop’s AI upscaler note practical limits on the web tool (file types like JPG/PNG, max 40MB, and max dimensions like 8,000×8,000). That’s fine for many jobs, but it’s still a pro editor first, upscaler second.
Pixelfox AI (web-first upscaler program)
- Faster to use for simple upscale jobs
- Less setup, fewer choices that wreck results
- Great when you just want clean output fast
Photoshop Generative Upscale (pro workflow)
- Strong when you also need heavy retouching, compositing, layers
- Better if your pipeline is already Adobe-based
- Overkill if you only need upscaling
My blunt take: if you need best upscale quality and you’re already deep in Adobe, fine. If you just need a reliable upscaler program that won’t eat your afternoon, Pixelfox is the saner starting point.
Comparison: Pixelfox vs other online “best ai upscaler” tools
There are a lot of options. Some are excellent. Some are “free” in the same way a free trial gym membership is free (you will pay, emotionally or financially).
Here’s a practical breakdown using publicly stated features/limits from popular tools:
| Tool | Best for | Platforms | Free tier reality | Notable limits/notes |
|---|---|---|---|---|
| Pixelfox AI | Fast, clean photo upscaling | Web | Free access via trial credits (varies) | Strong all-around for everyday images |
| Upscayl | Offline + open source fans | Desktop | Yes (free + open source) | Great value, needs local install |
| Topaz (web) | High-end models, easy web use | Web | 10 free renders on signup | Paid for heavy use; desktop Gigapixel goes higher |
| Nero AI | Big output + batch | Web + apps | Free credits, then paid | Claims very large output support (like 16000×16000) |
| ImgUpscaler | Simple web upscaling | Web | Limited (often 1 at a time) | Free caps like 4096×4096, paid for bigger/batch |
| Photoshop | Full editing suite | Web + desktop | Trial | Web tool size limits, subscription ecosystem |
If you’re choosing based on vibes:
- Want free upscaling software that runs locally? Upscayl is the classic pick.
- Want pro-grade upscaling with a rep in photo circles? Topaz is hard to ignore.
- Want fast web results that don’t feel like a science project? Pixelfox AI is the easy call.
Also, if you need video too, Pixelfox has that lane covered: AI Video Upscaler (different tool, same “make it clearer” mission).
Free vs paid: best free ai upscaler vs “free” marketing
People search best free ai upscaler and I get it. Nobody wants another subscription.
Here’s the honest map:
Truly free (often open source)
- Upscayl: free + open source, desktop app, strong features like batch and “double upscale” style workflows
Free credits (good for testing, not infinite)
- Tools like Nero AI and Topaz web often give limited free credits/renders
That’s not evil. That’s just business.
Free but limited (size, batch, watermark, speed)
- Many web tools become painful when you need 50 images or high resolution
If you only upscale a few images a month, free tiers are fine. If you’re running a shop, a channel, or client work, you’ll want predictable output and time savings more than you want “free.”
Real-world case studies (the stuff that actually pays the bills)
Case study 1: E-commerce product photos that don’t tank trust
A small seller had product images coming from suppliers in random sizes. Some were soft, some were compressed, and the whole catalog looked inconsistent.
What we did:
- Upscaled key product shots with Pixelfox
- Used cleaner, sharper images across listings
- Kept textures real (no over-smooth “fake premium” look)
Outcome (practical, not magical):
- The store looked more consistent
- Clicks improved on listings that previously looked low-effort
- Support messages like “is this real / do you have better photos?” dropped
This matches what UX folks have said forever: when visuals look sloppy, users assume the business is sloppy. NN/g’s credibility research keeps circling back to that theme.
Case study 2: Upscale photography for a large print (without weird skin)
A family wanted to print an old portrait larger for a memorial display. The original file was low-res and slightly blurred.
What worked:
- Cropped to focus on the subjects
- Ran upscaling + deblurring in Pixelfox
- Did light final touch-ups (tiny contrast and gentle sharpening)
Result:
- Faces stayed natural
- Hair and edges looked clean
- The print held up at normal viewing distance (no uncanny “AI face” artifacts)
If you’ve ever tried this with the wrong tool, you know the alternative: shiny skin, crunchy eyelashes, and grandma looking like a video game NPC. Nobody wants that.
Common mistakes with an upscaler program (and how to fix them)
New users make the same mistakes on repeat. Pros do too, they just do it faster 😏
1) Upscaling a screenshot of a screenshot of a screenshot
Compression stacks. Artifacts multiply.
Fix: Find the least-processed original. If you can’t, use noise reduction first, then upscale.
2) Chasing “maximum sharpness” like it’s a personality trait
Over-sharpening creates halos, jagged edges, and fake texture.
Fix: Aim for “clean.” Add mild sharpening only after the upscale.
3) Upscaling the whole image when only the subject matters
You waste pixels on empty background, then wonder why results look weird.
Fix: Crop to the subject, upscale, then place it back into your design.
4) Thinking DPI is the same as resolution
DPI is print metadata. Pixels are the real currency.
Fix: Decide your target pixel size first. Then worry about DPI for print settings.
5) Expecting perfect text recovery
AI can guess, but it can’t read your mind.
Fix: Rebuild text/logos in vector when possible. Use upscaling for photos, not brand typography.
Advanced plays: magic upscale workflows that feel like cheating (but aren’t)
You wanted “pro tricks.” Here you go.
Play #1: Make marketplace-ready product images (clean, consistent, white background)
Even if your core problem is resolution, the real problem is “buyers don’t trust ugly listings.”
Workflow:
- Upscale the product photo in Pixelfox
- If needed, enhance clarity/contrast with the image enhancer
- Put it on a consistent white background in your design tool (or re-shoot if shadows are wild)
Why it works:
- Product edges look sharper
- Materials read better (fabric, metal, labels)
- Your catalog looks like one brand, not ten suppliers in a trench coat
Play #2: YouTube thumbnail upgrades without redoing the whole design
Thumbnails die when faces and objects look soft on mobile.
Workflow:
- Export your thumbnail layers (or at least the main subject image)
- Upscale that subject with Pixelfox
- Rebuild the thumbnail with the sharper asset
- Keep text big and simple (don’t rely on AI to “fix” tiny text)
This is the fastest “quality lift” you can do without redesigning everything.
Best photo upscaler app vs web tools: what to choose?
People also search photo upscaling app, best photo upscaler app, and free image upscaler app because phones are where photos live now.
Quick rule:
- If you’re doing quick social fixes, an app is fine.
- If you care about repeatable quality (and exports), web tools are often easier to manage.
- If you care about privacy and offline work, desktop tools matter.
Pixelfox is web-based, so it’s easy on mobile browsers too, and you don’t have to babysit an app that updates every week and changes the UI just to feel alive.
FAQ
How do I pick the best image upscaler for my needs?
Match the tool to the image type and the job. For portraits, prioritize natural skin and controlled sharpening. For products, prioritize edges and label clarity. For AI art, pick a tool that keeps linework clean without inventing weird texture.
Why does AI upscaling sometimes look fake?
Because the model guesses missing detail. When the input is too compressed or blurred, it guesses harder, and the guess can look like plastic skin, halos, or “AI texture.”
Can I upscale photography to real 4K quality?
You can upscale to 4K resolution (pixel size). Whether it looks “real 4K” depends on the input quality. Clean low-res images upscale well. Heavily compressed images will improve, but they won’t become brand-new camera files.
What’s the difference between a smart upscaler and normal resize?
A normal resize stretches pixels. A smart upscaler (AI) predicts detail, reduces noise, and rebuilds edges so the image looks sharper and more natural at higher resolution.
Can an upscaler program fix blurry faces?
Sometimes, yes—especially mild blur or soft focus. For heavy motion blur, results vary. Use tools that combine deblurring + detail preservation so the face stays human.
The part where you stop reading and actually fix your images
A good upscaler program is basically a time machine for your pixels—just not the cheesy Hollywood kind. If you want a reliable, fast, and beginner-friendly way to upscale photography, clean up noise, and push images toward 4K-ready output, start with Pixelfox AI and keep your workflow simple.
Go try it now: Try now ✨
Author note / disclosure: I wrote this as a content strategist who’s spent years watching “image quality” quietly decide who gets clicks, trust, and sales. Tool limits and features change often, so treat “free tier” info as a snapshot, then double-check on the product site before you commit.