 Credit

You tap one button. Your skin looks smooth, colors pop, background glows.
Then you post. And five seconds later you hate it because it looks… fake.
That love–hate thing with photo filters is real. People want fast ways to beautify photos, but they’re tired of cartoon skin, broken apps, and “who is this person?” selfies.
Surveys from groups like Statista and the Dove Self-Esteem Project say most teens and young adults edit their pictures before posting. At the same time, many say filters make them feel worse about how they look. So this is not just “how to add filters to photos”. It’s also how to do it well and without wrecking your self-image.
In this guide we’ll go deep on:
- What modern image filters actually do in 2025
- The best photo filters and apps (free and paid)
- How to filter a picture on phone, desktop, and pic filter online
- How to fix common tech problems and mental health traps
- Pro workflows using pro photo filters and AI tools like Pixelfox AI
- Real case studies, mistakes to avoid, and FAQs
And yes, we’ll talk about free photo filters, free online filters, and tools that do not drown you in ads and spyware.
What “photo filters” really mean in 2025
People say photo filters and mean 5 different things:
-
Classic color filters
Stuff like “Warm”, “Cool”, “Vintage”, “B&W”. These picture filters change color, contrast, and brightness in one go. -
Beauty filters for faces
Skin smoothing, eye brightening, teeth whitening, slimming. These can beautify a photo fast. They also cause a lot of body image issues when overused. -
Creative photo effects
Light leaks, grain, glitch, bokeh, film look, picture fx, all those fun pic effects that make photos look stylized. -
AR and face filters online free
Think dog ears, anime eyes, age progression, or cartoon styles. These are live face filters online free in apps like Snapchat, Instagram, TikTok, and AI web tools. -
AI-driven filters and image filters
This is where tools like Pixelfox AI live. They do smart filter image actions:- Auto skin retouch
- Color grading
- Background tweaks
- Old photo restoration
- Style transfer and recolor
So when you search “how to put filters on pictures” or “add filter to photo”, you might mean anything from “make this selfie less dead” to “turn this black and white portrait into a cinematic poster”.
The trick now is not “can you add a filter to image” but “can you do it fast, realistic, and without destroying the mood or your face”.
Top tools and best photo filters in 2025 (free & paid)
Let’s talk tools. I’ll split this by what you actually want from your picture filters.
1. For everyday pics and quick posting
These are for “I took this on my phone, it looks okay, I just want it better”.
-
Instagram
- Good for: quick photo effects, stories, reels
- You get basic image filters like “Clarendon”, “Juno”, “Ludwig”.
- Great for fast edits, not so great for fine control.
- You also have instagram filters online style AR effects inside the app.
-
Snapseed (free)
- Good for: color, detail, local edits
- You get powerful sliders, selective edits, healing tool.
- Tons of free filters and advanced adjustments.
-
VSCO
- Famous for: film-style picture filters
- Good for: consistent aesthetic on Instagram grid
- Free plan has some picture filters free, full pack is paid.
2. For faces, selfies, and portrait videos
Skin, eyes, lighting. That’s the big three.
-
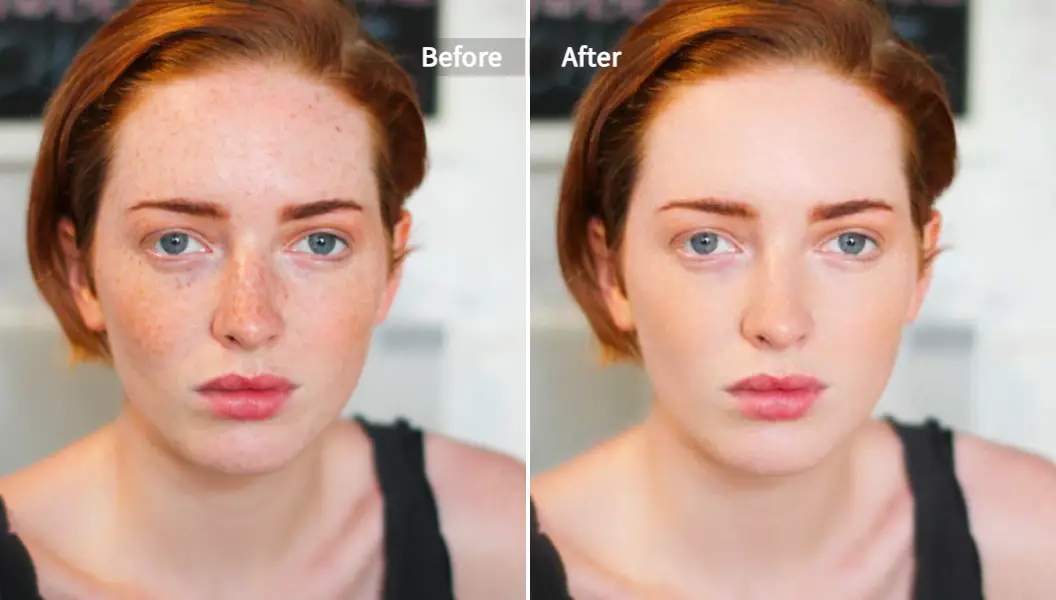
Pixelfox AI for photos (web)
- Use the AI Photo Retoucher when you want to smooth skin, remove pimples, and keep texture.
- It detects face and body skin and does auto retouch in seconds.
- Great if you want subtle, realistic photo filters instead of “porcelain doll” plastic.
-
Pixelfox AI for video
- The AI Video Portrait Enhancer helps with vlogs, Zoom-style recordings, and talking head clips.
- It works like a smart AI video beauty filter for your face in motion.
- Perfect if you need photoshoot filters look but in video.
-
Apps like Facetune / Snow / Meitu
- Good for: intense beauty edits
- They give heavy reshaping, big eyes, tiny chin.
- Use them with care. Your face still needs to look like… your face.
3. For creative effects, color, and retro vibes
You want pic effects, picture fx, or some artsy effect for image.
-
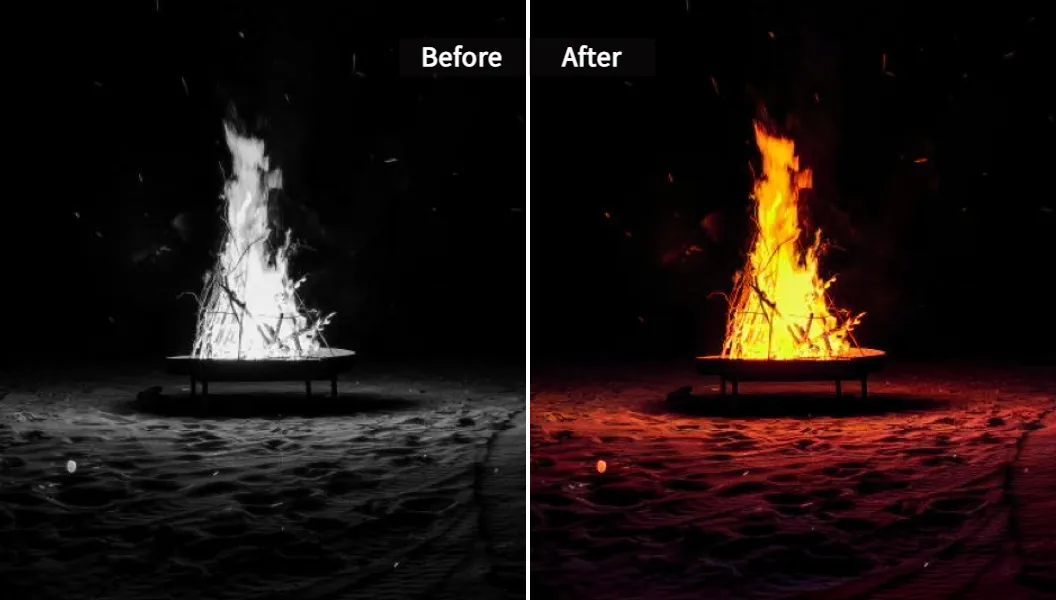
Pixelfox AI Image Colorizer
- The AI Image Colorizer turns black & white shots into color automatically.
- Great for old family photos, archives, or giving mood to monochrome projects.
- Works as both an Old Photo Restoration step and a stylized photo effects move.
-
Pixelfox AI Image Recolor tool
- The AI Image Recolor tool lets you change color of clothes, products, or props.
- Perfect if you want the same photo but with different brand colors, or testing which color sells better.
- This goes beyond basic “filter pics”. It’s controlled color change.
-
Lightroom / Photoshop presets
- Huge world of pro photo filters and LUTs (color presets).
- Amazing if you know what you’re doing. Slow if you don’t.
4. For total style control and brand consistency
You want your feed, store, or portfolio to look like one cohesive thing.
-
Pixelfox AI Style Transfer
- AI Style Transfer lets you copy color and lighting from one photo to another.
- So you can take your “dream look” photo and let AI match other shots to it.
- That’s next-level filter image behavior. It’s like a custom filter built from your reference.
-
VSCO / Lightroom for creators
- You build your own presets, then use them as pro photo filters.
- Great if you shoot a lot and want full manual control.
How to add filters to photos (phone, desktop, online)
Now the practical part. You searched “how to add filters to photos” or “how to put a filter on a picture”. Here’s the no-BS walkthrough.
On iPhone (Photos app)
- Open Photos, tap the picture.
- Tap Edit.
- Tap the filter icon (three circles).
- Swipe through options and tap one.
- Adjust intensity with the slider if available.
- Hit Done.
So that’s the fastest answer to “how to filter a picture” on iOS. No extra apps needed.
On Android (Google Photos)
- Open Google Photos, pick your image.
- Tap Edit (or the sliders icon).
- Tap Filters.
- Choose a filter and adjust strength.
- Save a copy.
If the image filters look soft or washed out, add a bit of contrast and clarity after you apply the default filter.
How to put filters on pictures for Instagram
If you want instagram filters online style effects inside the app:
- Open Instagram → + → choose your photo.
- On the preview, tap Next.
- You’ll see Filters at the bottom.
- Tap a filter, tap again to dial the strength.
- Tap Edit for extra tweaking if you want.
- Post.
Tip
If your filters “disappear” or don’t load, log out and back in, then clear app cache or update the app. This fixes a huge part of “Instagram filters not working” complaints.
How to add filter to photo online (no app, just browser)
Sometimes you just want free online filters in a browser. No install. No account mess.
A simple workflow:
- Go to a pic filter online tool like Pixelfox (in your browser).
- Drop your photo into the upload area.
- Pick your action:
- Use the AI Photo Retoucher for subtle beauty edits.
- Use the AI Image Colorizer if it’s black & white.
- Use the AI Image Recolor tool to change product or clothing colors.
- Let AI process.
- Download in full resolution.
That covers “add filter to image” or “add filter to photo” without touching your phone’s storage.
Pixelfox runs fully on the web. According to its own policy, it processes photos and then deletes them. It does not store images or share them with third parties. That matters a lot if you work with client photos or sensitive shots.
Common problems with photo filters (and how to fix them)
You’ve probably seen these:
- Filters not loading
- App crashing
- Fine on one device, ugly on another
- Skin looks like wax
- Colors look great on phone, awful on laptop
Let’s fix both tech and mental stuff.
Tech issues
1. Filters not showing or broken
- Update the app.
- Clear cache/data for Instagram, Snapchat, or your editor.
- Log out, log back in.
- Reinstall if nothing works.
A lot of “free filters” inside random apps are tied to ad SDKs and sketchy networks. If an app feels slow or spammy, drop it.
2. Blurry or over‑soft images after filters
Some apps over-smooth to hide noise. That makes everything look soft.
- Use lower intensity.
- Add a bit of sharpening or clarity after the filter.
- Try a better tool like Pixelfox AI Photo Retoucher, which keeps skin texture while fixing blemishes.
3. Colors look wrong on different screens
Your “perfect” orange on your phone turns neon on your friend’s device.
- Don’t push saturation to 100.
- Avoid super heavy photo effects plus extra filters stacked.
- Keep skin tones natural. If skin looks like a traffic cone, dial it back.
Mental health issues (yes, they belong here)
Research the last few years from health groups and universities points to “filter dysmorphia”: people only see themselves through heavy filters, then hate their real face.
Some simple guardrails:
- Use photo filters to fix light and color, not your entire identity.
- Keep at least some unedited or lightly edited selfies in your camera roll.
- If you edit for others (clients, friends), keep them looking like themselves.
- Stop editing when you think “if I move my nose a bit more…” That’s the line.
Tip
If you catch yourself taking 50 selfies and filtering all of them hard, set a rule: 3 photos, one gentle edit, post it, leave it. Your brain will thank you later.
Groups like the Dove Self-Esteem Project and many psychologists say small changes + honest images help more than “perfect” faces. Your social feed doesn’t need to look like a Marvel CGI test.
Advanced tricks: pro photo filters, photoshoot filters & FX
Now for the fun part: how to go past “this looks okay” and into “oh wow, that looks pro”.
1. Build a consistent Instagram grid or brand feed
You want best filters for pictures that match each other, so your feed looks like one story.
Try this:
- Pick 3–5 reference photos you love.
- Use AI Style Transfer to match new shots to that look.
- Save those results as your new “base style”.
- Light edit from there, but stay close.
This gives you your own pro photo filters made from real images, not random defaults.
2. Photoshoot filters for e‑commerce and products
Say you shoot a white sneaker on a gray background. You want the same shot in red, blue, and green without doing five photoshoots.
You can:
- Shoot one clean, well-lit product photo.
- Use the AI Image Recolor tool to change color of the sneaker or t‑shirt.
- Keep shadows and details intact.
Now you have smart photoshoot filters for product colors. You basically used AI as an effect for image without complex masking in Photoshop.
3. Add effects to a pic without making it a mess
You want to add effects to a pic for a poster, flyer, or story, but you don’t want it to scream “2009 Instagram”.
Try this approach:
- Start with a clean color filter.
- Add one extra picture fx only: maybe grain, maybe vignette, maybe light leak.
- Stop there. Resist stacking 6 pic effects.
If you need heavier style for a campaign, use AI style transfer or a well built preset instead of random stacking.
4. Turn old photos into hero content
You can turn grandma’s wedding picture into a campaign visual or a warm brand image.
- Run the photo through AI Image Colorizer.
- Fix dust or scratches in another tool if needed.
- Lightly sharpen, not too much.
Now a historical photo becomes a modern asset, and it looks real, not like someone just slapped a filter on it.
Real‑world case studies
Let’s make this less abstract.
Case 1: Small shop owner fixing product photos with AI
Mia runs a small online jewelry brand. She shoots products on her phone. Her problem: every batch of photos looks different. Some are warm, some are cool, some are yellow from her living room lamp.
What she did:
- She picked one photo that looked “right” in her mind.
- She ran that through AI Style Transfer and then applied that style to other product shots.
- She used the AI Image Recolor tool to test ring colors (silver, rose gold, gold).
Result:
- Her product grid looked unified.
- She got her own “brand photo filters” without touching advanced software.
- Customers stopped asking “is this gold more yellow or more rose?”
Case 2: Content creator upgrading vlogs without makeup
Jay does educational videos on TikTok and YouTube. Lighting in his room sucks. He did not want to buy a full studio just to look awake.
What he did:
- He recorded as usual, but a bit closer to the window.
- He ran his videos through the AI Video Portrait Enhancer.
- The tool smoothed skin slightly, fixed contrast, and improved face lighting.
Result:
- Comments switched from “bro you look tired” to “love your vibe”.
- He didn’t look fake or heavily filtered.
- He saved time vs doing manual grading in Premiere or DaVinci.
Common mistakes with photo filters (and how to avoid them)
You’ve probably done at least one of these. Everyone has.
Mistake 1: Over-smoothing skin into plastic
People load face filters online free, crank smoothing to max, and boom: alien.
How to avoid:
- Keep skin texture. A little acne or pores are normal.
- Use tools like Pixelfox AI Photo Retoucher with low to medium intensity.
- Zoom in before and after. If you can’t see pores at all, you went too far.
Mistake 2: Using one filter for every scenario
That moody dark filter that looks great for night shots? It kills your sunny beach photo.
How to avoid:
- Use different photo filters for different light:
- Soft warm filters for indoor tungsten light
- Cleaner, neutral ones for daylight
- Don’t force heavy teal‑orange on everything.
Tip
Save 2–3 “go to” filters: one for day, one for indoor, one for low light. Rotate these instead of blindly using the same preset everywhere.
Mistake 3: Ignoring context (LinkedIn ≠ TikTok)
Some people use the same heavy glam filter for LinkedIn headshots that they use for party stories.
How to avoid:
- For LinkedIn and CV photos: gentle color corrections, light skin retouch, clean background.
- For TikTok, Reels, stories: your filter pics can be more playful, but keep them still “you”.
Mistake 4: Crushing resolution with bad tools
Some free image filters apps destroy image quality, add watermarks, or reduce resolution.
How to avoid:
- Check export size in the app.
- Avoid tools that slap big logos over your work.
- Use web tools like Pixelfox that keep original resolution and don’t watermark your images.
Pixelfox AI vs Photoshop and other online tools
You might ask: why not just use Photoshop and be done?
Compared to Photoshop and other heavy software
Photoshop and Lightroom are amazing.
They are also:
- Expensive (unless you get student deals)
- Complex if you only want to add filter to photo
- Slow for batch tasks if you don’t know actions or scripts
Pixelfox AI:
- Runs in your browser, no download.
- Focuses on real tasks: skin retouch, colorization, recolor, style matching.
- Uses AI to do the boring parts, so you don’t have to mask and brush for hours.
For full retouch campaigns, Photoshop still rules.
For “I need this done in 30 seconds and looking professional”, AI tools are hard to beat.
Compared to random free online filters tools
There are a ton of sites that promise free image filters, free photo filters, and filter photo free. Many:
- Compress the image badly
- Add watermarks
- Sell your data
- Have sketchy ads or pop‑ups
Pixelfox AI:
- Keeps your uploaded shots private and deletes them after processing, per its policy.
- Focuses on quality: high-res output, realistic color, skin texture.
- Has targeted tools instead of a messy all‑in‑one screen that confuses beginners.
That’s why I keep pointing back to it. It’s not just “one more pic filter online”.
It’s a focused AI toolbox that solves real pain points from creators, influencers, and small brands.
FAQ about photo filters and AI editing
Q1. How to filter a picture without losing quality?
Use tools that keep original resolution. Avoid saving screenshots of screenshots. Start with good light, then apply gentle photo filters. If you use Pixelfox, upload the original file and download the full-size result.
Q2. Why do my filters look different on other phones?
Screens have different color and brightness. Some phones boost saturation. Use moderate filters, not maxed-out photo effects. If possible, check your edits on another device before using them for important work.
Q3. Can I use AI filters for commercial work?
Yes, you can use tools like Pixelfox AI Photo Retoucher, AI Image Colorizer, and recolor tools for ads, product pages, and client projects. Just make sure you own the original photos and your edits are honest (no lying about product color or results).
Q4. How is an AI filter different from normal app filters?
A normal filter is just a fixed preset: it applies the same adjustment to every pixel. An AI filter “looks” at the content. It treats skin differently from background, and finds faces and objects. That makes pro photo filters results more natural and targeted.
Q5. Can face filters online free hurt my self-esteem?
They can, if you use them hard and often. When you only see your face with big changes, your real face might start to look “wrong” to you. Use filters to enhance, not to erase who you are. Keep some unedited photos and remember that social media is not real life.
Where to go next if you want better photo filters
You don’t need 20 apps. You need a simple system:
- Use your phone’s editor or VSCO/Snapseed for base color image filters
- Use Pixelfox tools when you need:
- Smart skin retouch that still looks real
- Old photo colorization
- Consistent style across a shoot
- Product or clothing color changes
- Video portrait enhancement
Start small. Pick one or two tools. Keep your edits light. Test what works for you and your audience.
In the end, photo filters should support your story, not hide it.
If you want to see how AI can do the heavy lifting while you stay in control, open Pixelfox in your browser and upload one image. Play with it for ten minutes. You’ll get more done in those ten minutes than in an hour of random app hopping.